Testing your motorhome’s battery systems increases overall performance and longevity
A motorhome is a complicated set of mechanical and electronic systems, and the heart of most of those systems is power. When plugged in at a resort, power comes from the electrical connection and all is well. However, as you start your coach, or operate various devices while unplugged, the battery bank does the work. Without these batteries you could not start your motorhome’s chassis engine, run the exhaust fan or power the TV. Since dead batteries are one of the most common problems with motorhomes, we are going to discuss how to properly test and maintain the batteries in order to reduce the chances for problems while on the road.
A typical motorhome has independent chassis and house (or coach) batteries. The chassis batteries (also called starting batteries) are usually one or two 12-volt batteries (wired in parallel) that deliver the power to start the chassis engine. These batteries are designed to deliver a large amount of current over a short period of time to start the engine, and are recharged with the alternator as you drive. Depending on the particular motorhome, the batteries can be wet cell (flooded lead acid), gel or absorbed glass mat (AGM) varieties. The most common are flooded lead acid, and these are the type with removable caps that allow the user to maintain the electrolyte level inside. Gel and AGM are considered Valve Regulated Lead Acid (VRLA) and are maintenance-free.
The other batteries in a typical motorhome are the house, or coach, batteries. These deep-cycle batteries can range in number from as few as two to up to as many as your coach can carry. Often (but not always), coach batteries are 6-volt batteries wired in series that produce 12-volt power to the coach. Some new motorhomes, notably those with powerful inverters and significant 120-volt AC-powered accessories, have larger house battery banks consisting of up to 16 6-volt batteries, but most normal-size motorhomes have between two and four. These batteries are most commonly flooded lead-acid batteries or AGM due to the amp-hour capacity they offer, in addition to their deep discharge/recharge abilities. Lithium batteries are also becoming more popular as the prices continue to drop. These batteries are super efficient and can be discharged to a deeper point without damaging the cells.
[satellite gallery=11 thumbs=on]
Wet-cell batteries demand the most maintenance and require the most steps for testing. Maintenance procedures for these batteries are watering, specific gravity testing of the electrolyte and voltage (state of charge) testing. These wet-cell batteries can also be more prone to corrosion, so it’s important to keep the terminals clean. Though they do require more maintenance, wet-cell batteries are also long-lasting and economical, and they offer high amp-hour/reserve capacity, all of which make them a common choice for house batteries in a motorhome.
Some manufacturers include sophisticated multistage or so-called “smart” chargers, so in many cases you already have the necessary equipment to charge the coach batteries. Highline coaches may have a charger for the chassis batteries, either a separate charger or a charging circuit that diverts power from the coach batteries as needed. Of course, you must have the motorhome plugged in to shorepower or have the generator running for these chargers to function.
Maintaining your motorhome’s batteries is pretty simple, and is something you can perform yourself if you are even remotely familiar with a voltmeter. Testing wet-cell batteries can be done in one of three ways, but if you want the whole picture of your battery’s health you need to perform all three. If you are maintaining a gel or AGM battery, then you can skip the electrolyte testing and electrolyte-level monitoring, as gel and AGM batteries are sealed and do not require watering or specific gravity testing.
Before you dive into the battery bay, make sure you have the proper protective gear for yourself. Batteries contain sulfuric acid, which is quite dangerous to your skin and eyes. Always use protective gloves and goggles when working with batteries. If you are exposed to battery acid on your skin or eyes, immediately flush the affected area with water and/or seek medical attention.
When batteries are being charged, especially during the equalization phase (if so equipped), they produce hydrogen gas, which is explosive, so make sure the area is properly vented and you should definitely refrain from smoking. Following the procedures outlined in your owner’s manual is critical with regard to the proper procedure for venting.
Methods of Testing
The first and most common test is the open-circuit voltage of the battery. Voltage testing can be done on all battery types. Since these batteries are usually part of a battery bank, you will have to disconnect them from each other and unplug the motorhome from shorepower or turn off the generator to ensure there is no charging being performed at the time of testing. If you just finished charging the batteries you will need to allow them to “rest” 12 hours before testing, or else the results will be incorrect. You can also take the surface charge down by running a couple of incandescent lights for a few minutes. This is not exact, but is close enough for practical purposes.
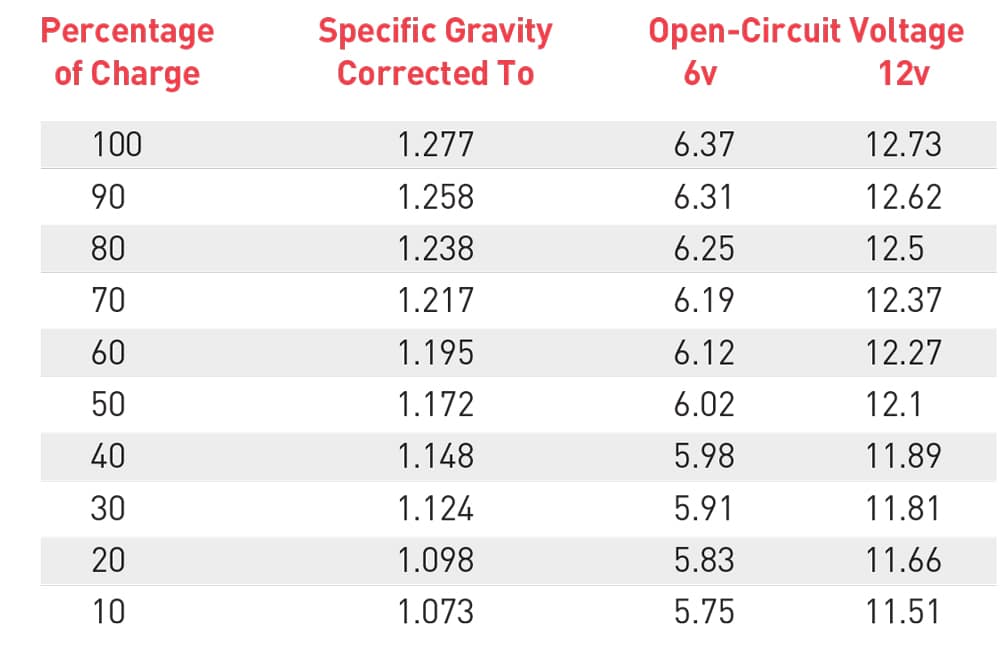
Before disconnecting the batteries, it is always a good idea to either draw a chart of the battery wiring or to take a photo so you can rewire them properly after you finish. Checking the voltage of a 6-volt or a 12-volt battery will require a voltmeter. On the left is a chart of the battery condition based on the voltage and specific gravity.
The second way to evaluate a battery’s condition (wet cell only) is to measure the specific gravity of the battery acid inside each cell. Since wet-cell batteries are the most common type used for house batteries, it is likely that your motorhome came with this type of battery from the factory. Recently, however, some manufacturers have begun offering low-maintenance AGM batteries as an option or even standard equipment. This test can only be done on wet-cell batteries that have removable caps; be sure to use caution when removing the caps in case there is some splash from the electrolyte. This test involves using a hydrometer, which is widely available at most auto parts stores for about $10. To ensure better accuracy, use a slightly more expensive temperature-correcting hydrometer.
The final evaluation method – and perhaps one of the most important for starting batteries – is a load test. This type of test measures the voltage of the battery while delivering a large current into the battery test device. Not everyone has a load tester (sometimes called a toaster tester), so if you don’t have one, you can purchase it for less than $50 at most auto-parts stores. If you prefer, you can remove the battery(ies) from the coach and take it/them to an auto-parts store or battery dealer for testing. These locations generally use a much more sophisticated computerized load tester that will give a complete test of each battery.
After conducting these tests, you should have a very good idea of the condition of your batteries and will be able to determine if they need additional charging or replacement. If the batteries do need charging, follow the instructions for the charger and then retest the batteries again after the charging is complete.
The batteries we used for this article are the same ones we installed in December 2011 and that were featured in the July 2012 MotorHome article “Put Power in Its Place.” This makes the batteries just over 4 years old. When not in use, they have always been connected to a multistage charging system and the four coach batteries have been refilled with distilled water as needed.