Understanding RV Water Systems
Image Caption:
Nothing portrays affection more than being the person responsible for dumping and maintaining the RV holding tanks. And yet, how many owners truly understand what makes the system tick and how to keep it performing at its best?
First of all, it really isn’t rocket science. It’s just science. We use water throughout our day to hydrate, to wash and to eliminate. In fixed structures, many people forget about the process after the contents are flushed away, but with an RV, this is only the first stage of the sewage-treatment process. We store the waste, treat it and systematically send it into an appropriate receiving system, commonly known as a dump station. Done correctly, the system remains relatively clean and operational with little fuss. Done wrong, solids can build up in the tanks, which can lead to trouble.
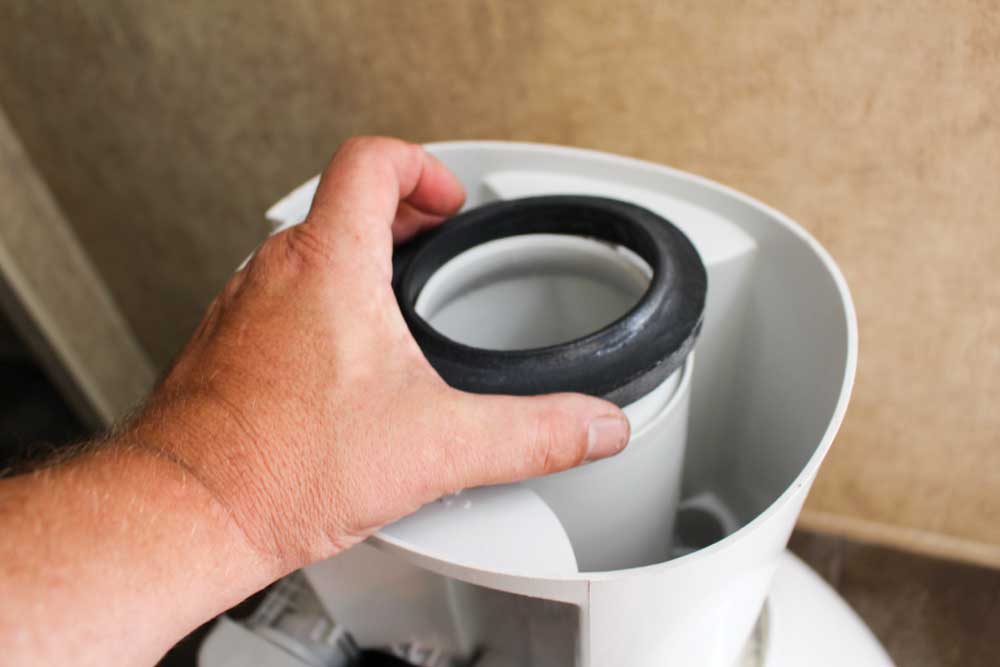
Unlike residential toilets, RV counterparts use a foam gasket instead of a wax seal. It is recommended to replace the gasket each time the toilet is removed.
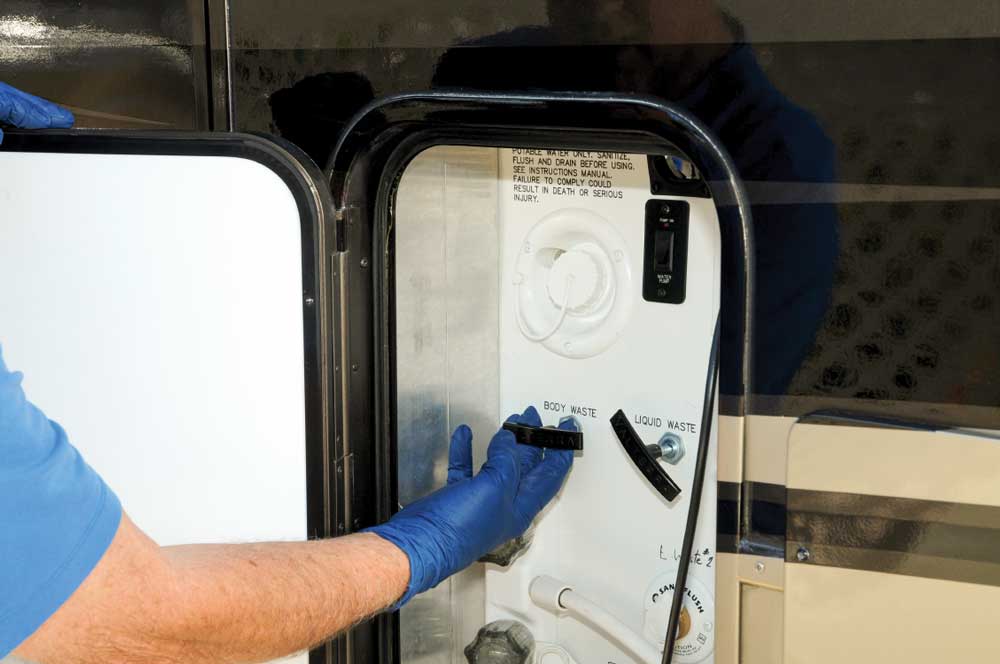
RVs with hidden tank valves will operate using remote, cable-controlled handles. The handle attaches to a frame that connects to a shielded bicycle-brake-type cable.
Some RV builders will mount the tanks in a heated area, and the discharge comes directly off the tanks. The compartment hatch has to be opened to connect the sewer hose to an articulating hose connection.
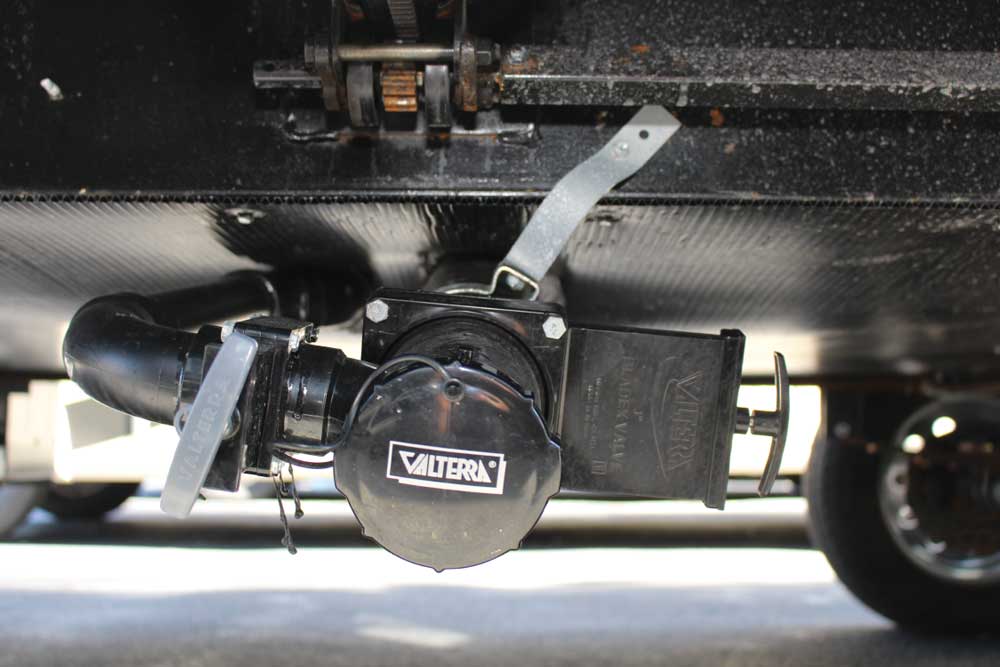
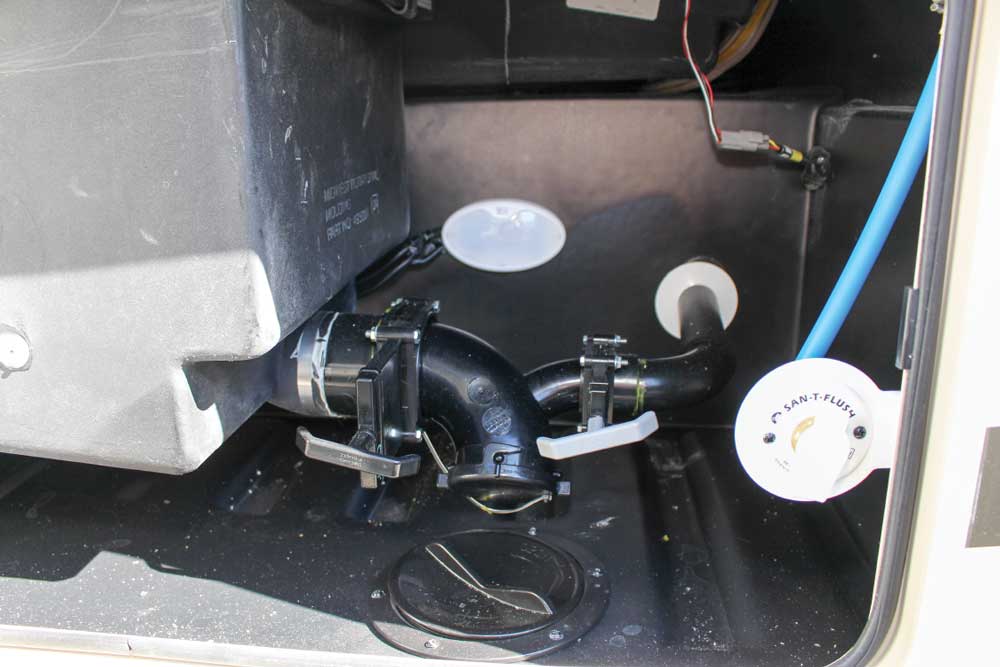
Most trailers will have a 3-inch pipe that comes straight out of the black tank, which makes attaching a clear external flush fitting (not shown) a practical option. The gray 1½-inch pipe goes into the valve at a right angle. For ease of identification, handles on this RV are color-coordinated (black for waste and gray for wastewater). Another variation has the gray line coming in at a 45-degree angle.
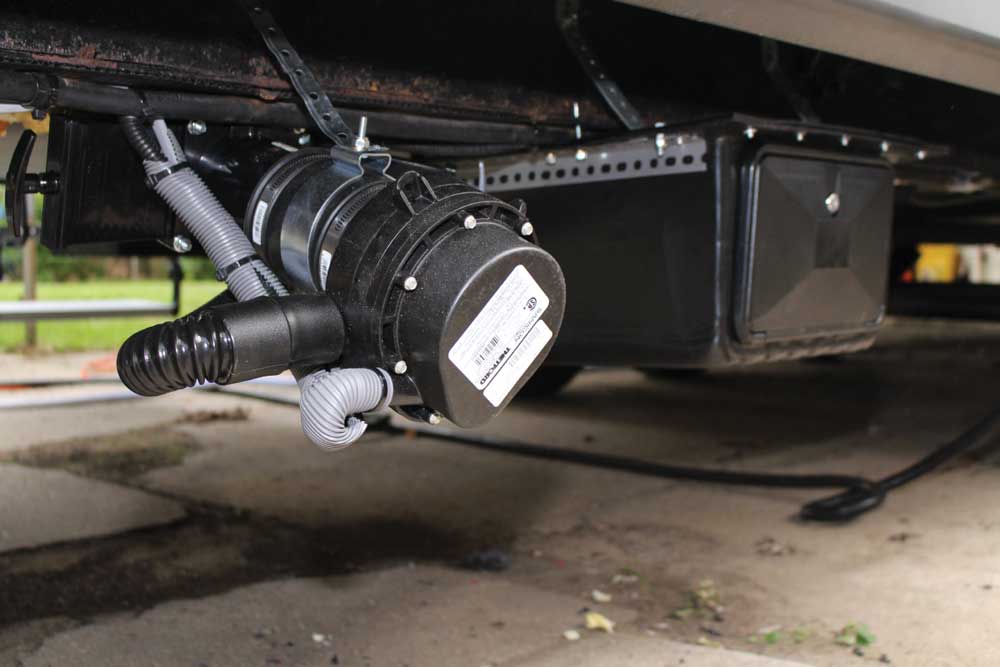
Macerators can be installed or twisted on to the sewer outlet and allow waste to be ground up and pumped to a disposal site.
Above the Floor
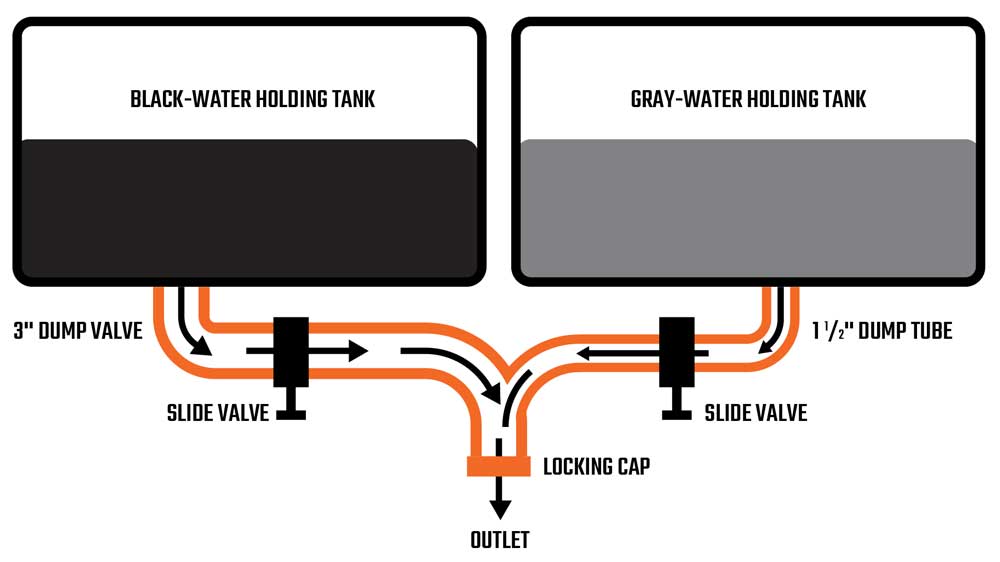
When looking at a diagram of a waste plumbing system in the average trailer, it’s pretty simple. The system is usually divided into two waste systems: the black system, which is solid waste, and the gray system, which is liquid waste from sinks and the shower.
The black waste system is usually made up of 3-inch black PVC pipe that runs from the toilet down to the holding tank. In most travel trailers, there’s almost no pipe; the toilet flange is glued to a threaded fitting that attaches directly to the tank. Fifth-wheels will have a pipe from an upper bathroom routed down to the tank. In all cases, the tank is vented through the roof.
The gray waste system has 1½-inch black PVC pipe that is routed from each water fixture, sink, shower and clothes washer to one or more gray holding tanks. Each will have a P-trap or a HepVo device to prevent gas flowback. A HepVo is a waterless valve that will prevent gas and tank overflow liquid from backing up into the shower or sink. The most obvious benefit is that, unlike a P-trap, water is not required to maintain the seal, which means the chance of odor coming back up into the RV when water splashes out of the P-trap is reduced to zero. The HepVo also requires much less physical space to install, and winterizing is not needed.
The gray waste system also needs ventilation to work correctly, to vent the tank and allow water to properly drain. Modern RVs reduce the number of roof fixtures by using small vents that are usually hidden in walls or cabinetry. Anti-siphon trap vent devices (ASTVD) are attached to a vertical pipe near the appliance and have a neoprene or rubber flap inside that opens when there is a vacuum. Higher-end models are spring-loaded. ASTVDs are maintenance-free; however, if there is an odor problem in the RV, especially from gray water, maintenance or replacement may be required. The ASTVD can be twisted off, via threads, for replacement. If the rubber has become misformed, the unit should be replaced.
To save weight, most plumbing components in an RV are plastic, but they rarely fail.
There are many models and styles of freshwater toilets on the market for RVs. They range from plastic economy models to full china-bowl electric-macerator flush models. While the latter usually depends on 1-inch rubber hose that’s routed to the black-water tank, the others connect to the aforementioned toilet flange on the floor. The toilets will have a two-position flush valve; the first fills the bowl with water, and the second flushes the bowl, which is done either with a hand lever or a foot pedal. When flushing, a sliding blade or ball valve opens to empty the contents straight down the pipe.
The toilet flange is similar to the one in a stationary home, but the seal is made of foam rubber rather than wax. If the toilet is removed for any reason, the best practice is to replace the foam-rubber seal. However, if it passes a careful inspection and is reinstalled just as it came out, it should be OK.
Below the FLoor
In a house, the soil stacks run into the cellar or below the foundation and then out to the sewer or septic system. Once you open a drain or flush the toilet, there’s nothing more to think about. In an RV, wastewater is collected in holding tanks by type: “gray” for the sink and shower water and “black” for sewage. The tanks are piped to termination valves and a fitting to which the sewer hose is connected.
Tanks are usually made of polyethylene or ABS plastic, and pipe fittings are either glued or spin welded in place, depending on the type of tank. The tanks are vented through the roof via a 1½-in pipe.
Some RVs have more than two holding tanks. This is not just for added holding capacity but to accommodate certain floorplans and for plumbing slope. For a waste pipe to drain correctly, it has to maintain a slope of at least 1⁄8-inch per foot, as required by the NFPA 1192 building code. Depending on the length and style of the RV, there may not be enough vertical drop to maintain that slope.
For example, a travel trailer might have only 3 to 4 inches from the top of the floor to the top of the tanks. Since the tanks sit right up against the bottom of the floor, the drain plumbing must be run above the floor, or, in the case of the toilet, drain directly into the tank. If the waste facilities in the RV are far apart, the solution is often to install multiple tanks. When configured in this manner, the waste systems are entirely separate from each other. Some motorhome manufacturers use macerator pumps to move waste from a passenger’s-side discharge tank to a driver’s-side sewage-dump connection, again, because of slope, and often a motorhome chassis is in the way of running directly to the discharge.
Black Tank Flush
Some RVs are equipped with a black-tank flush; aftermarket systems can also be retrofitted, which is a great option, since it helps rinse solids from the inside of the tank. The flushing system usually runs from a garden-hose connection on the side of the RV directly to the flush nozzle via hose/tubing and an inline vacuum breaker to prevent any chance of backflow. Line pressure works fine for a flushing system, and best practice is to use a hose for rinsing duties that will not be used for potable water. Varying lengths of gray hose are available from RV-supply stores, or you can make one from an old hose — making sure to mark it clearly for this purpose.
The diameter of the black-tank discharge pipe is 3 inches; the gray tank is 1½ inches in most cases. If a gray tank has its own sewer connection, it may have a 3-inch discharge pipe. The sewer-hose connection, however, remains the same. For those using a “gray-water pit” (where it is allowed), a replacement sewer cap with a garden-hose fitting is available. It is recommended to make a ¾- or 1-inch hose for this purpose using parts that can be found at a home-improvement center.
Waste Systems in Every Season
Many RVs are designed and built for “all-season” use. This can be a bit misleading because, although some RVs can usually do well in mild winter and snow conditions, most cannot handle severe weather. One of the ways manufacturers help to accomplish this is to enclose the dump valves and piping in a heated and enclosed underbelly, and add electric heating pads to tanks and plumbing. Often the dump valves will be remotely controlled, and some will be electric. The basic design and operation of the valves remain the same.
Dump valves in RVs use a sliding blade that minimizes the opportunity for clogging while being easy to disassemble and service. When the system is built, a flange is glued to the waste pipe on each side of the valve. Gaskets sit in a groove in these flanges, and the valve is inserted between the flanges and secured with four bolts. Should the valve fail to close, or if it leaks, the fix is pretty straightforward. Dropping the underbelly may be required.
Termination valve sets, where both valves are attached to a common, sometimes articulating sewer-hose connection, are relatively common. In trailers with this type of connection, the valves are usually exposed to the outside air, and thus can freeze, while some larger motorhomes will have this type of connection in a heated compartment.
Making the RV Water System Work Better
The black tank can be the most problematic. These tanks can collect solids and become a source of odor. Water is your friend here. It, along with an effective toilet treatment, is what allows the tank, and nature, to do their work. Too little water, and solids pile up on the bottom of the tank and can accumulate to the point where they prevent complete tank flushing, which is nasty and will produce an equally nasty repair bill.
Always start with a flushed tank and add a few gallons of water along with a preferred toilet treatment. Do not be tempted to use homemade concoctions in the tank. There’s plenty of bad advice on the internet, and mixing the wrong chemicals can be damaging to some components in the waste system, such as valve seals. Using anything but chemicals designed for RV holding tanks can create hazardous and even deadly gases, which can lead to system damage — and affect septic systems tied to dump stations. Again, add plenty of water to the toilet each time solids are introduced, and make sure there is plenty of water in the black tank before dumping.
Macerators, like those from Thetford, are becoming more popular in RVs. Portable models can be attached directly to the sewer-hose connection and are designed to pump the effluent through a 1-inch hose routed to the dump station. It will pump uphill to a certain degree and can offer the flexibility of dumping tanks into a residential cleanout. Whichever hose system you use, always drain and flush the black tank first, then the gray. Do not open both valves at the same time.