Everything You Need to Know About Operating Your RV Waste Tanks
Image Caption:
Traveling in a motorhome gives us the freedom to see the world from the comfort of our living rooms. We enjoy a fully self-contained environment wherever we happen to be, but as anyone who has been an RVer for a while will tell you, probably the most unpleasant part of the experience (yet arguably one of the most important) is dealing with the sanitation system. Proper use and care will help ensure that your travels will be footloose and fancy-free. On the flip side, without the right equipment and proper knowledge of how to use the system, you can be in for very unpleasant surprises.
For the most part, motorhome sanitation systems are gravity-powered. They usually consist of two separate arrangements: the gray-water system, which collects wastewater from sinks, showers and clothes washers; and the black-water system, which handles body waste from the toilet(s). It’s also possible that in some RVs, parts of these systems can be combined, like the sink and toilet in a second bathroom. Also in some cases, macerators, rather than gravity, can be used for toilets and dumping the holding tanks.
Motorhome sanitation systems share a few similarities with the systems in stationary homes. These include the piping, and the requirement for the pipes to have a slope for drainage, ventilation and certain fixtures. Otherwise, they’re quite different. The biggest difference is that the gray and black water in an RV are held in separate tanks, instead of being discharged into a sewer system via a common pipe.
Gray Water Tank
The gray-water system consists of sinks and showers, a 1½-inch pipe, ventilation, a dedicated holding tank and a termination valve for dumping. Ventilation is the most complex part, and is rather important to understand. For the water to drain from a fixture or the holding tank, ventilation (usually through the roof) is needed to prevent a vacuum.
In some RVs, the vent stack is too far away to reach. Instead of running an additional pipe through the roof, a vent check is installed, usually right under the fixture. A vent check, called an anti-siphon trap vent device (ASTVD), is a combination of a vent and a check valve. It is installed on the 1½-inch pipe under the fixture and has a small rubber flapper inside that opens to draw air into the drain system to prevent a vacuum, or chugging, at the sink or drain. This flapper reseals itself when no vacuum is present to prevent odor or gray-water overflow from entering the motorhome.
The drain piping has a P-trap, just like at home, or a new waterless, self-sealing type of P-trap called a HepvO. By code, the drain plumbing must maintain a minimum slope to the tank or main drain of 1â„8 inch per foot for proper drainage.
Black Water Tank
The black-water system consists of the toilet(s), 3-inch piping to a holding tank and a termination valve for dumping. Often, there will be a built-in black-water flushing system with a separate hose connection to assist with cleaning solids from the tank. Care must be taken when using the black flush to prevent overfilling the black tank with too much water by accident, causing the RV to fill with effluent, which often results in serious damage or a total loss.
RV Termination Valves
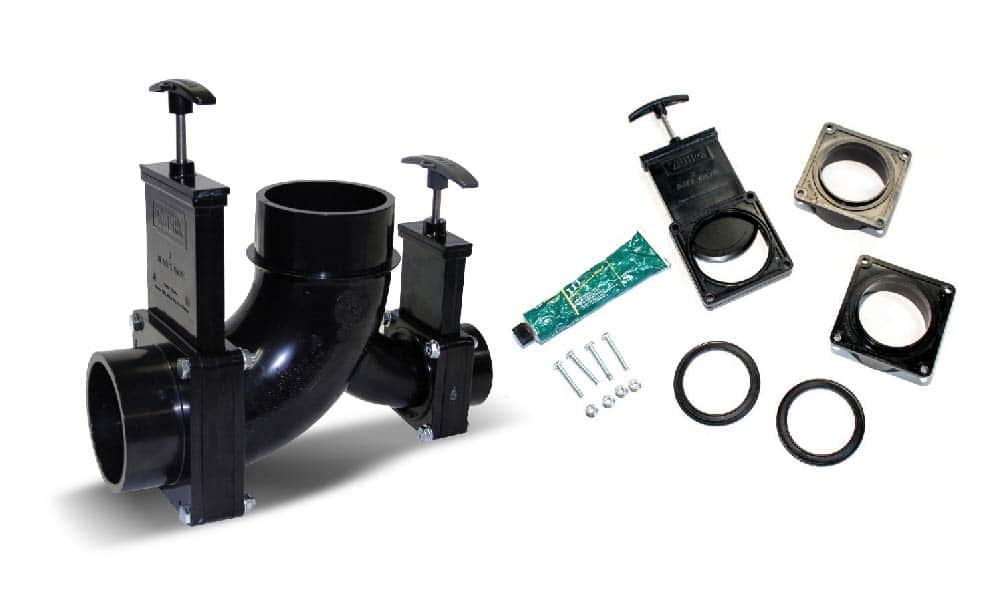
A typical termination-valve assembly (left) has a 3-inch-diameter black-water hub with a black handle and a 1½-inch-diameter gray-water hub with a gray handle. If the termination valve sticks or leaks, it may need to be serviced. Here, a valve is disassembled (right). The two flanges will be glued to the pipe on the RV, and the gaskets seated. The valve can be cleaned and then lubricated with valve grease, such as Dow Corning Molykote 111. Once the valve is working well, the new gaskets are installed on the flanges. The pipes are manually pried apart for the valve to slide in between (a helper makes this easier), and the four bolts are installed.
RV termination valves, historically known as full-way valves, use a knife gate that slides in a plastic housing with a rubber grommet or seal. These valves are typically 1½ inches or 3 inches in diameter, and there’s usually at least one of each.
Termination valves are fairly simple devices. Held in place by four stainless-steel bolts that compress the valve between two flanges, the valves are easy to remove and service in the event they become sticky or leak. Kits are available with replacement seals and bolts. Simply remove the valves after the tanks have been emptied and flushed, remove the seals and thoroughly clean the valve. If you prefer, you can replace the entire valve. Occasionally, the valves are buried under the motorhome and controlled by a remote cable, which requires removing basement panels for service.
Once clean, the valves can be treated with a waterproof valve lubricant such as Dow Corning Molykote 111, after which you should exercise the valve. Make sure the valve is in good shape and not deformed or missing any chunks. If it is defective, replace the valve. Make sure the new seals are installed correctly. A helper can make prying apart the pipe flanges and removing and reinserting the valve easier. Once the valve is seated, reinstall the bolts, test it, and you’re done. Don’t overtighten the bolts; snug plus a quarter turn is fine. Make sure the valve operates freely and smoothly.
Using the RV Waste Tank System
Keep valves closed except to dump. When dumping, open the black valve first and flush the tank, then close that valve and dump the gray tank, which flushes solids out of the sewer hose.
There are plenty of opinions on how to use your RV’s waste-water system and insufficient space here to debunk all the myths. Instead, here are the procedures specified by the professionals. The gray-water system is pretty simple and will seldom cause problems. You can occasionally use a gray-water deodorizer, if you feel the need. Enzymatic cleaners are available to help keep soap scum and grease from building up inside the tank with long-term extreme usage. The enzyme-based cleaners work best in new tanks or those that have been thoroughly cleaned and flushed. The enzyme ingredients are harmed or killed by residual formaldehyde left over from traditional holding-tank deodorants.
When it comes to the black-water system, many problems can be prevented by remembering this one phrase: Water is your friend. Take it from someone who has had to dig out and flush black-water holding tanks that were full of solids and no water. Leaving the black-tank termination valves open while at an RV park will allow the solids to collect in the bottom of the tank and eventually fill and block the flow of contents in the tank.
Keep the termination valves closed while in camp, monitor tank levels and dump as needed. This includes the gray water, unless you’re using a clothes washer, in which case it’s best to leave the gray valve open while using that appliance to ensure you don’t overflow the tank. If you keep the valve closed, the gray water in the tank will flush the sewer hose after emptying the black tank. Once the black tank is emptied and flushed, close its valve and open the gray-water valve to flush the sewer hose, washing out remaining solids.
Once the dumping cycle is complete, be sure to add water and the holding-tank treatment to the black tank. Many prefer non-formaldehyde versions, which are required in some states. Add at least 2 gallons of water, and instruct everyone to use plenty of water when using the toilet. The combination of the water and chemicals will aid in breaking down solids and deodorizing the effluent, and some will also help maintain the lubricity of the termination valve. Of course, make certain not to introduce any foreign objects into the toilet and holding tanks.
RV and marine paper is formulated to break down more easily than commercially available papers. Using the wrong paper, along with too little water, will plug the system, and that’s a bad thing, as plumber’s snakes don’t work in motorhomes. Tank cleaning has to be done by hand and is messy. Scott toilet tissue is an old standby for some RVers, but if you want to be safe use the stuff made for RV and marine use.
Holding-tank treatments come in a variety of formulations and forms, from small single-dose bottles to drop-in bags. Most work as directed. Ask fellow RVers for recommendations and try different ones to see which you like best. Contents left in the black tank for a long time in hot weather will put the chemicals to the test, and adding extra in those conditions is recommended.
Many folks are buying four-season motorhomes these days and venturing out into cold weather. If you’re braving freezing temperatures, tank heaters are a must, and a great investment. You can also use some potable antifreeze in the tanks to prevent freezing. Potable RV antifreeze is key; do not use automotive antifreeze, as it is poisonous and can sicken and kill pets and wildlife, and seep into the water table at parks with septic systems and leach fields.
Holding-Tank Sensors
For some RVers, holding-tank sensors are the bane of their existence. Tank monitors are notoriously inaccurate. Ordinary tank sensors in most RVs consist of metal buttons attached through the side of the holding tank. These buttons connect to a resistor-pack wiring harness that allows the monitor panel to show the resistance between the sensors and illuminate the corresponding LEDs. The problem lies in introducing water contaminated with sewage, soap and fat into the tanks, and these can accumulate on the sides of the tank. Depending on the placement of the ground wire in relation to the sensor wires, the panel can be fooled into thinking those sensors are under water, giving a false reading.
Cleaning the tanks is one way to correct this issue; holding-tank cleaners from companies like Thetford can aid in this task. Using an aforementioned black-tank flush system is a great way to clean the sides of the tank, especially if the sprayer is aimed at the side that has the sensors.
Another method for fixing a sensor problem is to upgrade the system with Horst Miracle Probes that replace the original button probes. The Horst probes use a pin that sticks out into the tank, rather than a button, so any growth inside the tank can’t create an electrical connection. The black-tank version has a shroud over the top of the pin to prevent paper or other material from hanging on and creating contact.
Alternatively, the entire system can be replaced with an electronic-sensor system like Garnet’s SeeLevel II monitoring system, or, for a more complete, hands-free sewage dumping experience, the SeeLevel III system. In these systems, electronic strips are adhered to the sides of the tank and detect the dielectric differences between liquid and air through the tank wall. This means accurate readings, despite growth inside the tank. An additional benefit is that the sensor strips read the entire level of the tank, unlike typical probe systems, which read the tank in thirds
RV Waste Tank Sewer Handling Gear
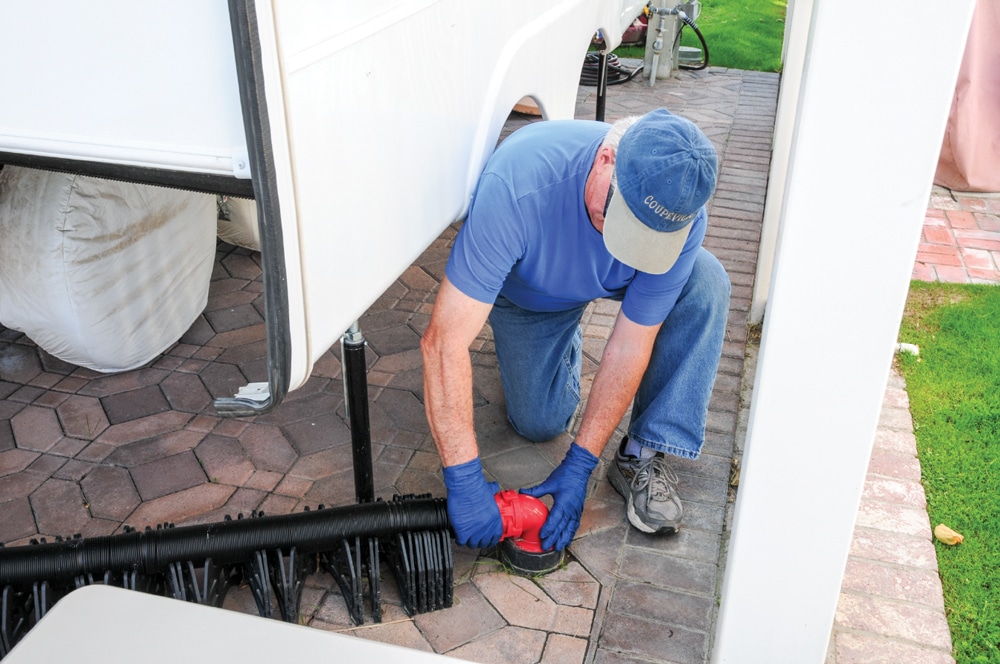
Don’t skimp on a sewer hose. Buy a good kit with a threaded elbow fitting. Not all campgrounds offer threaded fittings, but those that do will give extra security against spillage.
There are many choices when it comes to purchasing waste-disposal gear, from upgraded toilets to sewer-connection rings. Two pieces of advice: Do your homework and don’t go cheap.
Sewer hoses and kits come in many forms, and it is tempting, especially when on a budget, to make do with a $7 to $10 hose. Invest in a good-quality sewer-hose kit with solid connections. High-quality hoses that are freeze-, crack- and even crush-resistant are available. The technology has come a long way from the old metal-spring, vinyl-wrapped products of yesteryear.
Start with a clear connector, as it’s the only way to see what is draining out of the black tank and, while flushing the tank, to make sure that the water coming out is clean. Second, use a kit with an end that will screw into the sewer connection at the campground. Not all dump stations have threaded fittings, but those that do offer an extra bit of security against spillage. Third, have a matching extension hose with the proper connector, and if your motorhome has more than one termination connection, get the matching Y connector and lengths of hose. Now and then the sewer connection may be 25 feet or more away from the connection on your motorhome.
Some campgrounds, in some states or communities where it is legal, have gray-water pits instead of full sewer connections. This is where sewer caps with a garden-hose connection on them come into play. If a honey wagon comes around to pump your motorhome’s black tank and you dispose of the gray water into the pit, leaving the gray valve open into the pit is probably fine, as the honey wagon will effectively pump off the black tank. Once that’s done, follow the previously mentioned steps by adding water and chemicals back into the black tank.
Lastly, practice safe dumping. Always wear waterproof and preferably disposable gloves and some type of eye protection when handling sewage in the event of splashing. The heavyweight disposable gloves from Harbor Freight are inexpensive and work well. It should go without saying that if you happen to get splashed with waste material, clean the area right away, and isolate and wash any affected clothing with a healthy dollop of bleach if the type of clothing fabric won’t be ruined by the bleach.
By following a few simple rules, having good-quality equipment and remembering that water is your friend, you will have a more pleasant time dealing with the chore of dumping holding tanks and can get back to the real purpose of RVing – having fun and spending time with family and friends.
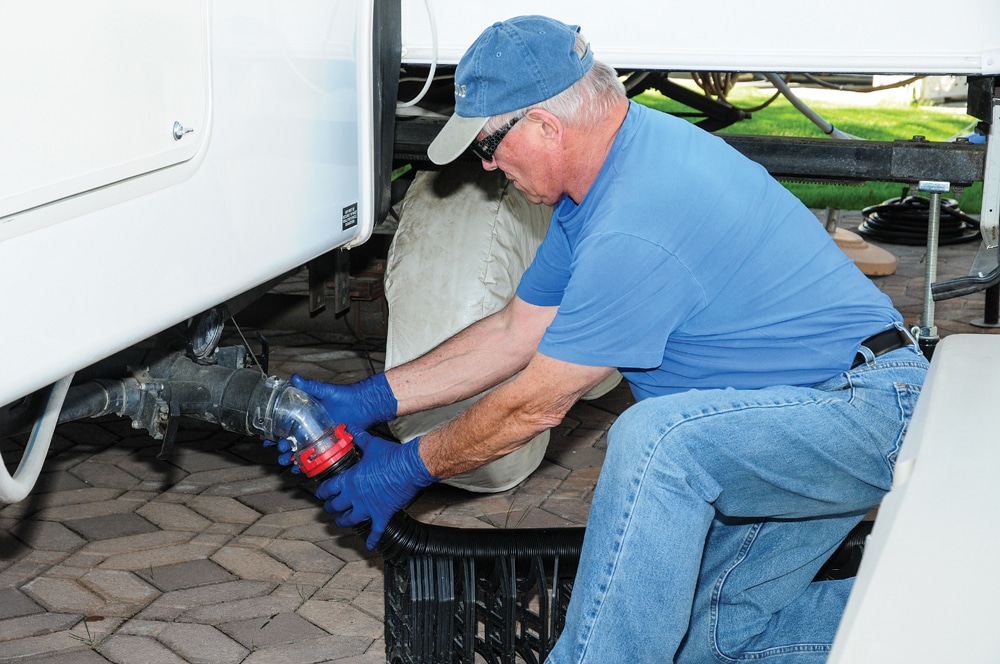
It’s best to have a clear 45-degree elbow connector at the termination valve to see what is coming out of the tank, and to ensure the tank is clean. Use gloves and eye protection when flushing tanks.
RV Toilets

Simple plastic toilets are an old-time standard in the RV world and are functional at best. In the last decade or two, a good selection of porcelain and porcelain-plastic hybrid thrones have come to market from Dometic and Thetford to make just about anyone’s derriere feel like royalty. Selections include short and long bowl, foot pedal or hand flush, rinse sprayer/bidet, and manual or electric flush with integrated maceration, which often requires installation of special plumbing.
Swapping out an ordinary RV toilet is usually a simple job. Freshwater plumbing extensions are sometimes required, and on rare occasions, the flange will need to be rotated. Always use a new foam flange seal (not wax) when installing or reinstalling an RV toilet. Also, inspect the new toilet carefully, making sure all the bolts that connect the bowl to the base are tight and that the flush mechanism moves freely.
Sanitation Resources
Holding-Tank Sensors
Garnet Technologies (SeeLevel) | www.garnetinstruments.com
Horst Miracle Probe | www.rvprobes.com
Holding-Tank Treatments
Camco (TST) | www.camco.net
Century Chemical (Travel Jon) | www.centurychemical.com
Dometic | www.dometic.com/usa
Eco-Save | www.eco-save.com
Star brite (Instant Fresh) | www.starbrite.com
Thetford (Aqua-Kem, Campa-Chem, Eco-Smart) | www.thetford.com
Valterra (Odorlos, Potty Toddy, Pure Power) | www.valterra.com
Walex (Bio-Active, Bio-Pak, Commando, Elemonate, Porta-Pak) | www.walex.com
Worldwide Monochem (Dyna-Bact, T-5) | www.monochem.net
Macerators
Clean Dump | www.cleandump.com
Thetford (Sani-Con Turbo) | www.thetford.com
Valterra (Sewer Solution) | www.valterra.com
Xylem (Flojet) | www.xylemflowcontrol.com
Sewer Hoses
Camco (RhinoFlex) | www.camco.net
Lippert (Waste Master) | www.lci1.com
Prest-o-Fit (Blueline, DuraForm) | www.prestofit.com
Thetford (Titan) | www.thetford.com
Valterra (Dominator, EZ Flush, Quick Drain, Viper) | www.valterra.com
Termination Valves and Parts
Barker Manufacturing | www.barkermfg.com
Camco | www.camco.net
Drain Master | www.drainmaster.com
LaSalle Bristol | www.lasallebristol.com
Valterra | www.valterra.com
Toilets
Dometic | www.dometic.com/usa
Thetford | www.thetford.com