Taking time at the end of the travel season to check all the components in an RV can make or break future trips
Planning a post-summer evaluation of your RV’s structure and systems is a critical step to ensure longevity — and that the RV will be ready to go when pulled out of storage. Upon close inspection, you are sure to find at least one area where maintenance is required, and prompt action to make things right will not only keep your RV looking like it’s road-ready but will ensure pride of ownership. The following steps and reminders are designed to help you get there, just like the pros would do it.
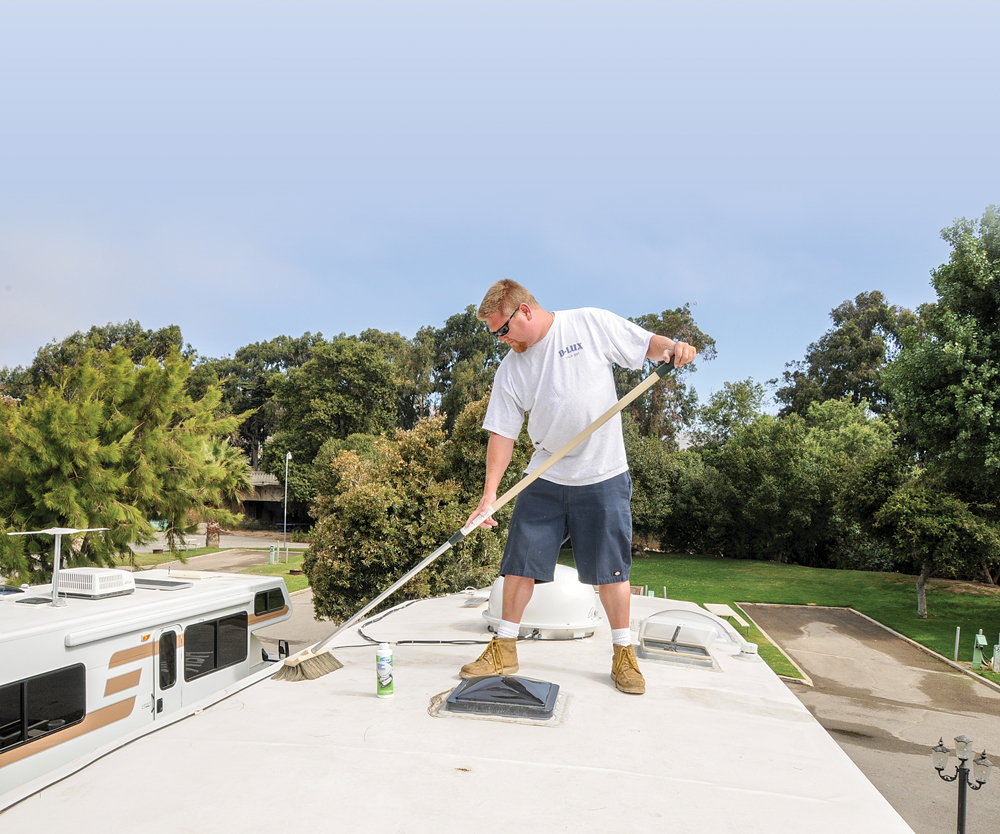
To uncover the little details, it’s best to begin with a thorough cleaning of your RV. Since a number of these steps require roof access, be sure to use extreme caution when climbing a ladder and wear nonslip, secure footwear. Start on the roof with a bucket of water and cleaning solution specific for the RV’s type of roof material.
|
|
||
|
|
||
| Washing a roof is essential to longevity and should be done two or three times a year, especially after the travel season and before storing the RV, even if it’s covered.
|
||
| Inspect the caulking around all vents and repair before a leak can damage the structure.
|
||
| A leak around the air-conditioner gasket can cause ceiling and frame damage. To replace, raise the air conditioner, remove the old gasket with a sharp putty knife and replace with a high-quality neoprene gasket.
|
||
| Check all clearance lights for function and caulking integrity.
|
||
| Wiper blades should be replaced annually.
|
||
| Leaking windows can be fixed only by removing and replacing the frame seal, not with silicone.
|
||
| Keep the slideout seals conditioned with a product like 303 Aerospace Protectant.
|
||
| Slide-topper fabric can deteriorate over time; check and replace, if necessary, before it’s too late.
|
||
| Maintaining a clean air-conditioner return air filter is essential for keeping the evaporator free of debris.
|
||
| If an inspection determines the need for slideout repair, the use of EternaBond tape will make the process clean and simple.
|
||
| Cracked tire sidewalls may warrant replacement, depending on the age and severity of the damage.
|
||
| Drain and flush the hot-water tank after a long travel season or at least once a year.
|
||
| Suburban hot-water tanks use an anode rod to prevent inner-tank damage. Replacing every six months is cheap insurance. | ||
| Lubricate the slideout mechanism only if called for by the manufacturer.
|
||
| A leaking ice-maker water valve in the back of the refrigerator can cause expensive collateral damage to surrounding structures and appliances.
|
||
| Inspection of the refrigerator burner assembly will prevent unexpected failures.
|
||
For rubber roofs, the most widely used and trusted cleaning solution is Spic and Span, but there are commercial products for this purpose on the market. When cleaning a metal or fiberglass roof, as well as for use on the sides of any RV, you can use a solution of water and Dawn dishwashing liquid or any RV cleaning product formulated for exterior surfaces. A medium-bristle brush will do a good job of gently removing even the heaviest environmental buildup.
After the roof is dry, carefully examine every inch of caulking around the vents, antenna and seams for integrity. If necessary, remove the old caulking and apply a high-quality sealant recommended for the type of roof material. Dicor self-leveling Lap Sealant (for specified purposes) works very well for recaulking roofing material.
Inspect all roof and plumbing vents for cracks or damage, and replace if necessary. Vent lids may look good, but they can deteriorate from the constant assault by the sun and are often fractured due to hail or tree branches. The vast majority of replacement vent lids can be purchased and installed far cheaper than replacing the entire unit. There are four or five different styles of 14- x 14-inch vent lids on the market; to be sure you’re buying the right one, take a picture of the lid hinge assembly and show it to the parts person.
Raise the TV antenna and inspect for any broken plastic pieces or loose pins. Lube the gears in the base assembly using white lithium grease; crank the antenna up and down two or three times to evenly distribute the grease.
Inspect the roof air-conditioner shrouds. The sun will make the plastic brittle to the point where they may even blow off during travel, thus exposing the compressor and blower motor to the elements — and possibly creating a traffic hazard. Once removed, check for a buildup of leaves, spiderwebs, mud dauber nests, etc. and clean all areas with compressed air. Carefully blow air through the rear condenser to clean out dust and debris.
The gasket between the air conditioner and roof should be checked annually. Once the interior grille is removed from the ceiling, the air conditioner can be unbolted so it can be lifted. At this point the gasket must be replaced. The gasket comes in two sizes in either black or white; generally, the black gaskets are higher quality and are recommended.
While you have the grille removed, check out the foam filter and clean with soap and water. If the filter is deteriorated, it’s time for replacement, which is inexpensive. Allow the filter to dry completely prior to reinstalling. Inspect the evaporator through the intake area while the filter is drying. Clean any debris from the evaporator using a soft brush. The model number will be inside the intake cavity, should you need replacement parts.
Before leaving the roof, service the roof material per the manufacturer’s recommendations. A properly maintained rubber roof should last 15 to 20 years. Metal or fiberglass roofs do not need a conditioner but should be kept clean. Any cuts or tears in rubber-roof material may be permanently patched with EternaBond tape. It’s a good idea to carry EternaBond tape with you at all times, as you never know when a tree might attack.
Satisfied with servicing the top portion of your RV, let’s head to the tow vehicle or the front of your motorhome, and check the wiper blades and wiper-fluid level. Wiper blades should be replaced annually, regardless of their condition. Open the hood of the tow vehicle or motorhome and check all fluid levels. Visually inspect the front of the engine compartment for anything out of place. Remove the air filter and carefully inspect for deterioration or excess debris and dust. Replace if necessary. For diesel motorhomes, move to the rear for a visual and fluid-level inspection.
Slowly walk around the exterior of the RV, carefully inspecting all windows and seals, refrigerator vents, compartment doors, clearance lights, exterior lights, taillights, backup lights and license-plate light, and don’t forget the headlights of the tow vehicle or motorhome. If the headlights are completely fogged over with age, there are kits that can be used to restore lens clarity (search for “headlight restoration kits” on Google to find examples). These kits are very easy to use and highly effective at making the lens look new again. Examine the weather stripping, moldings and caulking for cracking or peeling, and replace if necessary. Breaches in the seals on any of these items can allow water intrusion, which can seriously damage the structure and cause delamination.
Open and close all windows, baggage doors and hatches. Lubricate anything that may be sticking, such as the hinge assembly or a window mechanism. Check with the manufacturer for the correct type of lubricant. Lubricate all locks with a graphite lubricant specially designed for tumbler-type locks.
Open and close the awning while watching for binding. Be sure it folds up into the correct travel position; a simple adjustment may be necessary when the hardware will not nest properly. Carefully inspect the fabric; it’s amazing how fast the sun will deteriorate it. Powered awnings should be carefully inspected while extending and retracting. Listen intently for any type of grinding or metal-to-metal sounds. The wind sensor (if so equipped) can also be tested with a hair dryer. With the hair dryer on high speed in the cold setting, direct the flow of air 2 or 3 inches from the sensor to simulate a strong wind.
Inspect all of the slide toppers for proper tension, and check the fabric condition, especially where it is installed into the rail on the side wall. When slide-topper fabrics sag, it’s a good indication that the spring needs to be tightened.
Enlist the aid of helping hands and operate the slideout rooms while listening to and watching the movement. They should move freely and evenly, opening or closing. Inspect all slideout seals including the upper seal. Clean and apply a protectant to both the inner and outer seals, if applicable. Use protectant that is free of petroleum distillates. Don’t forget to inspect the bottom of the slideout room. Inspect all visible parts of the slide mechanism for loose bolts, excess rust or damaged parts. It’s amazing how fast damage can occur from a loose screw or debris buildup. Lubricate the slideout mechanism only if recommended by the manufacturer.
Carefully inspect and lubricate the entry step using the manufacturer’s recommended product. With a flashlight, lie underneath the step and check the mounting bolts and all wiring. Having a step fail in the extended position can quickly turn into a damaged step that is beyond repair (not to mention an injury). If your RV’s step is looking a bit rusty and is in need of some fresh paint, purchase a can of good quality black semigloss spray paint. Mask off the body of the RV around the step to prevent overspray. Apply as directed, using a facemask and protective eyewear.
Inspect each tire for abnormal wear or cracking on the sidewalls and between the tread. Also, inspect the inside of the tire for any type of bulge or major cracking in the sidewalls. Tires used for RV service normally time-out before they wear out. Seven years is the maximum life of most steel-belted radials; Michelin, for example, suggests that tires can last up to 10 years, if they are properly covered during storage or long-term visits at an RV park.
The DOT (Department of Transportation) code on the side of the tire will provide the date of manufacture. The code may be visible from inside or outside, depending on mounting. Inflate all tires to the recommended pressure before putting in storage, and don’t forget to inspect and check air pressure in the spare tire, if so equipped.
If the suspension is equipped with air bags, now would be the time to visually inspect for any type of wear, abnormal cracking and alignment of the mounting brackets on the frame. While you’re crawling around under the RV, it’s a good idea to visually inspect the hitch receiver. Inspect for broken welds or loose bolts. Repaint any rusting areas. Since you’re still under the RV and/or tow vehicle, look for any type of fluid leak, loose or missing bolts, burned wires and anything that may be excessively rusted or seem out of place. Check trailer suspensions for worn spring shackles. Take a look at the date of the last bearing/brake service and handle accordingly. Basically, you are on a mission to visually check the overall condition of the entire chassis.
Remove the water-heater access door and check for excess dirt, burned wires, spiderwebs in the gas-tube assembly or corrosion from a leaky pressure-relief valve. Sometimes the leaking from the pressure-relief valve will stop with repeated openings and closings; replace it if the leaking doesn’t stop. Drain and flush the inner tank. If the water heater is equipped with an anode rod, it should be replaced twice a year to protect the inner tank.
Open the access door to the rear in the refrigerator. Check for any type of a wasp nest, debris often caused by a bird’s nest, and any wires that may be out of place or loose. Turn the refrigerator on gas and listen to the burner; it should have an audible flame noise. When the flame is silent, the energy (Btu value) needed for proper cooling is diminished. A professional should service the refrigerator gas system annually.
It’s now time to move into the interior. Thoroughly test all appliances that have been dormant during the summer months. Inspect the refrigerator door gaskets and the interior plastic liner. Clean with the proper solution and put in two open boxes of baking soda, one in the freezer and the other in the refrigerator compartment, to absorb odors. Leave the doors cracked open while in storage.
An LP-gas leak/pressure test should be performed yearly, and doing this before the RV goes into storage or has been on the road for a while is a good idea. Improper gas pressure can affect the operation of all appliances. LP-gas regulators should be replaced every five years regardless of the condition. Replace the battery in the smoke detector every year. Test the smoke, carbon monoxide and LP-gas detectors — all three of these detectors should be replaced every five years regardless of the amount of use.
Test the operation of the toilet, and check for water leaks at the rear of the toilet and around the floor. Using a flashlight, inspect all of the moving parts that are visible. If the toilet is not holding water, a seal service/replacement is usually necessary, if cleaning the debris from the groove doesn’t do the trick.
Change all water filters unless the RV is being winterized. Water filters can grow a certain amount of algae when they sit for extended periods of time. Most water-filter cartridges need to be replaced on an annual basis.
Using a flashlight, inspect all visible water and plumbing lines under the galley and bathroom sinks, as well as all the fixtures in the utility bay for leaks or compromised connections. Test the dump valves for smooth operation and make sure the valves close completely. Don’t forget to check faucets and waterlines in the exterior shower compartment, if so equipped.
Operate the water pump while listening carefully for any type of a bearing deterioration or an unusual variation in rpm. If you suspect that the water pressure has diminished, it may be necessary to replace the water pump. Repair kits are usually ineffective and not reliable. Most water pumps have an intake filter between the pump and the water tank. Inspect and clean the filter before a problem arises.
Operate all the window blinds and inspect the cords and retainers. The cords, as well as all the plastic pieces, can be repaired or replaced. A good website to find these parts is www.fixmyblinds.com.
Remove all interior screens and clean with a mild soap-and-water solution. While the screens are out, open and close the windows while watching the mechanisms to make sure they are not bent or badly rusted. Lubricate with the light oil recommended for the type of window. Replace any gaskets that are deteriorated, torn or cracked.
Test the operation of the roof vents. Remove the screens and clean with a mild soap-and-water solution. Inspect and lube the vent crank assembly, making sure it is not bent or the nylon guide is not broken.
Inspect the shorepower cord as well as any extension cords and adapters that have been used during the season. Replace them when any of the cord ends are compromised.
A bad connection can create a serious problem.
Clean and inspect the batteries. Check electrolyte levels in open-cell batteries, look for corrosion and check the condition of the cables, wires and terminals. It’s a good idea to remove the cables one post at a time and remove any corrosion with 200-grit sandpaper. Clean the batteries and the battery compartment with a battery-corrosion remover/neutralizer or with baking soda and water. When reinstalling the cables, use a corrosion-inhibitor product available at auto-parts stores.
While an annual inspection may seem like a lot of work, there’s no question that the payoff in the future will relate to trouble-free journeys.