Lifeline offers AGM models for house- and starting-power needs
Although it is unpopular, battery maintenance is a necessary part of motorhome ownership and something that is required to keep a motorhome and its systems functioning correctly. After all, monitoring motorhome batteries and ensuring they are adequately charged and filled with distilled water is not a task that most owners enjoy.
In the past, most motorhomes came from the factory with 12-volt starting batteries (usually one or two) that are typically gel or sealed flooded lead-acid (FLA) batteries. For the house batteries, banks were usually comprised of two, four, six or even eight 6-volt FLA batteries.
Battery Wiring Explained
Following are examples of common wiring methods to get the most out of your motorhome’s battery systems.
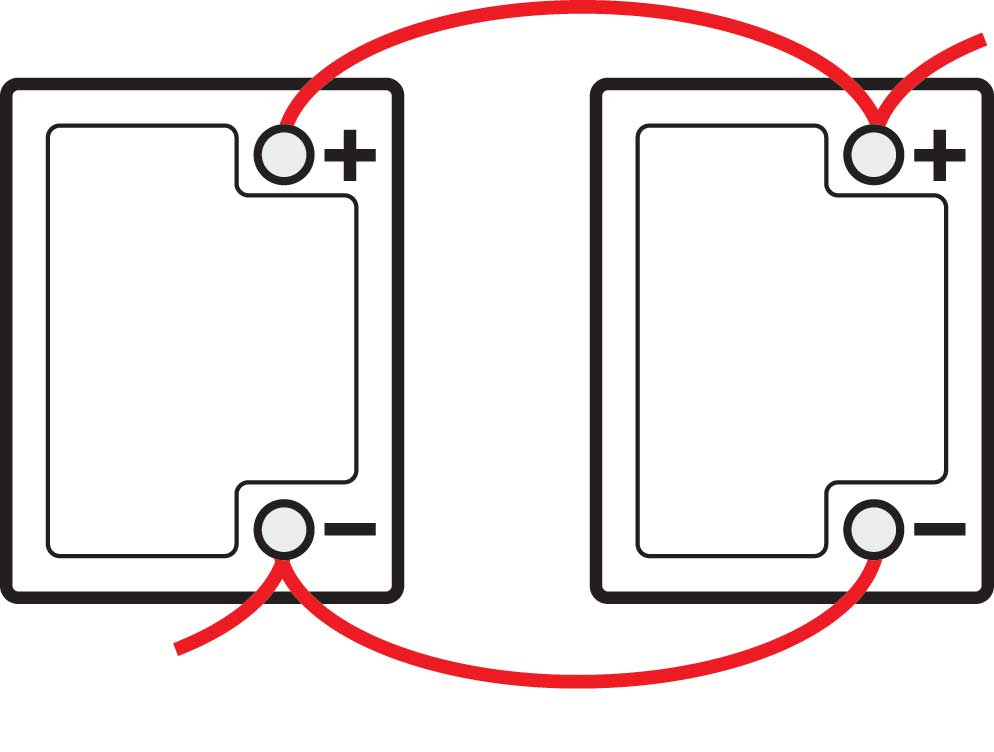
PARALLEL
To increase capacity but not voltage, connect the positive terminal from one battery to the positive terminal of another battery, and the negative terminal to the negative terminal.
Batteries Two 12-volt/80 amp-hours
Total Voltage 12 volts
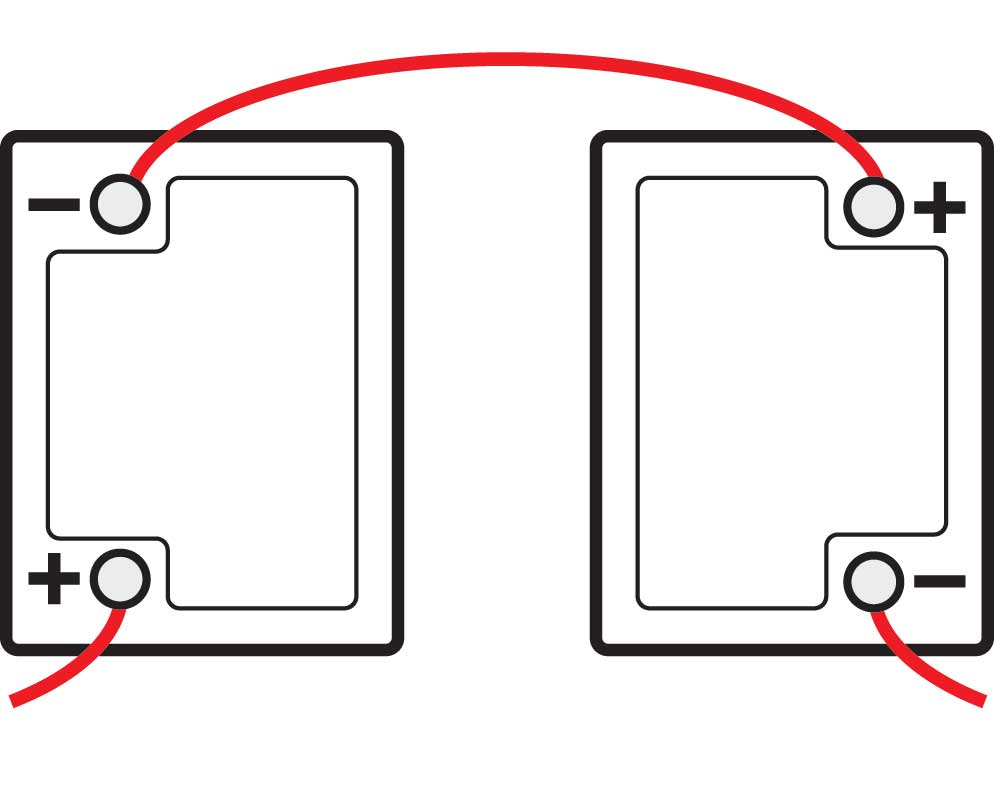
Total Capacity 160 amp-hoursSERIES
To increase voltage but not capacity, connect the positive terminal from one battery to the negative terminal of another battery.
Batteries Two 6-volt/200 amp-hours
Total Voltage 12 volts
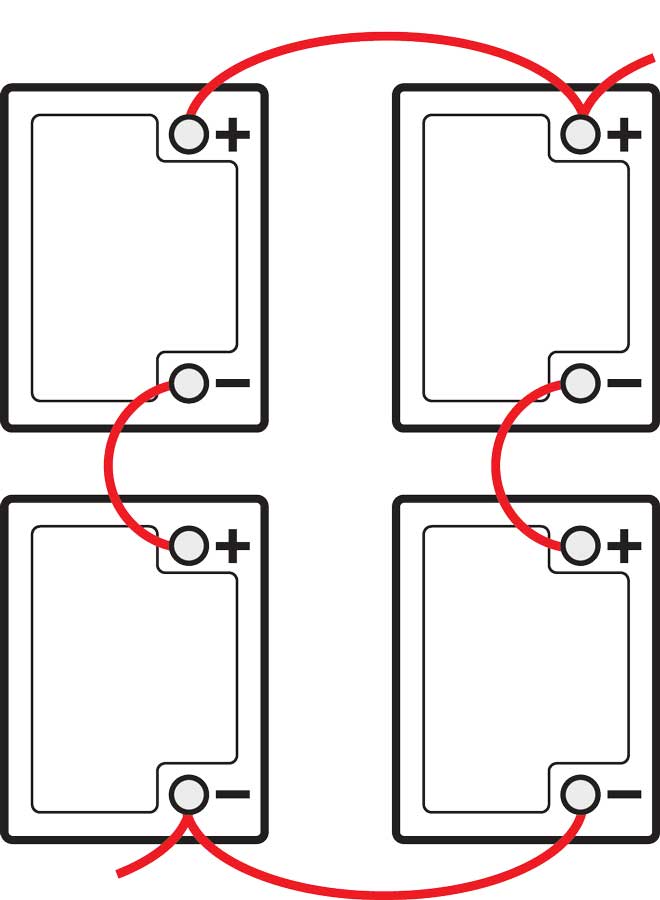
Total Capacity 200 amp-hoursSERIES/PARALLEL
To increase voltage and capacity, connect two batteries in series and two batteries in parallel.
Batteries Four 6-volt/200 amp-hours
Total Voltage 12 volts
Total Capacity 400 amp-hoursKeep in Mind
Parallel combines amps, not voltage.
Series combines voltage, not amps.
Series/parallel combines voltage and amps.
There are many reasons for the widespread use of 6-volt FLA batteries in motorhomes. They have a low initial cost (because of their use in golf carts), they allow for a long life in deep-cycle applications, they tolerate high-discharge applications well, and they can be maintained inexpensively by the addition of distilled water.
But, the drawbacks of FLA batteries are numerous as well. The first issue is the constant need for “watering,” which is checking and refilling of the cells with distilled water. These 6-volt FLA batteries are also prone to corrosion in the battery bay; they require an upright mounting position in a vented cabinet and they self-discharge at a high rate, which means they must be conditioned properly. For example, an FLA battery can discharge 5-10% a month as opposed to absorbed glass mat (AGM) batteries’ low rate of 1-3% a month. Other problems with lead-acid batteries include safety because of the potential exposure to battery acid when refilling. FLAs are also subject to acid leaking when overcharged and must be isolated from electrical equipment due to flammability concerns from off-gassing.
A recent trend has been to replace both the house and starting batteries with AGM batteries, which eliminates the arduous task of maintaining the old-style FLA 6-volt batteries. AGM cells utilize a fiberglass mat or pad that absorbs the electrolyte, which means there is no chance of spilling, which allows for placement in odd positions (basically anything but upside down). Another big advantage of AGM batteries is the lack of corrosion — and they are much less prone to sulfation. Plus, they can be charged more quickly due to their lower internal resistance. While 6-volt FLA batteries are easily frozen if left uncharged, AGM batteries are not prone to this common problem, and they are much more vibration-resistant. AGM batteries perform best when only allowed to discharge down to about 50% of their capacity, which is about 12 volts, so those who boondock need to make sure they keep that in mind when setting up the inverter or autostart generator, and an adequate charging system.
After careful consideration of the strengths and weaknesses of various battery types, we decided that life without battery watering would be very appealing, so we started shopping for new 12-volt AGM starting batteries and 6-volt deep-cycle AGM batteries for the house. There are several brands of AGMs on the market, but after some research and discussions with the experts, we turned to Lifeline.
Lifeline batteries are well-reviewed and a market leader among RV owners, and they are also used extensively by the U.S. Army, Navy, Marines and Coast Guard, as well as the FBI, CIA and the U.S. Border Patrol. Another important part of our decision is that Tiffin (the manufacturer of the Phaeton motorhome we used for this install) even offers Lifeline AGM batteries as an upgrade direct from the factory. If they meet the stringent requirements of an OEM, that means they must work well.
Lifeline AGM batteries have several interesting features. First, they all have lifting handles. If you have ever installed batteries in a motorhome, you know that moving them in and out can be a difficult task. With built-in rope handles, this task is much easier. The next thing we noted is their universal battery terminals. Not only are the terminals lead-free, they are made of a highly conductive copper alloy, and they include all the bolts and washers (also copper alloy) needed for connecting cables. These copper-alloy terminals and fasteners are corrosion-resistant and offer low electrical resistance for maximum conductivity. Lifeline also uses much thicker grids than most AGM manufacturers (1.0 inch versus .050 inch) for longer life, and they use a thick and strong battery case to ensure it stays straight and supports the panels inside the battery.
AGM batteries require a slightly different charging profile compared to most 6-volt FLA batteries, but nearly all modern inverters (and many converters in motorhomes without an inverter) installed on motorhomes have a setting to properly charge them so that shouldn’t be a problem for most owners. The 12-volt AGM starting batteries are usually charged by a 120-volt AC trickle charger when in storage, so even if yours is not currently compatible, they are inexpensive and easily changed, if needed. The Tiffin Phaeton 36QSH used for this upfit was already converted to an AMP-L-START charger several years ago, and it is fully compatible with AGM batteries.
The Phaeton had two Group 31 starting batteries, so we selected the Lifeline GPL-3100T (average online price: $361.20 each) for replacement. It offers 950 cold cranking amps (when tested to IAW battery council standards) at 32 degrees Fahrenheit, and like all Lifeline batteries, is built to aircraft standards. Not only is this battery made in the USA, it also offers an impressive five-year warranty, and since it has the same footprint as the previous batteries in the Phaeton, it was a perfect fit.
For the house batteries, four Lifeline GPL-4CT batteries (average online price: $358.75 each) were installed. The GPL-4CT is a deep-cycle AGM battery offering 220 amp-hours (AH) at 20HR rate, so with four of them wired in series/parallel a 440AH capacity is achieved with all the advantages of an AGM battery.
While the installation is not difficult, keep in mind that these batteries are heavy and lifting them out and installing new ones is a challenge if working solo. Also, there are several safety precautions to be aware of before starting the installation. Since you will be potentially working with battery acid, safety goggles and nitrile-coated work gloves should be worn.
Another caution revolves around the proper choice of tools. Using short wrenches prevents them from touching two different terminals and creating a short. Another option is to use electrical tape around the unused end of the wrench. Since a battery can’t be turned off, not much can be done to render the terminals safe, but there are precautions to help prevent shorting any terminals. When performing this work, it is best not to wear any jewelry, including metal rings or necklaces that could come in contact with the battery terminals. Also, make sure your sleeves do not have any metal zippers or snaps that are conductive.
Before working in the battery bay, make sure to disconnect the coach from any source of external power. This means unplugging from shorepower, turning off the generator and making sure it is not in auto-start mode, turning off the disconnect switches between the batteries and the coach and turning off the inverter. Solar panels must be disconnected from the batteries, using the provided switch in the system. Even if your solar panels do not have a disconnect switch, they will have an in-line fuse that can be removed.
The tools required for this project include basic wrenches/sockets to remove the batteries and the brackets that hold them in place as well as a cordless drill. You will also need sandpaper and paint to remove any existing corrosion from the metal brackets attached to the batteries. A wire brush can be used clean the terminals before installing them on the new batteries. Another handy item is a voltmeter. It’s also best to have a notebook and pen handy to sketch the current wiring of the motorhome’s batteries, or shoot a cellphone photo; doing this will make installation with the correct wiring a breeze. Following is a step-by-step look at installing new AGM batteries:
,https://www.motorhome.com/wp-content/uploads/2019/06/DON_3043.jpg|[4] Before starting the install, make sure to turn off all breakers, battery disconnects, auto-generator start and the solar panels (if any). ,https://www.motorhome.com/wp-content/uploads/2019/06/DON_3054.jpg|[5] Note the current battery bay wiring and make a sketch that shows how the batteries are physically placed and which length wires go where. This will serve as a guide to allow you to reconnect everything correctly. Detailed photos with the camera on your phone also work.,https://www.motorhome.com/wp-content/uploads/2019/06/DON_3092.jpg|[6] Before these batteries can be lifted out, the front bracket that holds them in place was removed. It was noted that the screws and the bracket itself was starting to corrode, so those items will have to be addressed later.,https://www.motorhome.com/wp-content/uploads/2019/06/DON_3106.jpg|[7] Once the screws were removed from the front battery-retaining bracket, it was taken out of the battery bay. Notice these wires have red and black bands on the end to indicate they connect to a positive or negative terminal. ,https://www.motorhome.com/wp-content/uploads/2019/06/DON_3095.jpg|[8] Depending on the layout of the battery bay, the next step is to disconnect the starting and the house batteries from the motorhome (negative cable first). The house batteries here are in the front, so the house battery negative cable was located and removed from the battery bank. Fortunately, our cables are labeled from the factory. If not labeled, use masking tape and mark each one before removing.
,https://www.motorhome.com/wp-content/uploads/2019/06/DON_3103.jpg|[9] Next, the house battery positive cable was removed, disconnecting the bank from the coach. ,https://www.motorhome.com/wp-content/uploads/2019/06/DON_3122.jpg|[10] Carefully remove the interconnected cables from the battery bank one by one until the batteries are separated. Remember, a battery can’t be turned off, so the cables are “hot” until completely removed; the terminals are always hot. If the batteries have a temperature sensor for the inverter charger, remove and put it aside for now. ,https://www.motorhome.com/wp-content/uploads/2019/06/DON_3147.jpg|[11] Carefully remove the house batteries by lifting them out of the battery bay and then remove the battery retaining brackets. There was a lot of corrosion here, which will need to be sanded and repainted before reassembly.,https://www.motorhome.com/wp-content/uploads/2019/06/DON_3175.jpg|[12] With the house batteries out of the way, the starting batteries were removed. To get there, the metal straps that hold them down need to be unbolted and the metal floor plate removed. All of these parts need to be sanded and repainted before reuse.
,https://www.motorhome.com/wp-content/uploads/2019/06/DON_3210.jpg|[13] Just as with the house batteries, when removing the 12-volt starting batteries, the negative cable (not shown) was disconnected before the positive cable. Having these cables labeled really speeds up the process.,https://www.motorhome.com/wp-content/uploads/2019/06/DON_3200.jpg| [14] The alternator charging cable that is connected to the starting batteries is removed and put aside for reinstallation later with the new batteries. If the coach has a chassis battery charger, mark those cables and reinstall properly.,https://www.motorhome.com/wp-content/uploads/2019/06/DON_3225.jpg| [15] Once the chassis batteries are completely unwired, remove them from the battery bay.,https://www.motorhome.com/wp-content/uploads/2019/06/DON_3236.jpg|[16] Most likely the battery bay will need cleaning. This Tiffin Phaeton has a poly liner covering the battery bay so it can be easily cleaned and does not require repainting since it is not metal. Depending on how the bay is constructed, it may require cleaning, sanding and/or painting.,https://www.motorhome.com/wp-content/uploads/2019/06/DON_3279.jpg|[17] Before reinstalling the batteries, we used a wire brush on the battery terminal lugs to make sure they were free of debris. Having a clean connection is very important to good electrical conductivity.,https://www.motorhome.com/wp-content/uploads/2019/06/DON_3316.jpg| [18] When installing the new Lifeline AGM starting batteries, first connect the positive cable of one battery to the other, then install the cable connecting the two negative terminals. Note the use of the Lifeline copper alloy bolts to connect the cable directly into the battery terminal. The correct torque as specified by Lifeline is 70 in-lbs (note this is not 70 ft-lbs). This is a parallel battery connection between the two batteries, which means the negative posts of each battery are connected and the two positive terminals are connected. This gives the electrical effect of one large 12-volt battery with almost 2,000CCA.,https://www.motorhome.com/wp-content/uploads/2019/06/DON_3281.jpg|[19] After the two chassis batteries are properly cabled, the positive terminal of one starting battery is connected to the motorhome’s positive cable as well as the alternator cable and trickle charging cable shown here.,https://www.motorhome.com/wp-content/uploads/2019/06/DON_3321.jpg| [20] The last step in replacing the starting batteries is to connect the main negative cable to the negative terminal of the new starting battery bank. Double-check the connections, test the voltage and install the positive terminal covers.,https://www.motorhome.com/wp-content/uploads/2019/06/DON_3110.jpg|[21] Before replacing the old metal retaining brackets, a cordless sander was used to remove all the corrosion before repainting with rust-resistant black paint. They don’t have to be painted perfectly, but a few coats of high-quality paint should be applied. With the use of AGM batteries, this should be the last time these brackets will need painting.,https://www.motorhome.com/wp-content/uploads/2019/06/DON_3328.jpg|[22] After screwing the bottom bracket back in place with new stainless-steel self-tapping screws, the top mounted brackets were positioned and tightened down.,https://www.motorhome.com/wp-content/uploads/2019/06/DON_3340.jpg| [23] When placing the new house batteries into the battery bay, make sure they are oriented (with regard to the positive and negative terminals) exactly as before because the battery cables are made to fit that particular layout. The repainted brackets were then screwed into the floor using a cordless drill. ,https://www.motorhome.com/wp-content/uploads/2019/06/DON_3354.jpg|[24] The last step to physically hold the batteries in place was to install the front battery-retaining bracket. After being sanded and repainted, the bracket was screwed into place using a cordless drill and it looks almost new again. Note that every battery has the handy lifting handles on top.
,https://www.motorhome.com/wp-content/uploads/2019/06/DON_3358.jpg|[25] Copper alloy bolts and washers were used to cable the new Lifeline batteries. ,https://www.motorhome.com/wp-content/uploads/2019/06/DON_3362.jpg|[26] When reconnecting the house batteries, start with the series connections first, routing the positive of one battery terminal to the negative terminal of the other one in the pair. Then do the same with the other pair before making the parallel connections, which are positive to positive and negative to negative. Make sure to carefully follow your photos and sketch.,https://www.motorhome.com/wp-content/uploads/2019/06/DON_3371.jpg|[27] After reinstalling the positive house battery cable to the correct positive terminal, the last connection is the house battery negative cable to the battery bank. All of these bolts on the battery need to be torqued to 70 in-lbs.,https://www.motorhome.com/wp-content/uploads/2019/06/DON_3337.jpg|[28] If the inverter has a temperature sensor in the battery bay, make sure to install it per the manufacturer’s instructions. Here it is mounted to the side of one of the 6-volt house batteries using double-sided automotive tape. It can also be mounted to the negative terminal along with the house battery cable. ,https://www.motorhome.com/wp-content/uploads/2019/06/DON_0043.jpg|[29] After the batteries are wired in series/parallel, it is easy to check the wiring by placing a voltmeter’s leads on the positive of one pair and the negative of the other pair. This is the same location as the house battery cables are to be connected, and it should show approximately 12.75 volts. ,https://www.motorhome.com/wp-content/uploads/2019/06/DON_3405.jpg| [30] After completing the wiring and confirming it is correct, there are a few more steps before connecting the motorhome to shorepower again. First, turn on all the breakers and battery disconnect, and turn on the auto generator start feature, if so equipped, and any other function previously disabled.,https://www.motorhome.com/wp-content/uploads/2019/06/DON_3412.jpg|[31] Depending on the inverter/charger, the setup menu will have to be accessed to change the house battery type to AGM. If the motorhome has an auto-start generator, make sure to change it to 12 volts as the auto-start point. ,https://www.motorhome.com/wp-content/uploads/2019/06/DON_3419.jpg|[32] Another setting to check on the inverter is the battery capacity. This motorhome now has 440AH capacity and 500AH is the closest setting in the inverter’s menu, so it was left as is. If the inverter has a “Max Charge Rate” setting, make sure it is at 100%. Due to the lower internal resistance of the AGM batteries, it should always be set at the highest rate.”]