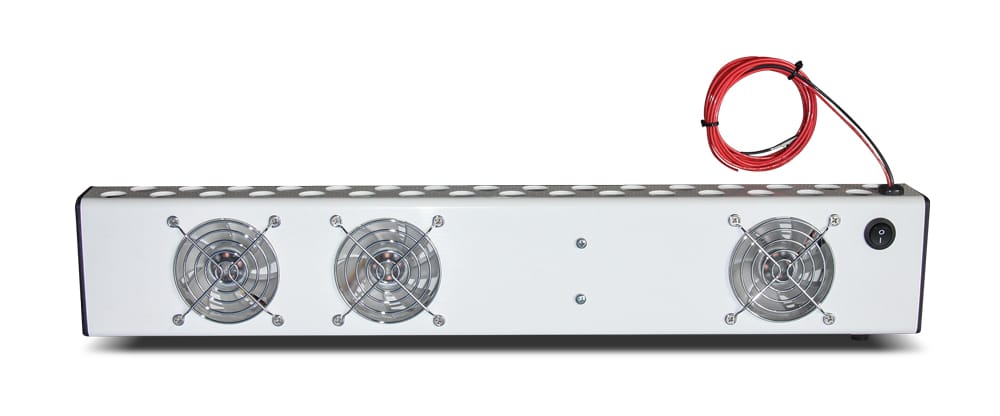
This add-on fan box from Smart RV Products beefs up interior circulation for more efficient operation and less food spoilage
RV gas/electric absorption refrigerators are subject to improper installation and high-ambient temperatures that can significantly affect the cooling process. When outside temperatures soar to 100 degrees Fahrenheit and higher, refrigerators need all the help they can get. A simple solution is to add a Fridge-Fix by Smart RV Products, a compact box with three waterproof fans and a pleasant blue light.
RV refrigerators are not equipped with interior fans, so there’s no circulation; it’s not uncommon to see box temperatures higher than 45 degrees – warm enough to lead to food spoilage. When refrigerators are overloaded with excess food, the temperature zones become far less efficient. When condensation builds up on the condenser fins, cooling can be reduced by up to 25 percent. Often, this excess moisture can turn to ice, and adequate cooling is further affected.
The Fridge-Fix kit comes fully assembled and installs easily using hook-and-loop fasteners. Smart RV Products offers applications to fit most motorhome refrigerator models.
Ice buildup is a common problem that affects nearly half of the RV refrigerators on the market today. Ice and additional condensation buildup can be caused by worn-out door gaskets or any food that has been left uncovered. When the thermistor, the refrigerator’s temperature sensor, becomes encapsulated in ice, a false temperature reading occurs, and airflow across the cooling fins is diminished. The Fridge-Fix eliminates frost buildup and accurately regulates cooling with its increased airflow.
Fridge-Fix is guaranteed to shorten cool-down time and cool all zones by quietly circulating inside air 10 to 12 times per minute, yet it draws only .5 to .75 amps. The high-quality fans are designed to last a minimum of 50,000 hours of operation.
![[1] Determine the location for the Fridge-Fix assembly. Remove the refrigerator’s interior light if it interferes with the fan assembly installation. [2] Clean the areas using a mild household cleaner and finish with an alcohol wipe where the Fridge-Fix will attach with hook-and-loop fastener.](https://www.rv.com/wp-content/uploads/2020/12/FridgeFan-01.jpg)
[1] Determine the location for the Fridge-Fix assembly. Remove the refrigerator’s interior light if it interferes with the fan assembly installation. [2] Clean the areas using a mild household cleaner and finish with an alcohol wipe where the Fridge-Fix will attach with hook-and-loop fastener.
There are no holes to drill; the Fridge-Fix mounts securely using hook-and-loop fasteners. Clean the area where the hook-and-loop material will contact the surface of the refrigerator when the unit is in place, dry thoroughly and wipe with alcohol. Peel the backing from the hook-and-loop and push the box in place; hold for 10 seconds with firm pressure. Be certain the Fridge-Fix is tight against the cooling fins.
Attach the ground clip to any of the metal fins, which may require a little help from a small hammer. The interior light is then mounted to the bottom of the Fridge-Fix with two Phillips screws that are already in place. In this model refrigerator, we decided to run the red positive wire through the condensation drain tube. Some refrigerators will have constant 12-volt DC power to the light assembly for even easier installation.
![[3] After peeling the hook-and-loop backing, press into place for 10 seconds to ensure a complete adhesion. [4] Attach the ground clip to one of the refrigerator’s interior evaporator fins and route the red wire through the condensation drain tube.](https://www.rv.com/wp-content/uploads/2020/12/FridgeFan-02.jpg)
[3] After peeling the hook-and-loop backing, press into place for 10 seconds to ensure a complete adhesion. [4] Attach the ground clip to one of the refrigerator’s interior evaporator fins and route the red wire through the condensation drain tube.
Total installation time runs around 60 minutes. Since the shelves have to be cleaned and the refrigerator turned off before installing the Fridge-Fix, this is a good time to clean out the refrigerator.
We began testing the new fan in an ambient temperature of 68 degrees. The inside of the refrigerator was allowed to reach the same temperature as the interior of the motorhome. After installation of the Fridge-Fix, the refrigerator was set with the thermostat on No. 2 with the door closed and never opened during the cool-down period. Before the install, we recorded the cool-down time from 68 to 38 degrees at four hours and 40 minutes. We were able to shave 22 minutes off that cool-down time after the installation of the Fridge-Fix.
When opening the door for the first time, we could feel the circulation of cold air from the three very efficient fans. There is no question that the Fridge-Fix will save electricity and LP-gas with its highly efficient air-circulation system.
![[5] Remove the rubber plug from the condensation drain tube at the rear of the refrigerator and pull the red wire through. [6] Using the supplied Scotchlok, attach the red wire to the refrigerator’s incoming positive wire.](https://www.rv.com/wp-content/uploads/2020/12/FridgeFan-03.jpg)
[5] Remove the rubber plug from the condensation drain tube at the rear of the refrigerator and pull the red wire through. [6] Using the supplied Scotchlok, attach the red wire to the refrigerator’s incoming positive wire.
Prices range from $64.95 to $109.95. The Fridge-Fix is backed by a two-year, no-questions-asked warranty.
Smart RV Products
877-472-7799
www.smartrvproducts.com