Getting your motorhome ready to roll after winter storage makes for a successful travel season
Each year as winter thaws, the first thing most of us think about is getting the motorhome ready and planning the first trip. But before you start packing, there are a lot of things that need to be done to ensure a successful travel season. A motorhome is a very complex machine with lots of systems and opportunities for problems. All of these systems require some maintenance – some more than others. Getting a rig ready could take a day or two if done correctly, so allow yourself time before your first trip to go through our list of spring-cleaning tips. A little time spent now will go a long way toward ensuring a full season of fun.
After uncovering a motorhome or retrieving it from storage, one of the first things we suggest is to open up all the windows and turn on the roof exhaust vents and let it air out for several hours (or overnight, if possible). This will not only help remove the stale air inside the coach, it will also provide fresh air for you while you’re inside performing some of the other tasks that lie ahead.
While the motorhome is airing out, open every cabinet and drawer and inspect the contents. An even better plan is to empty each cabinet and drawer while cleaning the interior. This gives you time to make a mental note if you are running out of certain items. This remove-and-clean step may seem like overkill, but there is a reason for it. While everything is out of the cabinets, you can look for other potential problems, such as rodent or insect infestation, as well as leaks or water damage from the roof, walls or internal waterlines in the motorhome. If any form of rodent or bug bait stations were used inside or in basement storage areas, now is the time to change them out as well. Performing this inspection with everything in the cabinets would not be nearly as complete, so take the extra time to do it right.
The interior is also prone to collecting mold, mildew, viruses and germs. No one wants to live with that. As we travel throughout the country and step in and out of our rigs, we, as well as our pets, bring in lots of undesirable things with every footstep and touch of our hands. So after you vacuum everything, make sure to disinfect all of the surfaces that come in contact with feet, hands, clothes and food. Areas such as the steering wheel, dash and other chassis controls, window tracks and locks, doorknobs and handles, HVAC controls, floors, sinks, toilet, shower, shower door, bathtub, furniture and water fixtures, as well as the interior of the refrigerator/freezer (and icemaker), should all be completely disinfected. Treat these areas just as you would inside your house and use clean microfiber or disposable paper towels and the correct disinfectant spray for each surface. The leather driver’s seat will need a different product than a toilet bowl, counter or a window track. In addition to the disinfecting of all the critical areas, the inside is likely in need of a good dusting of the cabinet faces, countertops, etc. Most of this is very similar to cleaning a home and many of the same products can be used here for general cleaning. If you still have a musty smell, a good air deodorizer made for RV use can help as well.
The HVAC system is another source of germs and mold; removing and cleaning the filters inside of the air return(s) should be part of the process. Usually there is a washable foam filter that can be cleaned and disinfected and reinstalled. After cleaning the filters, check the proper operation of the HVAC systems by running the furnace and air conditioner(s) at the various fan settings, etc.
Before draining and flushing the water system, make sure the water heater is turned off and completely drained. Then remove the water-heater anode rod, if your water heater has one, and check its condition. This is much easier to do now with the tank empty than after refilling. The anode rod should be replaced when there’s about 25 percent of the material remaining. Proper anode maintenance ensures water-heater tank longevity.
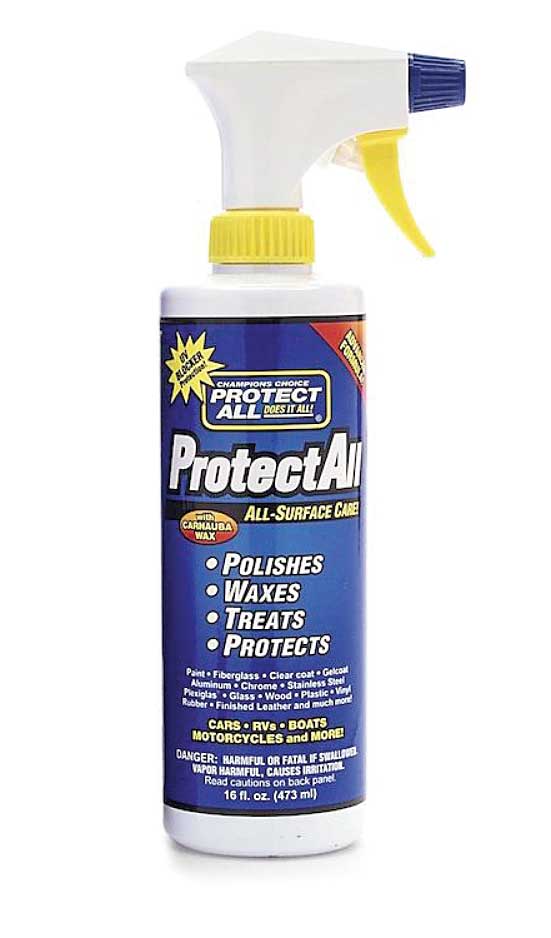
Protect-All is a great general-purpose product that can be used on many surfaces. It’s formulated to clean and protect painted surfaces, wood, plastic, chrome, aluminum, stainless steel, headlights, mirrors and even glass. Simply spray it on (allow it to set a bit for removing bug splatter) and then wipe off with a clean microfiber towel.
If winterization included the use of antifreeze in the water system, you will need to remove it and completely flush the water system. When there is no longer a chance of freezing weather, drain the tanks and lines by opening them up and allow as much of the antifreeze to drain as possible. Then, using a drinking-water-safe hose, add some fresh water to the water tank. Start turning on each water faucet and allow it to run until the water is clear (not pink). Repeat this procedure until all the antifreeze is gone. This needs to be done using both the water tank and the city water connection to ensure the water tank and the city water lines are cleaned out. Return the water heater bypass valve to the “normal flow” setting. This will allow fresh water to re-enter the water heater. Allow it to fill while running hot water through one or more water fixtures; when the air is replaced by water, you’re good to go. Make sure the de-winterization process includes the dishwasher, washer lines and icemaker as well. It’s always a good idea to make several trays of ice and dispose of them until you know the RV antifreeze is completely removed from the water lines.
Next, add a mixture of bleach and water to the freshwater tank to sanitize the system. To make the hypochlorite solution, mix ¼ cup of plain household bleach with 1 gallon of water for each 15 gallons of tank capacity. So, if you have a 30-gallon tank, use 2 gallons of solution. This makes the chlorine residual in the system 50 parts per million (PPM). Add the solution, then fill the tank completely. After the tank is full, open each faucet, shower, etc., and run water until you smell the bleach. After you have drawn the chlorine bleach into each water source, allow the system to sit for a minimum of four hours before draining the solution from the water system and repeating the rinsing process to remove the chlorine smell.
Other systems that need a complete inspection include the oven, stove or LP-gas cooktop as well as the furnace, water heater and LP-gas refrigerator. If you are going to light the water heater, make sure it is filled with water first and also inspect the outside exhaust. Often insects will build a nest in the LP-gas appliances, so remove the outside covers (if installed) to make sure they are not restricted; plugged covers can result in a fire and/or operational problems. Wasps like to build nests in and around the exhaust, while small spiders are attracted to the smell of the odorant in the LP-gas, and can make webs in the burner tubes, especially in water heaters. Since the LP-gas has been turned off all winter it may take several attempts to purge those lines and get everything working, so be patient if it doesn’t work right away. We find the best thing is to light the gas burners on the stovetop first, then move on to the refrigerator, furnace and/or water heater.
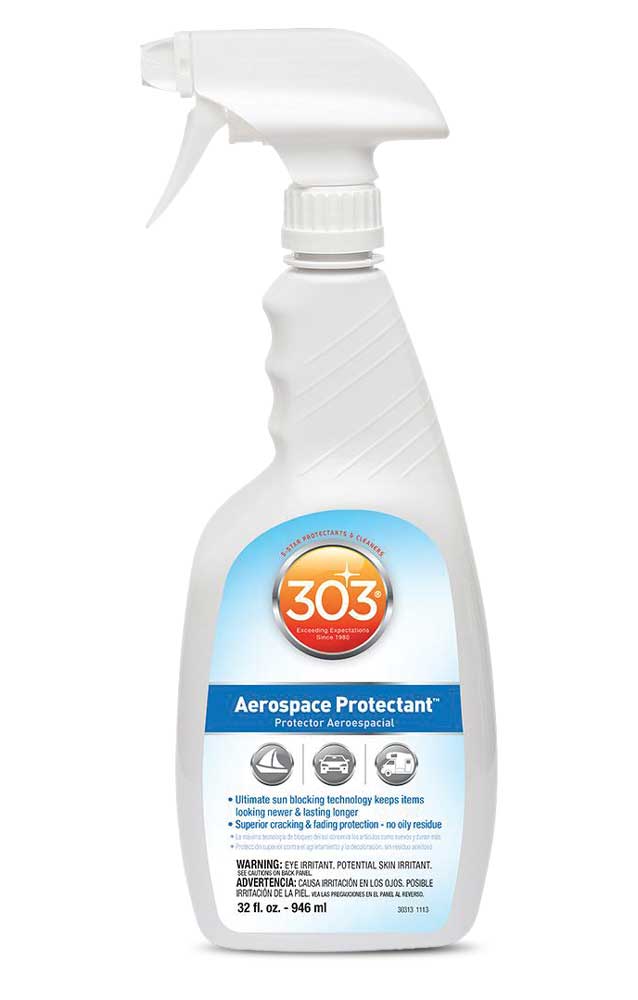
303 Aerospace Protectant is a good product for protecting vinyl and rubber against fading and cracking. Simply spray it on and then wipe it off with a clean microfiber towel. It leaves no greasy or oily residue behind, unlike petroleum-based products, which are harmful to rubber.
Most modern motorhomes utilize many battery-powered devices that should be inspected. Hopefully, before storing the motorhome, the batteries from the various remote controls were removed to prevent leaking and damage. This includes the TV and surround-sound devices as well as any weather-station remote temperature sensors and battery-powered clocks. Smoke detectors should be tested, and the batteries replaced, annually. Most smoke alarms are rated for eight to 10 years of life, while carbon monoxide and LP-gas detectors last only five to seven years. Many will have a date stamp indicating when they should be replaced.
While checking safety items, don’t forget to look at the fire extinguisher(s). Make sure it’s mounted properly and charged. If you don’t have at least one fire extinguisher inside (and preferably a second one easily accessible in a cargo bay), now is a good time to get that taken care of.
The chassis should be targeted next. If the motorhome has been plugged in to shorepower all winter and you have observed proper battery maintenance and storage practices suitable for the climate zone, the batteries should be charged – but it’s always a good idea to check condition and charge levels of the chassis and house batteries. If there is corrosion on the terminals, address that now.
If the motorhome has flooded (wet) cell batteries, the electrolyte levels must be inspected. Each cell must be filled to ensure all the plates are covered with distilled water, and then completely charge the batteries. Use a voltmeter and/or a battery condition tester to check each one and make sure they are charged before hitting the road. If a single battery needs replacement, it’s usually best to replace the entire bank. So, if one of the house batteries is bad (most motorhomes have between two to eight house batteries), replace them all. The same procedure holds true for chassis batteries.
Many owners like to perform an equalization charge on wet-cell house batteries once a year; follow the instructions for the inverter/charger and make sure the battery bay is vented during this procedure, and turn off all 12-volt DC devices.
While filling and checking the batteries, inspect the terminals and cables. Clean corrosion with CRC Battery Cleaner or baking soda and then protect them with CRC Battery Terminal Protector. CRC is specifically designed to prevent corrosion from forming on cable ends and battery terminals. Also check all of the battery cables and connections to make sure they are all tight.
Now is also a good time to test the generator. Check the oil/coolant levels and disconnect shorepower before starting; run under a 50 percent load (air conditioner, for example) for two hours. This should be done monthly while in storage, according to Cummins Onan. While the generator is running, check the air pressure in the tires and inspect them for bulges, dry rot and road hazard damage, etc. Also check the DOT date codes on the tires and make sure they are still within the manufacturers’ limits of age. Even if the tires are not damaged or dry rotted, they typically time out in seven years, unless the motorhome was stored indoors, in which case, they may be good for 10 years (check tire manufacturer’s recommendations) as long as there’s proper tread depth and they are free from sidewall cracks.
The motorhome’s engine should also be checked for basic items such as oil level, transmission fluid level, antifreeze/coolant, etc. Check the suggested service intervals in the owner’s manual and make sure everything has been serviced properly. This includes the engine, generator and chassis. Most fluids and filters need to be changed based on time or mileage. This means even if there aren’t many miles on the odometer, the motorhome may need servicing based on the time.
Slideouts and basement doors are other areas that need attention after storage. Extend the slides and inspect the rubber wiper seals that fill the gap around the structure and side walls when open. Without a properly working outer seal there is nothing preventing rain, bugs, dirt, etc., from entering the motorhome. Look carefully for tears, dirt/debris or places where the seal has pulled away from the slideout walls and around the perimeter of the slideout where the rubber gasket seals the slide against the side wall when closed. To ensure the seals last as long as possible, treat them with a slideout seal treatment, like Thetford’s Slide-Out Rubber Seal Conditioner, or Protect-All’s Slide-Out Rubber Seal Treatment.
It is also recommended to inspect the slide rails and gear mechanism. Usually these are located on the side and/or the bottom of the slide, and they also need cleaning and lubricating (if required by the manufacturer). After inspecting each track or mechanism, wipe to remove all dirt and debris and lubricate with a product like Camco Slide-Out Lube and Protectant or 3-IN-ONE RVcare Slide-Out Silicone Lube.
Clearly this is a long list of maintenance procedures, and not every one of them applies to every situation. As always, the most important thing is to get out on the road and have a safe summer of fun with your loved ones while seeing our great country.
The Clean Team
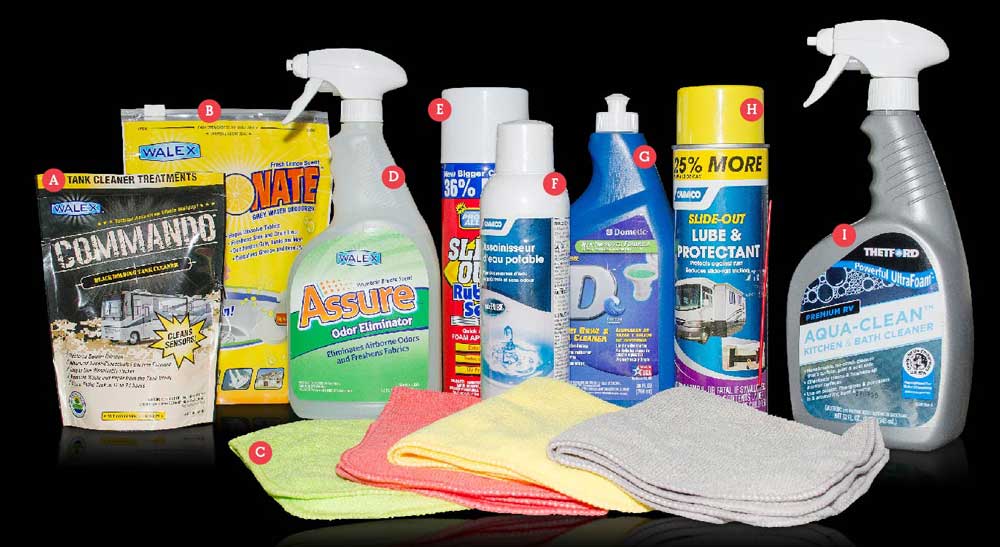 [A] If the black tank is not rinsed and cleaned properly, the sensors can yield incorrect data due to residual waste buildup on the walls. A good way to really clean the tank is to nearly fill it with water and toss in a Walex Commando Black Holding Tank cleaning packet. Allow it to sit for 12-24 hours, then dump. It uses natural enzymes to clean and deodorize the tank and remove debris.
[B] After cleaning the galley area, fill the gray-water tank and add a product such as Walex Elemonate water tank deodorizer. Elomonate is designed to clean and freshen drain lines and the gray-water tank. It also helps dissolve grease and food particles in the tank to ensure it stays smelling fresh and flows freely.
[C] Microfiber towels are a staple for cleaning any motorhome and they are great for interior and exterior use. They work well on glass, rubber and vinyl, as well as painted surfaces and glass.
[D] Sometimes the entire motorhome has an odor after being stored all winter. A good product to handle this problem is Walex Assure, which can be sprayed on all fabric surfaces and in the air to help rid the interior of stale, musty odors. It even works on smoke, mold and mildew smells and leaves a fresh scent.
[E] Maintaining the rubber slideout seal is another important part of maintenance. Inspect several times a year and treat the slide seals and gaskets with a product like Protect-All Slide-Out Rubber Seal Treatment. Simply spray on the rubber treatment and wipe away the excess. Make sure to wipe it on both sides of the slide room seals for maximum benefit.
[F] Camco TastePURE Drinking Water Freshener is a must if you regularly use the freshwater tanks. Simply add 1 ounce per 20 gallons of water when filling the tank. It helps prevent algae and slime, and also helps stored water stay odor free and tasting good.
[G] A motorhome toilet needs proper care. It has a rubber seal at the bottom to prevent sewer gases from entering the interior, and to keep water in the bowl. Dometic Toilet Bowl and Seal Cleaner, for example, is made specifically for motorhome toilets. Simply turn the bottle upside down and spray the cleaner inside the bowl. Then use a toilet brush to scrub the inside and rinse.
[H] If left without any maintenance the slideout rails are subject to corrosion and sticking. To help prevent problems with the slideout mechanism, spray the rails, gears or other metal parts with Camco Slide-Out Lube and Protectant, if recommended by the manufacturer. When used regularly, it can help prevent rust and repel water and dirt.
[I] Thetford Aqua-Clean is a good general-purpose cleaner for use in areas like the kitchen and bath. It has a foaming action that helps lift dirt and soap scum off the surface of counters and fixtures without scratching them.