Preparing your coach for another travel season
After a long, hard winter, one of the things that signals spring for RV owners is the de-winterizing of the motorhome. Once you know that freezing weather is over, it’s time for the annual spring freshen-up to get ready for the fun and travel that lies ahead. Of course, if you are a full-timer or live in an area that is not subject to freezing weather, you may not store your coach, so not all of these tips will apply to you.
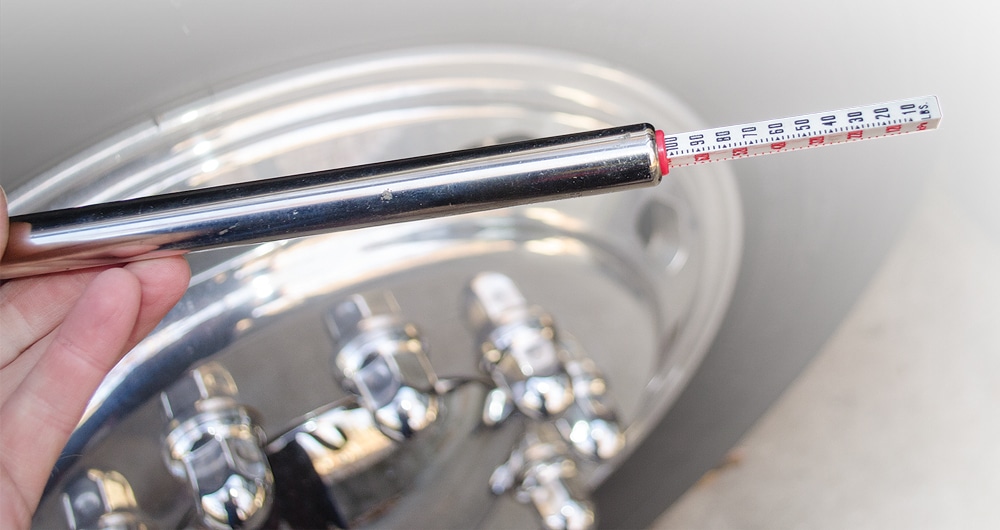
In addition to checking the tires for proper cold inflation pressure, completely inspect the sidewalls for cracking as well.
For many of us, our motorhome gets stored during the winter and therefore we have to undo all the steps we used to prepare the motorhome for the winter. After uncovering the coach or removing it from a storage location, the first thing we suggest is to unplug the 120-volt AC power. Then, after checking the oil and coolant levels in the generator, start it up. The generator needs a good run of 60 minutes or longer under load; your time spent preparing the motorhome will serve this role perfectly.
While the power is flowing from the generator, it is a great time to check all the 120-volt AC appliances, such as the refrigerator (if applicable), microwave, and TVs, as well as the HVAC systems. In addition to all the AC-powered devices, you also need to make sure all the 12-volt DC circuits such as the lights, awnings, exhaust fans, etc., are working.
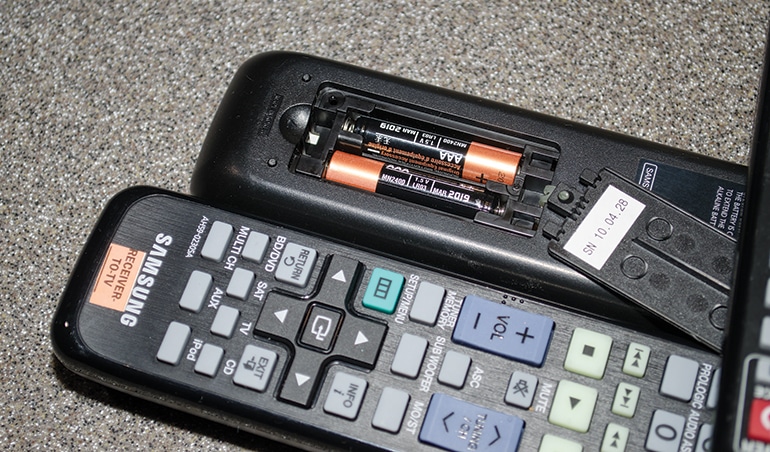
Replace the dry-cell batteries in all devices such as smoke alarms, TV remote controls, flashlights, etc., and test them fully.
Hopefully, you removed all the dry-cell batteries from your remote controls, clocks and smoke detectors last fall. Before you head out on your first trip, install new batteries into all of those devices and test them for proper operation. If you use an outdoor thermometer, don’t forget to install new batteries in it as well, unless it’s an old-fashioned model with a tube of mercury or today’s environmentally conscious equivalent.
If the water heater was properly drained last year, now is the time to get it ready for use. If you have a Suburban water heater and didn’t already check the anode rod last year, you should remove it and see if it needs replacement. If all is well, then you can refill the tank normally. On most motorhomes, that means accessing the hot-water control valve in the plumbing bay and turning it back to normal flow instead of the bypass setting that is used to winterize. Since a typical water heater is 5-10 gallons, this may take a bit to refill, so with the water hose still connected, turn on a hot-water faucet or shower. Within a few minutes, the tank will fill and water should start to flow normally.
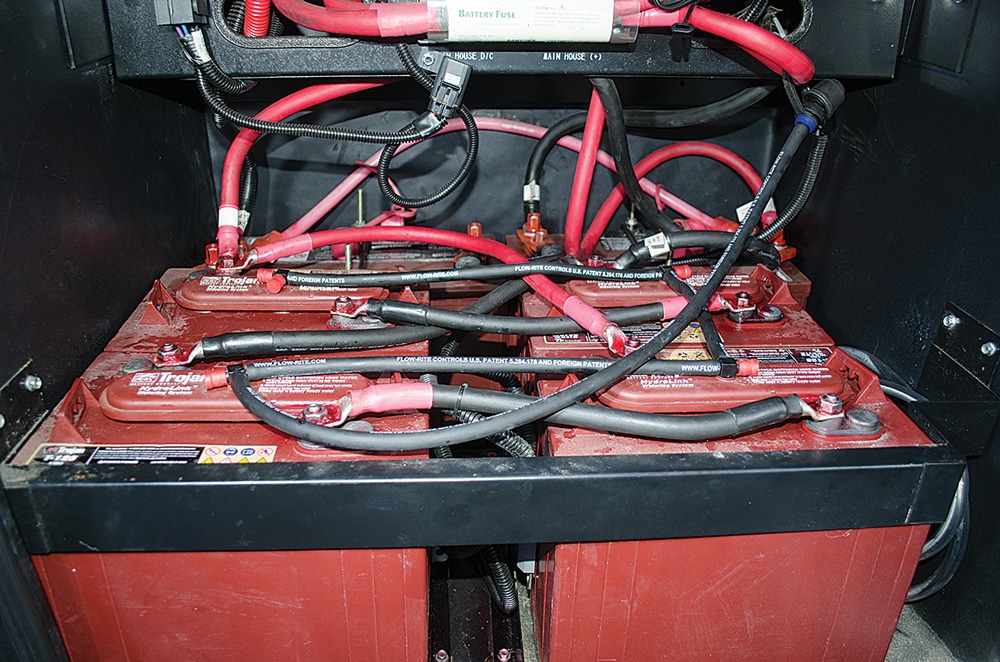
Inspect the terminals on the coach and chassis batteries for corrosion. As you can see, these were already protected with corrosion barrier and they are OK. Also check the electrolyte level in all flooded cell batteries. These Trojan batteries are connected to an easy-to-use central fill system called Hydrolink, which allows you to equally fill all batteries in one simple operation.
One of the biggest aspects of de-winterizing is to flush all the water lines of the nontoxic pink antifreeze that you added last fall. If you have access to a water hose, the easiest way to get this handled is to hook up the hose and add some fresh, clean water to the water tank. On most motorhomes, the antifreeze is added through the same pump that runs from the water tank. This is the reason we suggest you use the water tank filled with clean water to purge the lines.
With the water tank partially full, switch on the water pump and simply go to each faucet and run it until all signs of pink are gone. Proceed to the next sink, toilet, shower, etc. Don’t forget the outside faucet if your motorhome is equipped with one. The icemaker is a little more difficult to access, so one simple way to flush it is to turn on the refrigerator and allow the icemaker to cycle through several trays of ice. After two or three cycles, the ice should be clear and not pink. For added assurance, you can also switch the system back to city water and continue running more fresh, clean water through all the faucets. This procedure will ensure every possible water line is flushed.
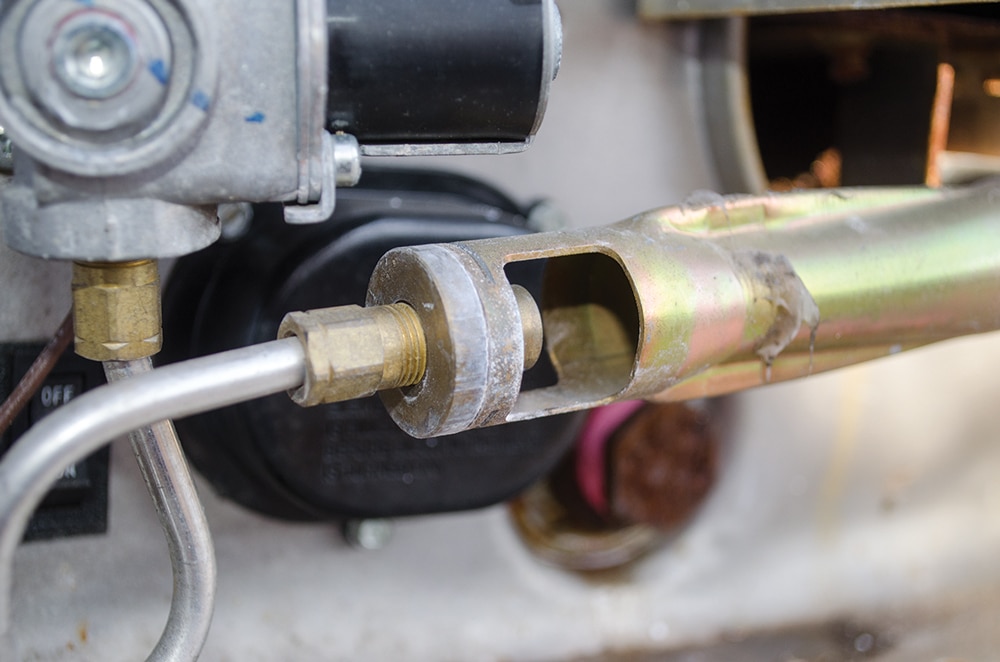
Carefully inspect the burner tube and the flue of all gas-operated appliances such as the water heater and refrigerator. These are common areas for insects and bees to build nests that need to be removed before lighting the burners.
Now that the water system is purged of antifreeze, the next step is to sanitize the water lines. A normal 60-gallon water tank requires approximately 1 cup of chlorine bleach added to the full freshwater tank. Next, switch the water flow valve to pull water from your tank instead of using the city water. Then, go to each faucet and run the water for a few minutes to ensure you are getting the bleach solution into the lines. Do this at each fixture, and then allow the system to sit a minimum of four hours. This gives the bleach time to kill most anything that is in the lines. After four hours, dump the freshwater tank and go back to city water and flush the lines again with clean city water from the connected water hose. Don’t forget to change out your in-line water filter that connects between the water hose and the coach. Usually this is a cartridge filter that is accessed in the plumbing bay and it is this filter that helps keep the drinking water clean and free of debris. You can further eliminate any remaining bleach taste or odor by adding a small quantity of baking soda to the fresh tank and circulating that water through the system.
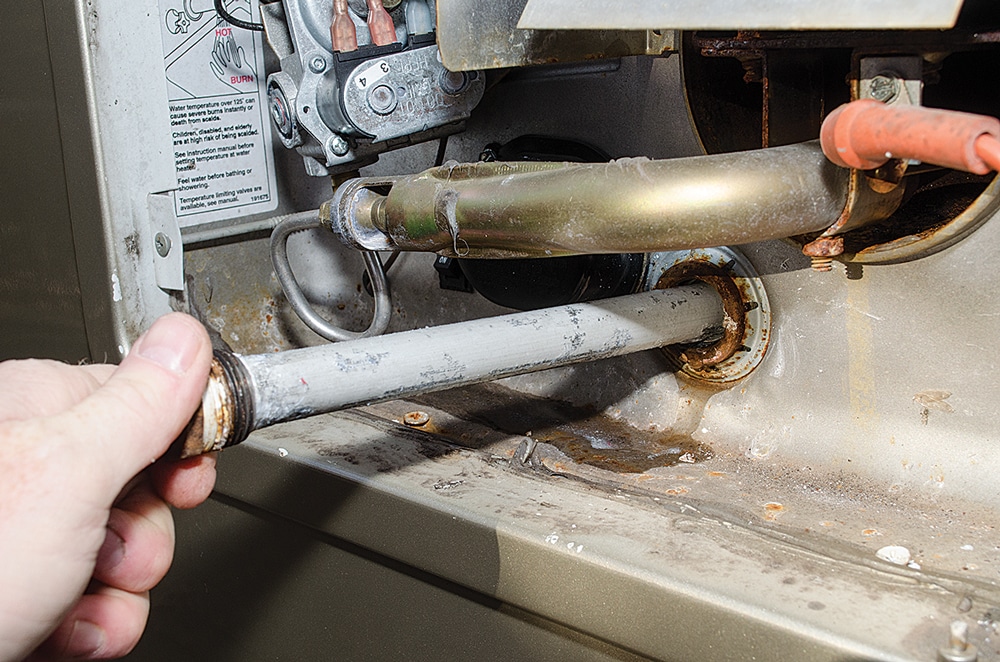
Inspect the anode rod in the water heater (if so equipped). This one is in near-perfect condition and will be reused.
Next, you will need to drain and flush the gray- and black-water tanks to remove the bleach-and-water mixture; otherwise the tank deodorizer chemicals may have difficulty working properly with the bleach water still lingering in the tanks.
Another common problem in motorhomes during storage is bugs and rodents. While you are in the coach, inspect it top to bottom and front to back for any signs of an unwanted occupancy. Many owners (including myself) use bug bait traps (small plastic bait stations) that help prevent infestation. Each spring, these need to be replaced to help get ahead of any bug problem that may be coming your way. You should also completely inspect all the under-dash wiring as well as closets and drawers to make sure that rats or mice are not setting up shop in your motorhome.
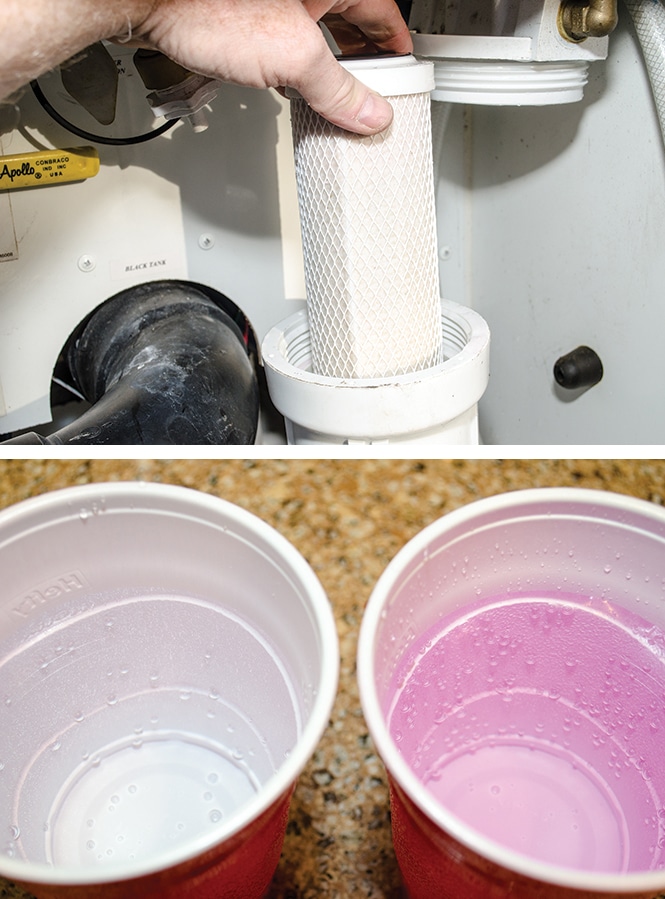
Installation of a new water filter is always a good idea. This helps keep your drinking and cooking water fresh and clean. One easy way to make sure your water lines are purged of antifreeze is to fill up a white cup with the water from each faucet. The pink color can easily be seen this way and prevents you from not flushing the lines completely. Ice made from the icemaker can be placed in a white cup and inspected as well.
Bugs like to take shelter in the water-heater burner tube as well as the exhaust area of propane-powered refrigerators and furnace combustion air intakes because the critters seem especially attracted to the lingering small of propane. Be sure to inspect these areas before using the appliances.
If your coach uses propane for the water heater and/or stovetop burners, you should take time to check their operation as well. After a long time in storage it usually takes several attempts for the burners and water heater to light, so be prepared for it to cycle several times before lighting. Of course the hot-water tank needs to be full of water before you turn on the water heater and this is true if you are using electricity or propane. After you finish testing all the propane-fueled devices, you should also check your fire extinguishers. Most of them have an on-board gauge or a printed expiration date. If in doubt, buy a new one before you go on your first trip. If all you have is the tiny little baby-size extinguisher that came in a recessed wall mount, do yourself a favor and buy a serious-size larger model as well.
After sitting all winter, the entire inside of the motorhome is likely in need of a full cleaning as well. This means all the floors, fixtures and cabinet faces, as well as the dash, closets and bathroom(s). This part of the cleanup is a lot easier if you previously did a thorough fall winterizing cleanup by removing all stray cooking oil splatters, grease on surfaces near the kitchen and the like. We prefer to use a disinfecting cleaner followed by a liberal use of a good air sanitizer. After that, you might also open all the exhaust vents and turn on the fans to pull in some fresh springtime air and get rid of that old, musty smell.
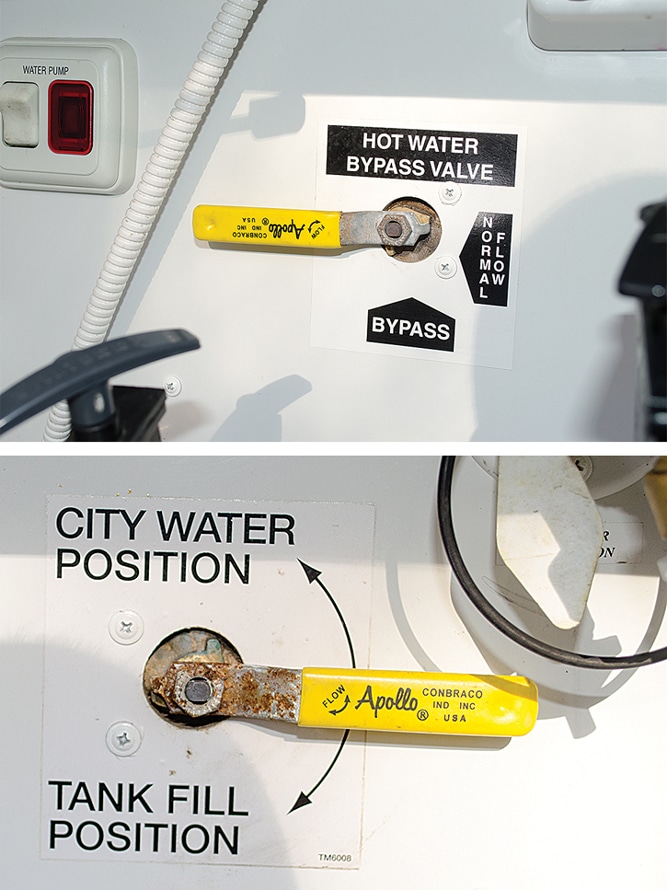
The water-control valve is usually found in the wet bay and it controls the freshwater flow into or around the water heater. When flushing, make sure you rotate the valve to the correct position for either filling up the on-board tank, or to run the coach from city water as indicated here.
Speaking of air, don’t forget to check the air pressure in all of the tires. Using a good quality tire pressure gauge, check each tire and bring it to the correct cold inflation pressure according to your axle weights. Usually, there is a chart inside your owner’s manual that you can reference after you know the exact weight of your loaded motorhome. When in doubt, just inflate the tires to the recommended pressure on the vehicle’s tire information placard. You should also carefully inspect the sidewalls of each tire and verify that the tires are still serviceable according to the Department of Transportation (DOT) date code. Most manufacturers suggest replacing tires every seven to 10 years, even if they are not showing signs of cracking.
The battery bay is another area that is prone to problems after extended storage. Inspect all the terminals for signs of corrosion and, if you are using flooded cell lead acid batteries, make sure you check the electrolyte level and add distilled water if needed. If you can’t remember the last time you equalized the house batteries, it may be a good idea to refer to the owner’s manual for your charger and equalize them now (gel cell batteries do not require equalization).
Even though many owners completely service their coach before storing it in the fall each year, it is always a good idea to check the engine oil, coolant level and transmission fluid levels. These are all routine things most people check often anyway, but it’s been a long time since last fall and this ensures the engine is ready to go when you are. After you finish this basic check, start the engine and allow it to idle for 5-10 minutes. This gives you and a helper just enough time to check the brakelights and headlights as well as the turn signals.
A full spring cleanup can be accomplished in a few hours and is definitely worth the small investment in time now as opposed to waiting until you are off on a trip.
If you use insect traps, replace them in spring before you head out on your first trip. This step can dramatically reduce the chance of bugs moving in with you during your travels.
Nothing spoils a trip faster than getting to a great new place and spending the first two days trying to get your coach operating properly or finding someone to do the repairs for you. It is so much easier and more convenient to follow these simple steps and then your vacation can be used for fun.