Furrion stereo components and a MORryde TV mount move the audiovisual experience to new heights
RVing is no longer only about going outdoors. It’s about having all the comforts of home, especially if you spend extended time in your RV. Additionally, many folks today consider their electronic connectivity an extension of themselves, so their motorhomes are starting to reflect that identity with individualized electronic immersion.
In the not-too-distant past, electronic entertainment systems for RVs were marginal, to say the least. Even though some RV stereos would promise things like USB and Bluetooth connectivity, the firmware and components were rarely up to the task and often out of date. But demand for new and better systems has not escaped the manufacturers, and new motorhomes often have a selection of good components to choose from, and in some cases, excellent components. And RV owners who would like to upgrade also have access to these improved components.
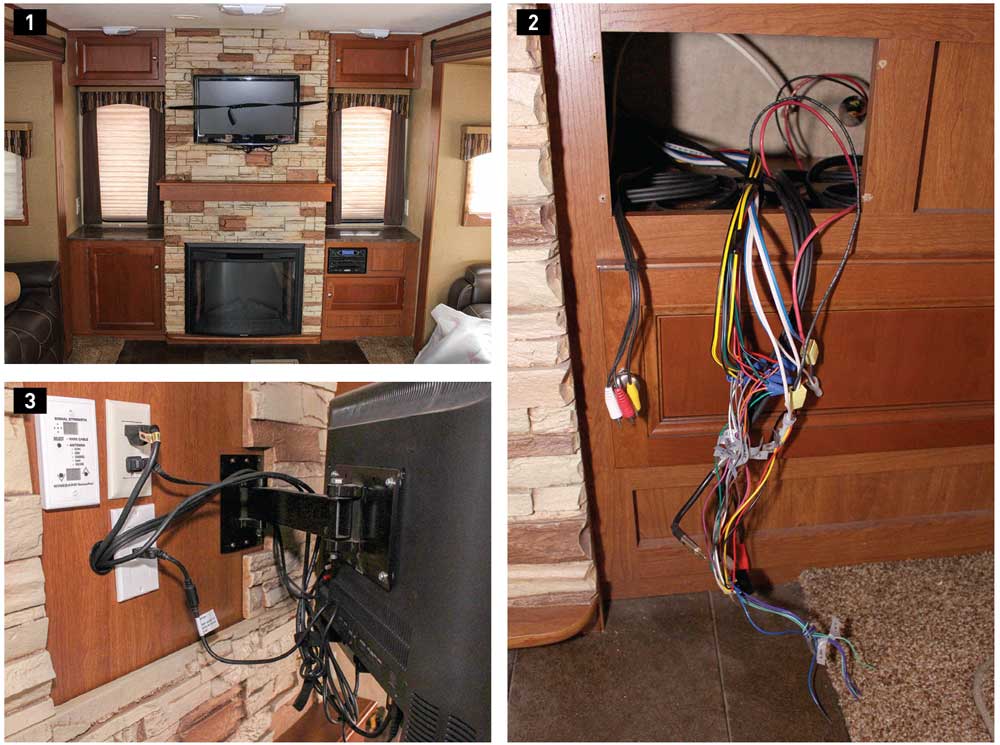
1) The original entertainment system, which consisted of a basic DVD stereo and a TV held to the wall with a vinyl strap for transit, was adequate but needed to be updated.
2) Removing the stereo revealed the wiring harness and RCA connections to the factory-installed TV. These had to be changed to a new harness, and an HDMI cable was added for the HDMI-ARC feature. 3) The original TV has a basic nonlocking articulating mount that didn’t reach out far enough for good viewing from the couch or the theater seating. Also, there wasn’t enough wiring for the entertainment system to connect to the TV.
One of the relative newcomers to the American RV market is Furrion, an Australia-based company that joined with Lippert Components to provide mobile-optimized electronics for the RV and marine industries. To check out some of the latest offerings, we upgraded the entertainment system in a test RV, which has a large living area with an electric fireplace.
The original system included an inexpensive 26-inch TV on a simple mounting arm above the fireplace, and the buckled strap that secured the TV for travel had scratched the screen. The stereo was basic RV fare with a DVD player and inexpensive 8-inch single-cone speakers mounted in the ceiling in the living room, bedroom and exterior wall under the awning.
Installation Tips
- Buy a coax stripper, crimper and professional RG-6 connectors, and always use RG-6 cable.
- Shop at RV-surplus warehouses for supplies and components such as screws and laminate tape for cabinetry.
- Map out your system and measure before buying.
We had added a satellite system and Blu-ray player, with audio that fed to the stereo, and HDMI and RCA (component) cables that fed through the cabinet up to the TV. Any streaming device, like an iPhone or iPod, was connected using a 1â„8-inch double-male stereo cable to an AV input on the front, because the USB provisions were even older than our iPod. The functionality and sound quality of the system were OK but certainly nothing to excite the senses.
To upgrade the system, we evaluated the type of components that would make sense for the RV and mounting options. In many cases, component upgrades can be a simple replacement, but not in the test RV. This became more apparent after we received the components we picked, but more on that later.
4) The framed wall, designed for the old TV mount, was modified for the new mounting bracket, which attached to the wall in the center behind the TV. We stripped the wall and added a 2×6-inch board for this modification. We used 2×6 lumber because that was what the manufacturer had used in the wall, but the TV is light, and smaller dimensioned lumber could have been used. 5) Upon opening the wall, we found bad coax connections that were the source of an annoying static condition. We replaced all the connections with professional-grade RG-6 connectors. 6) Additional HDMI cables were routed to the entertainment center; one existing cable was reused, along with the component cables for connecting to the system components, including the Furrion stereo.
The first consideration was to upgrade the TV. After taking measurements, we could fit a 32-inch unit comfortably on the wall without it overwhelming the space; the next size up, 48 inches, was way too big. We wanted an LED HDTV with several HDMI inputs and component connections. Because the TV was to be mounted in an RV, we wanted it to be well made to handle the abuse on the road. In addition, we wanted a stable TV mount that would allow us to eliminate the strap.
From a componentry standpoint, we wanted a stereo with good sound, a DVD player and HDMI connectivity, plus inputs and outputs. We wanted additional connectivity, like the stereo in our truck, so we could use Bluetooth, USB and a front auxiliary input. The stereo also had to support multiple speaker zones, so the bedroom and outside speakers could be isolated, and we wanted to upgrade the speakers to improve the sound in the living room, especially while watching TV.
After studying the options from Furrion, we chose the FEHS32D9A 32-inch LED HDTV (MSRP $502.95), the DV3300 stereo head ($297.95) and the new FSBT43S-BL sound-bar speakers ($105.95/pair). To mount the TV, we went to MORryde, a company well known for its RV-suspension upgrades, for one of its wall and cabinet mounts. For this project, we choose the TV1-087H self-locking articulating-arm mount ($154.99).
The TV and stereo head work seamlessly, as designed. They connect via HDMI with ARC (Audio Return Channel), which allows audio produced by the TV to be sent back to the stereo so it can be heard on the stereo speakers. All the components, including the Dish satellite receiver, Blu-ray player and VCR (yes, we still have one), feed directly to the TV – all but the VCR using HDMI. In addition, the over-the-air antenna and park cable connections come to the TV from the Winegard SensarPro digital signal-booster unit.
Summarily, anything watched on TV is heard in stereo through the sound-bar speakers; no audio connections need to be made to the stereo. The two units communicate in the background, so a change in the input of one reflects in the other. When a DVD is inserted in the DV3300, the TV will turn on and go right to the correct input. Play a Blu-ray disc, and the TV and stereo will change inputs.
The DV3300 stereo has full Bluetooth connectivity with most smart devices and features NFC (Near Field Control), a convenient way of pairing an NFC-compatible device just by touching it to the Furrion label on the front of the stereo. The Bluetooth connectivity not only supports phone functions (a microphone is on the front of the stereo) but also allows audio streaming from the wireless device. In addition, by downloading the iOS or Android Furrion EC Control App, the DV3300 can be controlled from a smart device, making it possible to stream and select music, and control the DVD player, the radio tuner and just about every other function from another room or even out under the awning.

7) The finished TV installation required moving the receptacles and cutting the stone facade. We filled in the remaining holes with putty later. The large hole in the panel was disguised with matching laminate tape acquired from an RV-surplus store. 8) Rewiring the stereo head was easy but required modification because the new unit had two speaker zones instead of three, which required adding a Pyle PVCS2 speaker switch.
9) Once the speaker switch was installed, the living room speaker bars were on “A” and the bedroom and outside speakers were on “B,” further split on the Pyle switch and marked. 10) The Furrion speakers can be hardwired or connected using the included spade terminals.
The Furrion sound-bar speakers are a marked improvement over the original round paper-cone speakers. Designed as an alternative to the company’s large sound bar, these are designed to replace the ceiling speakers found in most RVs, and with the separate tweeter, provide much nicer sound. An optional subwoofer is available from Furrion to make the sound even better; however, in our case, there was no place to install it without losing cabinet space, and we’re already self-conscious about volume-related thumping disturbing the neighbors, so we opted not to install one.
Furrion’s universal remote is provided with the TV, and it does an excellent job controlling all the components. Just about every feature of the stereo can be controlled from the TV remote, including answering and hanging up the phone. The stereo also comes with its own credit-card-size 48-button remote, which controls everything on the DV3300, but the larger TV remote and mobile app are better options.
Installing the system required quite a bit more work than was originally anticipated and called for some extensive wiring and carpentry. Once the system was laid out, we discovered a few things that could not be predicted in advance. None of these issues stopped us from upgrading the system, but many more hours of work were involved.
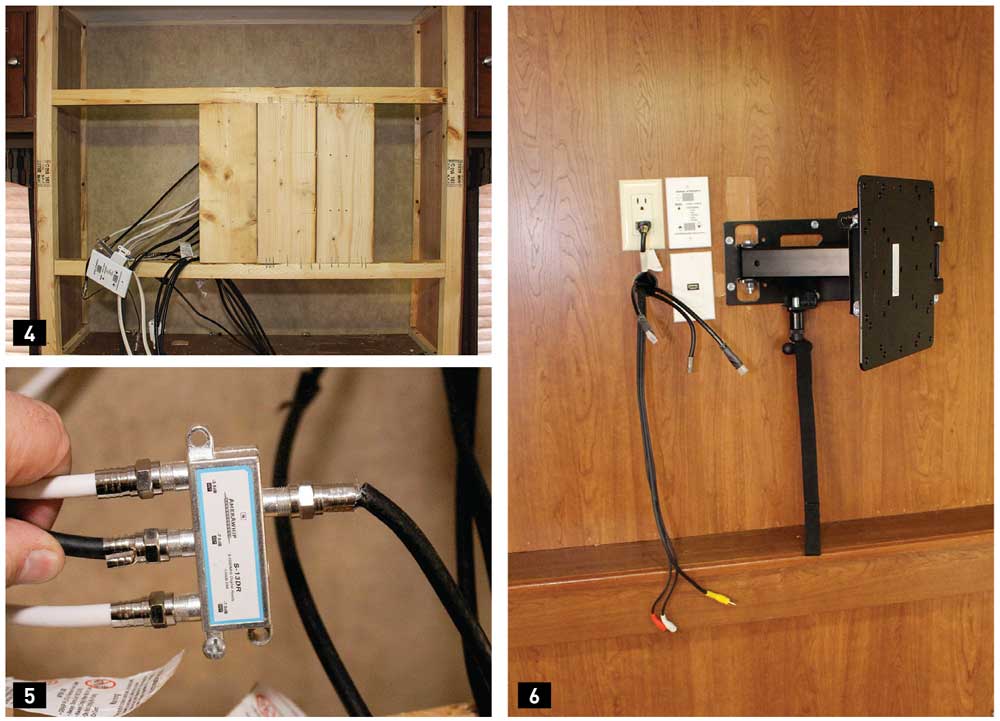
First, the original TV was mounted to a simple swing-away bracket that was attached to framing in the fireplace wall to the right side and center of the TV. The new MORryde bracket was much heavier-duty, and it mounted dead-center behind the TV, which is relatively universal. In this case, there was no mounting support in the wall. In addition, there were no HDMI cables running from the stereo and the Blu-ray player to the TV, so those had to be routed.
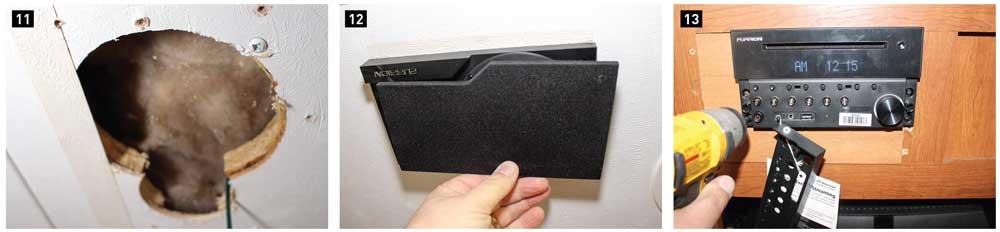
11) The hole from the original speaker had to be opened and adjusted for the new speaker. This was a better option than pulling down the ceiling panel and cutting in a new opening. 12) The new speakers look good and sound better. 13) The stereo head attaches with four screws under the lower faceplate, which snaps back in place. A new cabinet style to fill in the larger hole from the old stereo was as close to the original as possible; larger holes were filled in later with matching putty.
All this required removing the faux-stone facade, the fireplace and the upper-cabinet lauan paneling. Once the wall framing was accessed, a 2×6-inch backer was added. This also allowed routing of the HDMI cables down to the stereo cabinet.
In most cases, you won’t be able to strip the wall where the TV attaches, so knowing where the TV backers are and what they can hold is important. Finding the backers in a wood-framed cabinet or wall is easier; RVs with laminated side walls should have aluminum plates built into the wall that are location marked. A call to the RV manufacturer may help identify TV-backer locations and how much they can hold, but only a few will have this information available, so don’t count on it. Attaching to cabinets and countertops is much more straightforward.
Wiring the DV3300 was a little more of a challenge in that the stereo has a two-zone-speaker setup instead of three. In this case, we still wanted to be able to separate the inside and outside speakers, so we shopped online for a Pyle PVCS2 in-wall speaker switch (around $14) that allowed us to split the second speaker output into two: one for the bedroom and one for the outside speakers.
When switching wiring harnesses from the old stereo to the new, switch one circuit at a time. Feed the second speaker output to the input of the speaker switch, then attach the two sets of speakers to the A and B positions, respectively, and you’re done.
We had to locate RV-cabinet stock to fill in the hole where the original stereo was mounted and make a base for the DV3300. The back of the DV3300 is a single-DIN size case, and the stereo attaches to the cabinet via four screws on the lower section of the face, underneath a removable plate.
Installing the sound-bar speakers took some careful consideration and modifications as well. Our original idea was to install them in the fireplace cabinet above or below the TV. We came to realize that the cabinet was not “tight” enough for speakers, and with the faux-stone facade, we were concerned about vibration noise. To compensate, the living room speakers in the ceiling were replaced with the sound-bar speakers.
While the wiring was adequate, the hole was not the right size or shape, so after careful measuring and cutting with a hole saw, space was made for the tweeter, and the slight gap left by the original speakers was masked with matching ceiling-seam tape, purchased with the cabinet stock at an RV-surplus warehouse.
The Furrion equipment, built and tested for the rigors of RV and marine use, works as promised and provides a satisfying entertainment experience. The MORryde TV mount is rock solid, locks in place and allows the TV to be pulled out and turned toward the couch or theater seating so there’s no neck twisting to see the screen. All in all, the result was a tight installation that looks and sounds far better than the previous setup.

Furrion, 888-354-5792, www.furrion.com
MORryde International,
574-293-1581, www.morryde.com