Running a typical forced-air furnace on LP-gas is becoming a more expensive proposition, obviously because propane has skyrocketed in price. Many owners who camp with hookups will use portable electric heaters (or heat pumps, if so equipped) to offset some of these costs, as long as the outside temperature is not too severe. Bothell, Washington-based RV Comfort Systems has developed a product that adds an electric option to most RV forced-air furnaces, giving owners added heating flexibility.
Similar to water heaters equipped with an electric option, RV Comfort Systems’ solution allows users to choose between electric or gas heat. The CheapHeat electric add-on system is so efficient that some owners could make it through an entire winter without the need to refill the propane tank/cylinders. Depending on how the RV is used and other factors explained below, the savings on propane alone could eventually pay for the CheapHeat system, especially for full-timers.

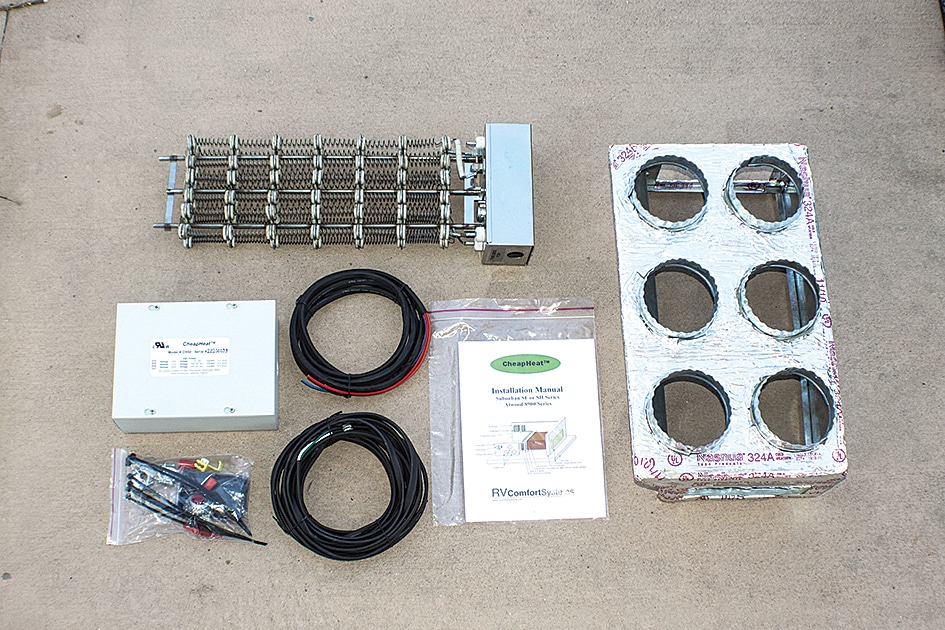
The plenum normally arrives in the kit without the ducting holes, but was factory predrilled for the specific furnace used in the test installation.
Electric heating coils and the controller are the key components of the CheapHeat system. Three models are offered, so the chances of retrofitting just about any furnace are pretty good. The uniquely designed heating coils are highly efficient and fully protected by a fusible link safety device that prevents overheating if the blower motor fails.
The CheapHeat’s specialized controller is designed to receive a signal from the furnace when it’s time to cycle on, activating the heating coils and sending warm air through the existing system of ducting and registers using the furnace’s blower motor. A switch allows the user to choose between gas and electric heat.
Another benefit of the CheapHeat system is the elimination of cold air blowing during pre-cycling without heat until ignition, as well as the post-cycle cool down. Also, the blower motor is likely to last longer, since it will not be subjected to the intense heat that surrounds it during normal heat cycling in the gas mode.

The heating element is equipped with a fusible link that prevents catastrophic failure.
A few things have to be considered when ordering the CheapHeat system. The cabinet adapter must be ordered to mate to the existing furnace brand, which will be a Suburban or Atwood. It’s also critical that the RV can handle the power requirements of the electric coils. There are three available models. The DH-50 puts out the most heat and draws 21.6 amps from each of two legs of 120-volt AC power. The middle unit (DH-37) draws 15.6 amps from each of two 120-volt AC legs and the smaller system (DH-18) draws 15.6 amps but from only one 120-volt AC leg, which makes it the only unit that can operate on 30-amp service. The other two require 50-amp service.

Flexible ducting is routed from six ports in the stock Suburban furnace in the test fifth-wheel.
Cost also needs to be measured. The manufacturer provides a chart that equates the output of each CheapHeat model to a standard gas-fired, forced-air furnace used in an RV. The claims are based on 60 percent efficiency of the gas furnace, which is somewhat controversial. All RV furnaces are AGA (American Gas Association) certified to be 80 percent efficient, but testing by RV Comfort Systems technicians reveals that that figure may be a little optimistic. No doubt RV furnaces suffer from efficiency losses; you can experience that by feeling the amount of heat that blows through the exhaust. In some cases, the bluing of the metal exhaust shroud suggests that the temperature has reached higher levels than what is expected of a furnace that is only losing 20 percent efficiency. Nevertheless, the subject continues to be debated and buyers need to be cognizant of the numbers when trying to amortize the cost of the CheapHeat addition.

The ducting and collars are removed from the rear panel of the furnace to start the installation process.
There’s no question that the user will save money running the electric heat when hooked up to power that is not metered. In many cases, there will also be savings when staying in parks with metered electric, which is normally the case when full timing, but that depends on the cost of electric and LP-gas — and, of course, outside temperature and desired comfort levels.
Installation of the CheapHeat system requires a working knowledge of AC wiring and electrical codes. The company recommends that a certified RV technician performs the retrofit.
The heat plenum adapter adds 6 inches to the back of the furnace, which means that adequate space is required. Prior to installing the plenum adapter, the technician will have to notate the number of flexible heat ducts connected to the existing furnace and drill the appropriate number of holes in the plenum using a 4-inch hole saw following the chart diagram in the instruction manual. Once that’s completed, the duct collars are installed and the tabs bent back 90 degrees, securing the collars to the plenum adapter.

On this Suburban furnace, pliers were used to fold the tabs flat on both sides of the furnace to allow the new plenum to fit properly.
When installing the heat coils into the plenum adapter, it’s important that the fusible link is at the bottom. From here, all the collars and flexible ducts are disconnected from the furnace prior to installing the plenum adapter assembly onto the rear of the furnace. For maximum airflow, the joints should be sealed with 3M high-temperature metal tape (not supplied).
Before attempting any AC wiring, the RV must be unplugged from shorepower (and inverter off, if so equipped). All wiring should be 300 V NEMA rated and meet all national, state and local codes. The wiring exercise requires routing low and high voltage wires from the shorepower junction box to the disconnect switch to the CheapHeat controller box, and hookup of the changeover switch. A wall in the furnace compartment was 2 feet from the incoming 50-amp service panel and 3 feet from the furnace, which simplified the three-hour installation.

After the heating element is installed into the plenum, the plenum is installed to the rear of the furnace and high-temperature aluminum foil tape is used to seal the edges.
It’s best to mount the controller and the two 30-amp breakers (purchased from a home improvement or hardware store) within 10 feet of the furnace. The obvious choice for mounting the gas/electric selector switch in the test trailer was near the existing wall thermostat that controls the air conditioning and heating. After establishing there was enough clearance to run the wiring to the controller, the switch was easily cut into the wall.
seveAfter double-checking all wiring connections and plugging the rig into shorepower, it was time to perform a run test. This is performed by turning the changeover switch to the gas position. The thermostat was set to the “heat” position and 10 degrees higher than the inside room temperature. The furnace came on and the gas ignited. Once gas operation was verified, the thermostat was turned off, the changeover switch moved to the electric position and the thermostat turned back on. When the switch is set to electric heat, the thermostat wire to the circuit board/gas valve is interrupted so the burner will not ignite. Power is then routed directly to the fan motor, which pushes the air over the heated electric coils that are also activated. The fan and the CheapHeat came on instantly. Allow the system to run for the recommended 20 minutes the first time it’s operated to burn off any residue and make certain there are no problems.

At the top the junction box for the 50-amp service is installed. Below is the disconnect switch, and to the right the system controller is mounted.
In the first week the CheapHeat was tested in a high-altitude park in Colorado where the temperature was very cold. The system we installed requires 50-amp service, which the park had. The electric heat raised the temperature rapidly and felt every bit as warm as the gas heat. Thanks to CheapHeat, we saved substantial money on propane since we were able to use the electric heat exclusively, and the electric power was not metered. It was also nice to eliminate the 17-mile trip to town necessary to re-fill the propane cylinders.
The CheapHeat system is a practical solution to the high cost of LP-gas and may be amortized over a short period of time, especially if the RV is used in cold climates and in parks where electric is included in the site fee. All three models come standard with a one-year limited warranty and retail prices ranging from $249 to $695.
RV Comfort Systems
425-408-3140 | www.rvcomfortsystems.com

The orange, 10-gauge Romex runs between the J-Box to the disconnect switch to the controller then runs down to the heating element. The flexible heat ducting is attached to the plenum.

The two circuit breakers were purchased from a local home improvement center.

Before installing the Scotchlok on the air switch wire make sure the correct wire is selected. The Scotchlok connects the wire from the controller to the fan motor feed wire.

It takes patience to follow the color-coded wiring diagram, but the instructions walk the installer through the process.