Whether it’s heating or cooling or cooking or refrigeration, your RV systems need proper care to keep them happy and healthy
The appliances in our RVs help make them comfortable homes away from home. But like anything mechanical, they need scheduled maintenance for continued efficiency. Ignore them, and you could end up with an unexpected problem that can impact any trip.
While general maintenance procedures for air-conditioning, cooking, heating, refrigeration and water-heating appliances are included in this article, it’s important to follow the instructions outlined in the specific owner’s manuals. Manuals for many common RV appliances can be found on the websites listed in each section.
Some appliance maintenance requires significant disassembly, special tools and equipment, and opening the LP-gas system. If you are not comfortable with these operations or don’t have the proper equipment, see a certified technician for the service of that appliance.
Air Conditioning
RV air conditioners come in a range of sizes and styles, but the most prevalent are roof-mounted 13,500- and 15,000-Btu units that are either ducted or direct-vented, meaning they have a plenum on the ceiling (usually fitted with the controls) that blows cool air directly from the unit. Some ducted systems have a direct vent as an added feature. Some smaller trailers come equipped with small-box air conditioners mounted in the side wall of the trailer.
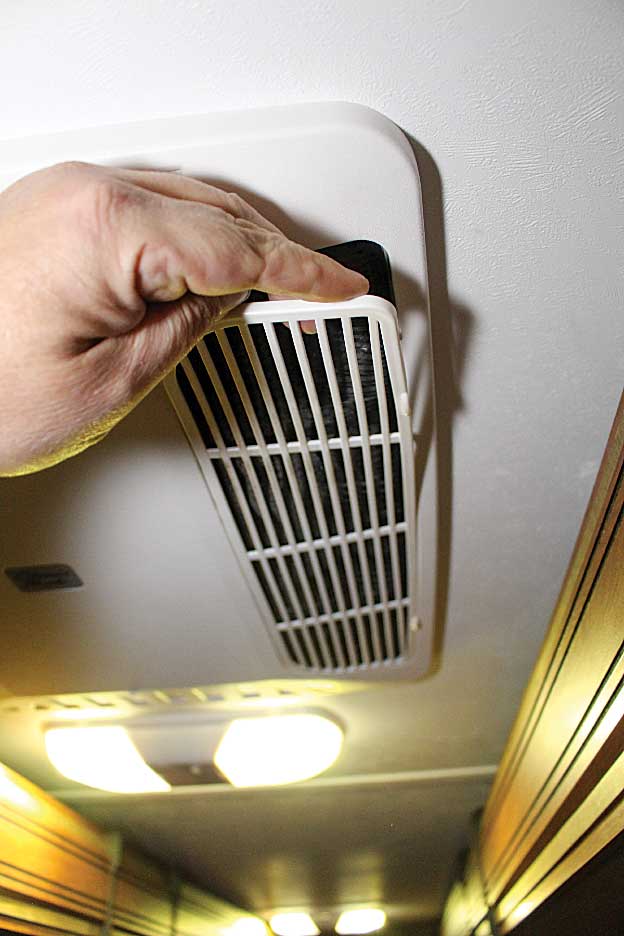
Air-conditioner maintenance is remarkably simple, as RV units are sealed from the factory without recharging ports and solid-state control systems. The most frequent maintenance requirement is to keep the return-air grille and filter clean in the ceiling unit, and it is essential to do this at least monthly during heavy use and more often in dusty conditions. These filters are important, as they keep dirt and dust from getting into the evaporator fins, plugging them and preventing airflow, and causing freeze-up and frosting.
It’s also important to keep an eye on the components under the air-conditioner shroud on the roof. The inside of the unit should be kept clean and free of leaves, pine needles, wasps’ nests and other detritus. Mildew or dirt that accumulates under the shroud should be removed. Condenser fins should be clean and unbent. Carefully flushing the fins with water should suffice for cleaning. Bent fins can be straightened with combs that are available from HVAC-supply stores.
Since the air conditioner is sealed from the outside rooftop, spraying water on the fins shouldn’t create an issue with moisture penetration. If the air conditioner is excessively dirty, however, removing the unit from the RV before cleaning may be preferred. Many air conditioners have their electronics in the outside section, usually under a small metal cover, so when cleaning the unit, the power must be disconnected and the electronics protected from overspray.
Many new RVs have H-ducted roof systems with separate ducts for the registers and return air, and no central ceiling unit. In this case, the return-air grille has a small filter that needs to be removed and cleaned in the same fashion as the others.
A properly operating air conditioner should produce about a 20-degree-Fahrenheit difference in temperature between the return air and cooled air from the register closest to the air conditioner. For example, if the air going into the unit is 100 degrees, 80-degree return air is appropriate.
- MAINTENANCE TIP: Anytime you look up at the ceiling unit and see dust, it’s time to clean the return-air grille and filter. Simply remove the grille (this procedure differs by brand and model, so check the owner’s manual), remove the filter, thoroughly wash it in the sink and let it dry before reinstalling.
Resources
Airxcel (Coleman-Mach) | www.airxcel.com/coleman-mach
ASA Electronics (Advent Air) | www.advent-air.com
Atwood Mobile Products (Air Command) | www.atwoodmobile.com
Dometic (Blizzard, Brisk, Penguin) | www.dometic.com
Cooking
Of all the cooking appliances found in RVs, LP-gas-powered ranges require the most maintenance, but the procedures are not difficult. These are pretty simple devices that, as long as they receive the proper LP-gas supply, should work as designed.
Cleanliness is the key to maintaining an RV range, as spilled and burnt food and liquids can block LP-gas ports on the cooktop. Debris left under the cooktop on unsealed models is an attractant for pests.
On most cooktops that can be opened, the grill can be removed by pulling it forward and lifting it straight up to unlock it (it has spring clips in the rear). Pins in the rear act as hinges, and the unit should be able to be lifted off the pins and set aside. Clean this whole area thoroughly.
Each burner secures to the bottom of the pan with a single screw and may have an igniter wire attached. There’s seldom a need to remove these, unless a major spill results in plugging of the little holes, or ports, in the burner or some of the “jets” fail to light. In this case, the burner can be cleaned after removal by pulling away from the valve manifold at the front, being careful not to lose the plastic grommet at the manifold, if it has one.
The burner can be submerged in hot, soapy water and scrubbed carefully. Persistently plugged ports can be cleaned with a needle or wire, being careful not to enlarge the ports; wire or bristle brushes should not be used. After cleaning, shake the burner and let it dry, then reinstall and test. Continued problems could signify an LP-gas pressure issue, which should be checked by a professional.
The oven is controlled by a temperature-sensing valve that is mounted to the range-top gas manifold. Routed from the manifold is one tube for a pilot and one for the main burner, and a thermocouple wire running down into the upper rear of the oven box. This thermocouple should remain clean for proper operation, and if it becomes fouled, a light cleaning with emery paper is all that is required. The thermocouple can be removed from the back wall by compressing the spring clips.
Temperature in an RV oven can fluctuate more than in larger residential or commercial models, so using an oven thermometer is recommended, rather than relying on the temperature setting. To avoid burning the bottom of food, get a small pizza stone that fits on the metal tray above the burner. It should be small enough not to block the holes in the sides of the tray. This will help even out the oven temperature, and the higher flame temperature won’t be directed at the bottom of the food.
- MAINTENANCE TIP: To keep the inside of the cooktop spick-and-span, line the bottom with aluminum foil, being careful not to block the ventilation or access holes in the sides and rear. If you have a boil-over or other spill, cleaning up is simply a matter of removing the foil and replacing it with a fresh layer.
Resources
Airxcel (Suburban) | www.airxcel.com/suburban
Atwood Mobile Products
(Atwood Ranges, Wedgewood Vision) | www.atwoodmobile.com
Furrion (RV Chef) | www.furrion.com/kitchen
Heating
Furnace maintenance is very important, with most procedures completed by a certified RV technician or appliance technician who is experienced with burner-assembly removal for cleaning and/or inspection. Return-air rates must be maintained to prevent overheating. Frequent cleaning may be required if the furnace is used often or exposed to excessive dust, carpet lint or pet hair. Depending on the make and model, the entire furnace may need to be removed for service.
[satellite gallery=1 caption=on thumbs=on]When removed, the burner is inspected for heat damage and burn-through, the ignitor is inspected and cleaned or replaced, and gaskets are replaced as needed. Service includes a visual inspection of the inside of the burn chamber, and fans are checked for damage or evidence of rodents’ nests, among other things.
The large air grate in front of the cabinet where the furnace is located does not have a filter. Contrary to popular belief, this is intentional.
Use of a filter here would restrict the flow of air to the furnace, and when dirty, could restrict it enough to cause the furnace to overheat and cycle on and off repeatedly.
The round, flexible furnace ducts are like Habitrail tubes to mice, and they will nest in them, and sometimes even build nests inside the furnace. Any indication of mice in or around the furnace is a problem that should be investigated by a certified technician.
- MAINTENANCE TIP: Never store anything in front of or in the return-
air compartment or vent for the furnace. Keep the furnace ducts clear so air is freely discharged from each register, and keep dirt and debris from falling into the floor registers inside the RV.
Resources
Airxcel (Suburban) | www.airxcel.com/suburban
Alde | www.alde.se/usa
Aqua-Hot | www.aquahot.com
Atwood Mobile Products (Hydro Flame) | www.atwoodmobile.com
Truma (Combi) | www.truma.com/us/en/home
Refrigeration
Cleanliness is important in back of the refrigerator, as air space and ventilation are paramount for proper function. Remove the exterior-access panel and vacuum or sweep the area regularly, or blow it clean with a can of compressed air. Make sure there are no nests or other obstructions in the roof or upper-wall vent. An inspection mirror can be used for viewing up the ventilation space to make sure it is clear.
[satellite gallery=2 caption=on thumbs=on]Rust will often form in the burn chamber and chimney of a refrigerator, just like on a barbecue grill, and will accumulate around the burner, which must be cleaned. Vacuuming, sweeping or blowing out this area with compressed air will often suffice. If there is a lot of foreign material, the ports on the burner appear plugged or burned through, or the flame is not clear blue when operating the refrigerator on LP-gas, removal of the burner and cleaning or replacement may be required.
The electrode-spark gap should be set according to the manufacturer’s specifications when cleaning and reinstalling the electrode and burner. Manufacturers also recommend that LP-gas pressure and electrical voltage be checked.
Cleanliness inside the refrigerator is equally important for proper function and to keep from attracting pests when the RV is in storage. Pay special attention to the door gaskets. Clean any mildew and make sure the gaskets are in one piece and not separated from the door.
Condensation will form inside the refrigerator when it warms after use, and any remaining moisture can encourage mildew growth and unpleasant odors. Refrigerator and freezer doors should be propped open during storage to allow ventilation and keep mold from growing.
For more information on RV refrigerator maintenance, see “Fridge Fix” in the March 2017 issue.
- MAINTENANCE TIP: All RV refrigerators have some type of latch or spacer card that holds the doors open while in storage to prevent mildew and odors. Aftermarket door holders are also available, and towels or crumpled newsprint can be used as an inexpensive alternative.
Resources
Atwood Mobile Products (Helium) | www.atwoodmobile.com
Dometic (Americana, Classic, Elite, NewGen) | www.dometic.com
Thetford (Norcold) | www.thetford.com