Water leakage around an air conditioner means it’s time to replace the gasket before damage occurs
Every year, after the first big rain of the season, it’s not uncommon for RV owners to discover that there’s a leak originating from the air conditioner’s inside ceiling assembly. After a period of time, the weight from the air conditioner compresses the gasket, which starts to work its way loose during travel. Rainwater then finds a path into your RV, creating a stained ceiling and wet surroundings.
Replacing the gasket between the air conditioner and the rooftop is fairly simple. Foremost, if the gasket is in decent condition, the problem can usually be traced to a loose air conditioner and can be remedied simply by tightening the bolts. For that reason, air conditioners should be inspected and/or tightened every six months for the first couple of years to compensate for the compressing gasket.
If tightening the bolts doesn’t do the trick, the gasket needs to be replaced. Gaskets come in two sizes: 14-by-14 inches or 14-by-16 inches. If you know the model of your air conditioner, a call to the manufacturer usually will confirm the size. If not, just remove the interior ceiling assembly and measure the gasket from the inside. While there are a few styles of gaskets on the market, it’s best to purchase one that’s made of black neoprene foam; cost is around $25, and they are available at most RV dealers and RV supply stores. Do not purchase the white universal air-conditioner gaskets; they will not hold up.
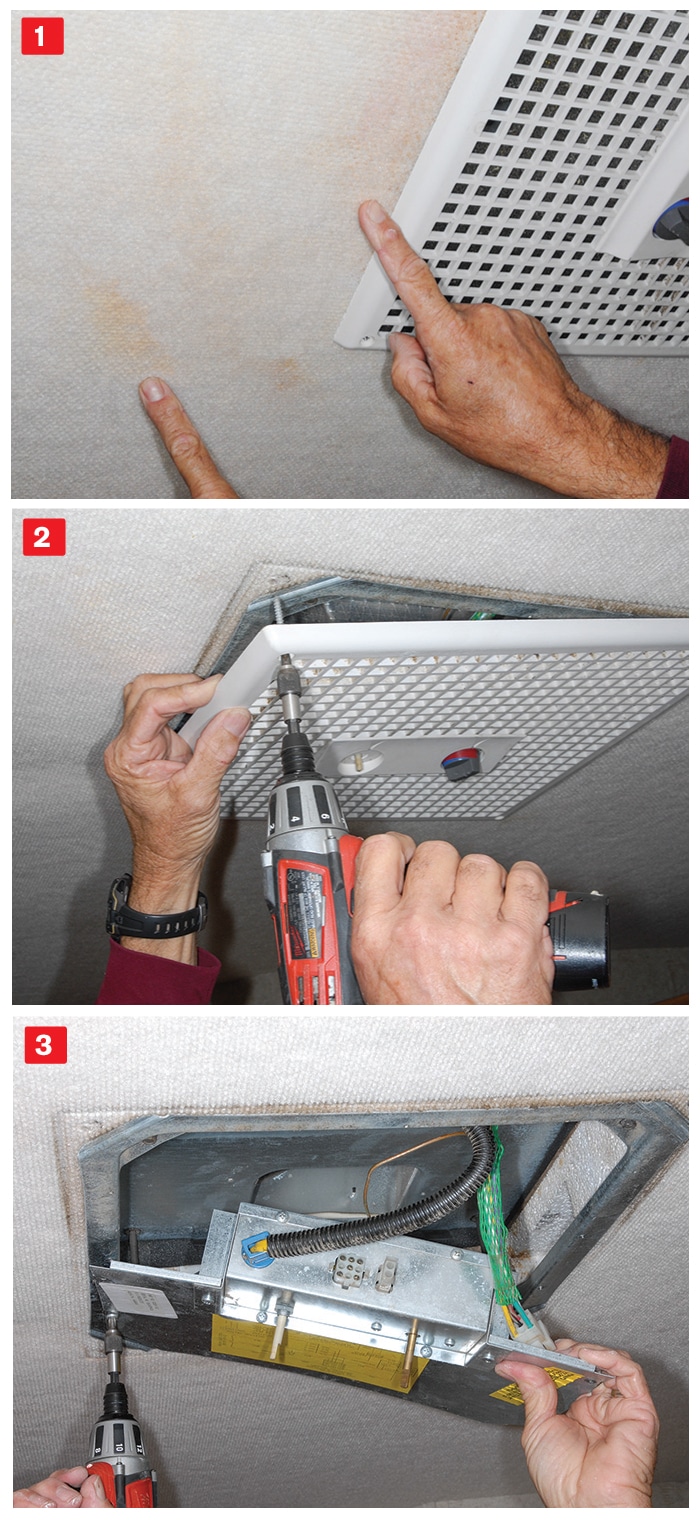
Installation is quite simple but requires a second person. To get started, make sure the RV is unplugged from electrical power and remove the ceiling assembly.
Once the underside of the air conditioner is exposed, disconnect the electrical connections from the upper unit to the ceiling assembly. In most cases, the Romex 120-volt AC supply wire does not have to be removed. Once the bolts that secure the upper unit to the tie-down plate are removed, the air conditioner is ready to be lifted off the opening in the roof. It may be easier to unscrew and lift off the plastic shroud that covers the top of the air conditioner, as this will give you some handholds to properly manipulate the air conditioner back into position during reassembly. We’ve done this job many times, so we were able to leave the shroud in place. With the help of another person, lift the air conditioner and place it on its side, being careful not to lay the unit on its top, which could damage the compressor. Clean and inspect the roof material where the gasket was seated. Mineral Spirits, Simple Green or a similar cleaner will do the job well.
If there are any cuts, tears or holes in the roof material, it will be necessary to make repairs before installing the new gasket. This is most problematic when working with rubber roofs, where the material can be pulled off with the gasket (if this happens, 4-inch-wide EternaBond tape does a fabulous job of repairing damage to the roof area).
Using a sharp putty knife or a scraper, strip the old gasket from the bottom of the air conditioner. While it was simply installed with double-sided tape, over time the gasket can bond to the air-conditioner surface and become difficult to remove. This process will take the most time and require patience.
With the gasket removed, the surface is cleaned with the same product used on the roof. Install the new gasket in the same position. Be careful here; once it sticks, it cannot be repositioned easily. Before the air conditioner is reinstalled, use some type of a straight edge and check the roof for level. Over the years the weight from the air conditioner can cause the roof to sag and make it difficult to stop the leak, even if there is a new seal in place.
If the roof is sagging, carefully lift the roof material (rubber or fiberglass) and install a thin piece of plywood (shim) underneath the substrate. Be sure that the shim is at least an inch wider than the outside dimensions of the gasket. Secure the shim using the correct glue for the particular construction of the RV. There will be no need to use screws for installation, as they can cause additional permanent damage to the roof material. Some service techs suggest using caulking between the gasket and the roof material, but this mistake will make it nearly impossible to remove the air conditioner in the future. If you are the least bit unsure about this shimming process, it’s best to leave it to a professional.
With the help of an assistant stationed on the roof, set the air conditioner back down over the opening and work together to center the unit. Once the position is set, bolt the air conditioner to the roof. There is no specified torque rating for the holddown bolts, so snug them first and finish by giving them three or four turns. Install the upper shroud if it’s been removed, then assemble the ceiling components. Now would be a great time to clean the foam filter with a mild soap and warm water and allow it to air dry.
After the first road trip, remove the inside ceiling assembly and retighten the holddown bolts. Then check again after six months.
Some RV manufacturers use fabric on the ceiling. As the air conditioner leaks, the water will stain the ceiling fabric, as it did on the RV we repaired. These water stains can be stubborn to remove, but a product called InstaGone does an amazing job without user exertion. Simply spray the cleaner on the surface, and the stains will usually disappear. InstaGone also works on wood-panel ceilings. It’s available online.
After a little time and some elbow grease, the leak will be sealed and the potential for future water damage will be diminished.