Getting back to the basics is critical for proper selection, inspection, maintenance and performance
Big tires, as on a motorhome, mean big money. Understanding your motorhome’s tires and taking care of them can save you a lot of cash in the short and long runs, and minimize problems on the road. There are several aspects of tires that owners need to understand. Tire knowledge can be broken into several categories such as, inspection, DOT date codes, load ranges, sizes, care/cleaning, determining and measuring air pressure, and storage.
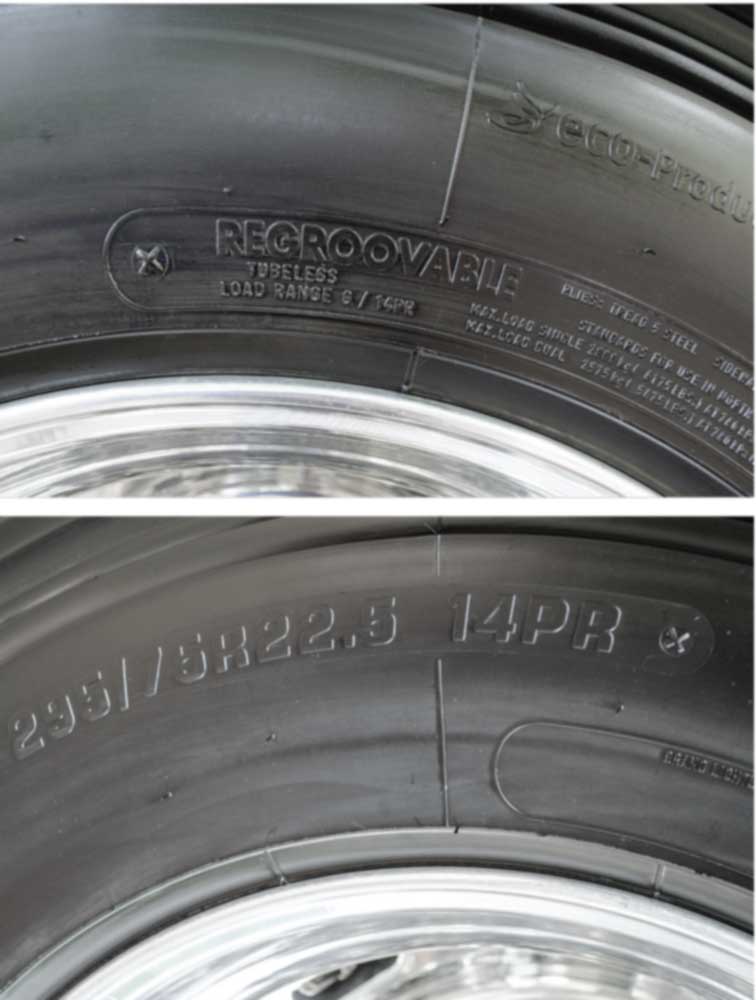
In order to determine the correct inflation pressure for a motorhome’s tires, you need to know the size and load range of tires installed on the coach. That info is shown here on the sidewall of the tire.
Inspection is the first line of defense. Tires can fail for a variety of reasons such as UV/ozone damage, age, road hazards, underinflation and overloading. So, if you are interested in being a good steward of your tires, perform a visual inspection on a monthly basis and before each trip. It is rare for motorhome tires to “wear out” from mileage, but it is still a good idea to check each tire for proper tread depth. Most states consider 2â„32-inch as the very bottom of acceptable for tread depth, but on heavy vehicles with a gross vehicle weight rating (gvwr) of more than 10,000 pounds, many states require replacement at 4â„32-inch on the front axle (steer) tires. Frankly, 4â„32-inch is safer to use as the replacement point on all tire positions for motorhomes. The risk and cost of tire failure is just too high to drive around on old or worn-out tires. For 95 percent of motorhome owners, tires will be replaced from age or sidewall cracking long before the tread is worn out, but tread depth is still part of a good tire inspection.
In addition to looking for obvious problems such as road hazard damage or bulges, you need to also carefully look for sidewall cracking. If you see cracking along the sidewall of a tire you should have them professionally inspected to determine if they should be replaced. Typically, cracks less than 1â„32-inch deep are considered acceptable, but if the cracks reach 2â„32-inch or larger they need to be replaced. Also, if you are able to see the belts or plies of the tires through the cracks, the tires should be replaced. Sidewall cracking can be caused by many factors such as UV damage, improper cleaning chemicals and improper use of tire dressings that contain petroleum distillates, as well as due to environmental ozone and inactivity/improper storage.
While we are on the topic of tire life and inspection, another important aspect is the DOT date code on the tire. Most tire manufacturers state that 10 years is the absolute maximum that a tire should be in use, as long as it has been properly maintained, and preferably covered while in storage. This time limit is from the date of manufacture of the tire, not the date you installed them or purchased the coach. There is a DOT date code on each tire but it could be on the inside or the outside sidewall, so you may have to look on both sides to find it. When buying new tires, personally check the date codes to make sure they are the newest possible. If you allow tires that are already 1 or 2 years old due to sitting in a warehouse to be installed on your motorhome, you have basically bought tires that are already 10-20 percent used up in terms of their useful life. With the expense of tires, that is a costly mistake that can be avoided.
Proper cleaning and caring for your tires are other important parts of making tires last as long as possible. Most tire manufacturers suggest that tires be cleaned with a mild soap. If you are going to use a tire dressing, use one that does not contain petroleum distillates, alcohol or silicone, all of which can be harmful to the rubber used in tires. You would think that all tire dressings would be free of chemicals that can lead to deterioration, but that’s not the case. Many commercially available tire dressings are aimed specifically at the automotive industry, where tires quickly wear out in a few years due to tread wear. Motorhome tires usually fail from sidewall damage, overloading/underinflation or age. Sidewall damage can be caused by improper chemicals being used on the tires. So when selecting cleaners and tire dressings make sure they do not contain the chemicals mentioned above. Proper cleaners and tire dressings may be a little more difficult to locate at the local auto parts store but the extra effort will lead to better longevity.
| [1] In order to clean the tire, first completely wet it, then spray thoroughly with a mild cleaner made specifically for tires such as this one from Griot’s Garage. Some cleaners can damage rubber so be careful and don’t use something that can harm your expensive tires |
| [2] Next you should use a medium-to-soft-bristle brush to scrub the tires to help remove all the dirt and road grime, then rinse thoroughly. |
| [3] The next step is to dry the tires. We suggest that you use a towel or microfiber cloth. |
| [4] In order to protect the rubber from UV rays use a high-quality tire dressing such as 303 Aerospace Protectant. Many tire dressings contain ingredients such as silicone or petroleum distillates that are not suitable for motorhome tires. So be careful and don’t assume that all products sold at the local auto parts store are suitable. |
| [5] After spraying on the 303 protectant, wipe off the excess with a microfiber towel to reveal a beautiful matte finish that is protected from UV damage for many weeks. |
The next facet of tire ownership is determining the correct air pressure for the load and size of the tires and then maintaining it. Tires are made to support a maximum specified load at a given tire pressure and it is important to maintain that pressure in order to achieve the best tire life and ride/handling of your motorhome. The first step in this process is determining the load range of the tires and then obtaining the load/inflation chart from the tire manufacturer. Motorhome tires are usually sold in load ranges such as E, F, G, H, J or L. The load range is molded into the sidewall so it should be easy to find. Once you have the tire brand, size and load range, you can then go to the tire manufacturer’s website and obtain the load/inflation chart. When looking at the tire pressure chart make sure you note that tire information on the chart is listed according to the load range of the tire and the wheel size, as well as the position of the tire. Tires used in a dual configuration are automatically downgraded on weight capacity compared to the same tire used in a single tire position.
When shopping for new tires it’s also important to select a tire size that’s matched to the pressure rating of the wheel and wheel width. Not all wheels are rated to the maximum pressure that some tires are built to carry. Also, some big motorhome tires such as 315/80R22.5 require an oversize wheel width (9 inches versus a more typical 7.5-8.25 inches found on most diesel pushers).
Once you know the load range and tire size, and have the manufacturer’s load/inflation chart, it’s time to weigh the motorhome. Obtaining a “four-corner” weight by measuring the weight on each wheel position is best. On a standard single rear axle motorhome this means you would obtain weights for left and right front axle positions independently, then do the same for the left and right rear axle. If you have a tag rear axle, then you need all six tire positions weighed. Not every scale can provide wheel position weights and there is a certain technique to determine this weight even at a scale that accommodates this process. See the article “Weigh To Go” in the January 2016 issue, or go online to http://www.motorhome.com/rv-how-to/rv-tech-tips/weigh-to-go, for the exact weighing procedures. Alternatively, the motorhome can be weighed professionally at most large RV rallies where vendors will be there offering this service. If it’s not possible to obtain the weight for each wheel position, then measure the axle weights, preferably with the coach loaded, fueled and ready for a trip, and add a 5 percent safety margin. Then select the proper pressure for your tire and weight from the manufacturer’s load/inflation chart.
If you don’t already have an accurate tire gauge for measuring pressure, make it a priority to buy one. If you have an old gauge and you are not sure of its accuracy, take it to a large commercial tire dealer and have it checked against a master gauge. Usually this can be done at no charge.
It may seem obvious, but be sure your motorhome tires are balanced. Some tire shops think it’s not necessary on a larger vehicle, such as a motorhome or commercial truck, but balancing your coach tires reaps the same benefits as having your family car tires balanced. These benefits include, for example, a smoother ride, reduced bearing and suspension wear and tear, and longer tire tread life.
Storage of a motorhome is necessary for many of us who are not able to travel in our motorhomes all year. If you store your motorhome, there are procedures to help preserve the tires while not in use. If you are a full-timer and park your coach for three or more months, consider that your tires are in storage. The first element of defense for tires in storage is to protect them from UV damage. This is easily done by using tire covers. If you are traveling and only stopping for a few days, then it is not necessary to cover the tires, but using a dressing (without petroleum distillates) with a UV inhibitor is suggested. If you are stopping for a few weeks or months, the tires should be completely covered.
Most manufacturers also suggest that the tires be inflated to the maximum rating when stored. Just make sure you reset the pressure before you travel again. The maximum pressure information is usually stamped on the wheel and molded on the sidewall of the tire, so use the lower of the two. When storing your coach, it’s best to park on a level surface that’s free of standing water. If you decide to use something to separate the tires from the parking surface (Michelin suggests plastic or wood), make sure the separator is wider than the tire footprint in both directions so that the tires are completely supported. This is necessary if you have a poor parking surface or if there’s standing water that needs to be kept away from the tire.
Understanding and maintaining tires may seem like a lot of work but if you have ever had a blowout or a flat tire you may have a better appreciation of the importance of tires and their effect on motorhome travel. Take care of them and they will provide many years of service.