Replacing worn-out fabric on a Dometic manual awning is a good way to restore shade and aesthetics
Ultraviolet rays from the sun have been bombarding the earth for millions of years. On an RV, continual exposure leads to damaged plastic components and trim and can wreak havoc on rolled up awnings that are not protected from the sun. Often the top of the rolled awning shreds, rendering the material unsightly at best and dangerous to roll out at worst.
As long as the hardware is intact, there’s no reason to replace the entire awning just because the fabric is worn-out. Replacing just the fabric makes the most sense, but this project, done on a manual awning here, should only be performed by mechanics or do-it-yourselfers who have experience working with awnings.
Most awning fabrics can be ordered via the Internet or through a local RV parts store. Replacement fabric will be a special order since it’s made specifically to fit the length of your awning and particular model. Keep in mind when ordering replacement fabric that in most cases it’s not returnable. Triple-check all measurements and model numbers before ordering.

1) Remove screws that run through the awning rail into the fabric. 2) Remove the lag screws from the front and rear upper brackets. 3) Slide the entire awning assembly out of either end of the awning rail.
If your existing awning still has a tag with the model number and serial number, check with the manufacturer to be sure that it is still the correct model number before ordering new fabric. The model number provides the color and length of the awning. Manufacturers often change colors from year to year, so be aware that the color scheme of your current awning may not be available. On the other hand, this gives you an opportunity to change to a color that best fits the RV’s paint scheme and your personality. Most vinyl replacement fabrics can be shipped via UPS, which is less expensive than using a freight company.
Replacement fabrics come with detailed instructions, complete with pictures. Most can be replaced within three hours. Be sure to enlist several able-bodied helpers and one who can prep the BBQ to celebrate the installation.
Getting Started
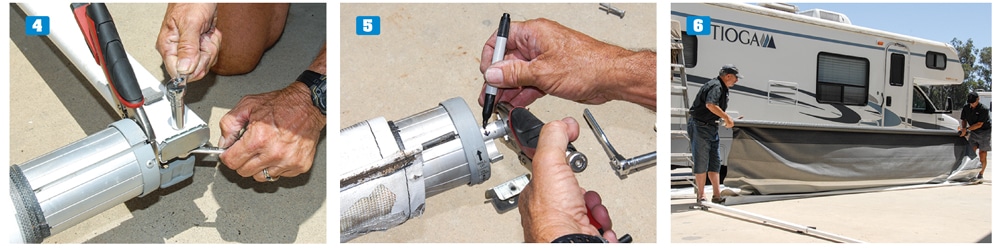
4) Use a pair of Vise-Grip pliers to hold the spring assembly while removing the bolt that holds the upright in place. 5) Mark the direction that you will need to wind the spring assembly before unwinding it. 6) Use the old fabric as ground cover to keep the new fabric clean during installation.
Begin the installation by opening and closing the awning at least twice while carefully inspecting all working parts for any damage and proper operation. Once satisfied that the hardware is in good working condition, unlock the awning and roll it out to about 10 inches. Leave the locking mechanism in this position. Remove any screws that are installed in the awning rail holding the fabric.
Be sure to save all the screws and bolts for reinstallation. Mark the location of the top mounting brackets at both ends of the awning rail before removing the lag screws or hex head screws. Detach the front and rear foot assemblies on the uprights from their brackets and drop to the ground to help support the awning while removing.
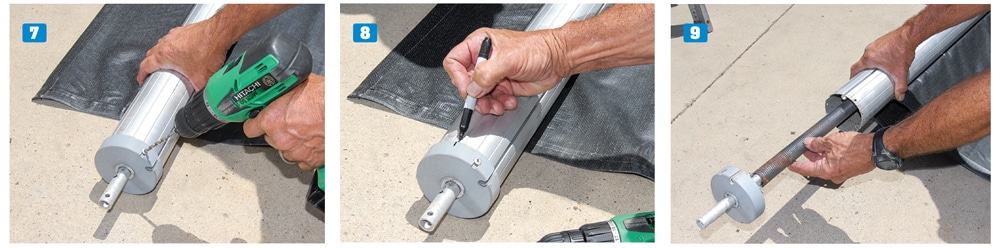
7) Use a 3/16-inch bit to drill out the rivets holding the spring assemblies in place. 8) Before removing each spring assembly, mark the end and the roller tube for reinstallation. 9) Pull the spring assembly away from the roller and set aside for later installation.
Once it’s determined on which end of the awning rail you’ll slide the fabric out of, you’ll need to recruit two or three people to help remove the awning, one on the ladder at the exit point of the rail and one holding the uprights as the fabric slides out of the rail.
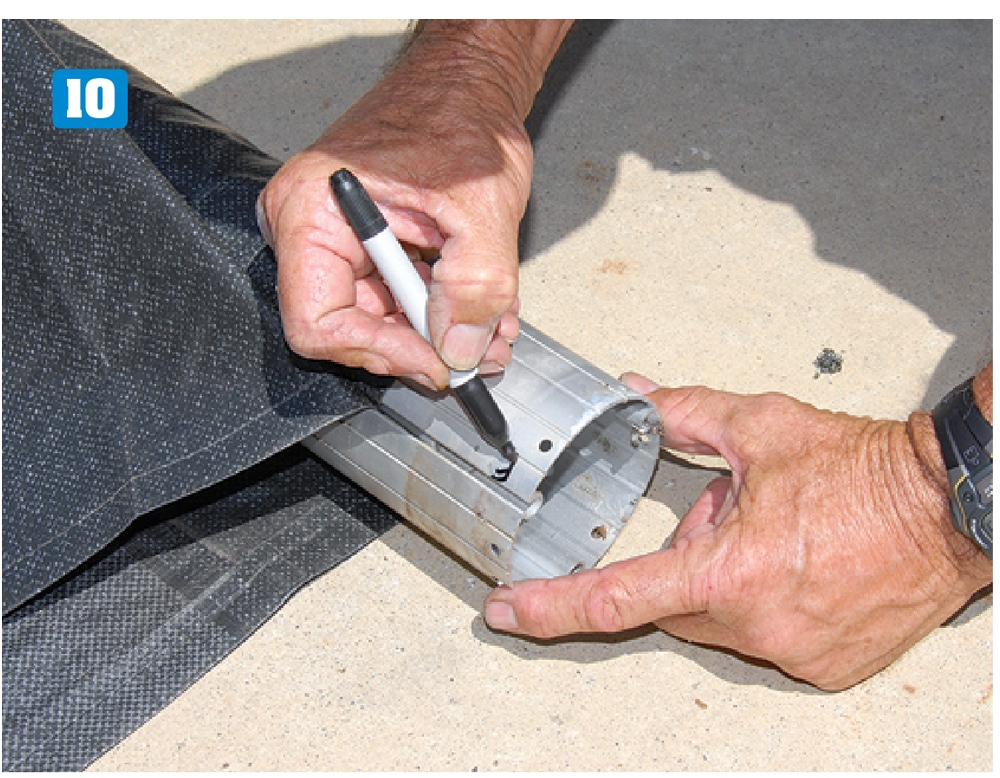
10) Before removing the fabric from the roller tube, mark the slot where the fabric slides.
Once the awning is clear of the railing, lay it on a clean, flat surface the same direction that it was installed on the RV. Follow the installation directions and unwind the front and rear torsion assemblies using a large pair of Vice-Grip pliers around the shaft. Caution: There is a tremendous amount of tension on the springs, and they can cause injury if the Vice-Grip pliers get away from you.
Mark the end on each torsion assembly and the roller tube for reinstallation. Drill out the two 3/16-inch rivets in each end cap and pull the torsion assemblies out of the roller tube; set aside for reinstallation.
Pull the fabric from the roller tube and stretch it out on the ground. This will provide a clean surface for the new fabric to lie on, rather than placing it on the ground. Before removing the fabric from the roller tube, mark the slots where the fabric and valance are installed. This will ensure that you get them back into the correct slots.
 File any sharp or rough edges that may slice the new fabric before sliding the new fabric into the roller tube.")
11-13) File any sharp or rough edges that may slice the new fabric before sliding the new fabric into the roller tube.
Use the round file to smooth out the slots on the end of the roller tube into which the fabric and valance will slide. Use the coarse flat file to smooth the sharp edge of the roller tube; this will make sliding the fabric onto the roller tube much easier and reduce snagging or tearing when working with the new fabric. Following the directions, slide the fabric into the roller tube.
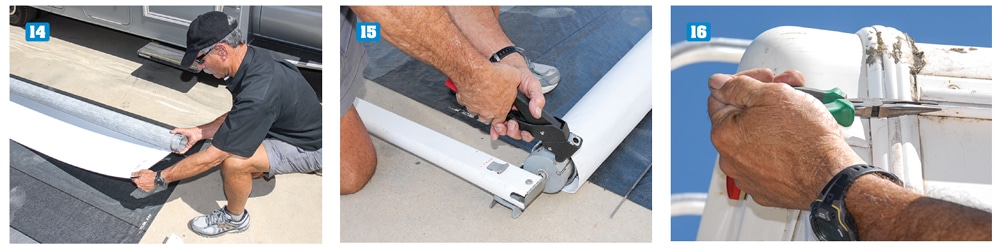
14) Carefully roll the new fabric in the proper direction onto the roller tube. 15) Use 3/16-inch-long aluminum rivets to secure the spring assemblies into place. 16) Using a pair of long-nose pliers, spread the opening of the awning rail to prevent the fabric from the snagging during installation.
Using a tape measure, center the fabric on the roller tube and cut the protruding polycord flush with the end of the roller tube. Reinstall the right and left torsion assemblies using a long 3/16-inch aluminum rivet (not supplied). Roll the fabric back onto the roller tube the same direction the old one was removed. Follow the instructions to complete the installation, including the direction and number of turns you will need to preload the torsion assemblies. Use the two supplied cotter pins to hold the wound torsion assemblies in place.
Before reinstalling the awning, use a pair of needle-nose pliers to open the end of the awning rail outward, then file any sharp edges or burrs that may catch or tear the fabric. Slide the awning into the rail. Center the awning in place and open and close it two or three times. Once you’re satisfied that the fabric and the awning are in the correct position and operate correctly, reinstall all screws and cover them with sealant to prevent water intrusion.
This DIY project is a bit tedious but well worth the effort and the satisfaction of a job well done. Dometic supplies excellent long-wearing replacement awning material. Figure around $200 for the cost of the new fabric.
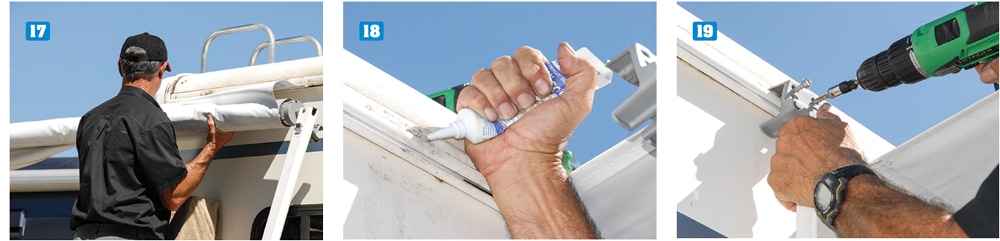
17) Carefully guide the awning with the new fabric into the rail with the help of one or two other people. 18) Before reinstalling the lag screws in the upper brackets, make sure to use a high-quality caulk in the existing holes. 19) Install the lag screws through the upper brackets in the same place from where they were removed.
Dometic | 800-544-4881 | www.dometic.com