RV Sanitation Basics
Image Caption:
Motorhomes are a great way to travel for a number of reasons, and one reason at the top of the list is a nice bathroom. Indeed, motorhomes would be far less popular if they didn’t have full sanitation systems – that includes a toilet and a black-water holding tank, which allows a motorhome to be operated self-contained for a number of days, in addition to a companion gray-water tank, which makes the kitchen, lavatory and shower functional (with an on-board freshwater supply).
As anyone who has neglected either of these tanks knows, the penalty can be offensive odor, especially in hot weather. Fortunately, keeping them operating efficiently and smell-free is relatively easy.
Treatment
Regular use of a high-quality holding-tank treatment (deodorizer and digester) is critical. Without it, solids do not break down properly, and odor builds up. Unfortunately, experience shows that all treatment products are not equally effective, and the choices can be bewildering. When in doubt, try a product that has been around for decades: Thetford’s Aqua-Kem. It contains formaldehyde, but the company insists that Aqua-Kem is fully biodegradable.
Thetford and other companies also offer products that do not contain formaldehyde, and they also may be effective. Follow directions to ensure good results. Toilet paper should be of single-ply thickness.
Use at least 1 cup of water for each flush, since higher fluid-to-waste proportions reduce concentration of solids.
Concentration of odors and solids can be more of a problem while the motorhome is parked for long periods, so it’s necessary to ensure adequate water flow into tanks during these rest periods. A thorough flushing after such periods is even more important (see later reference) than while traveling.
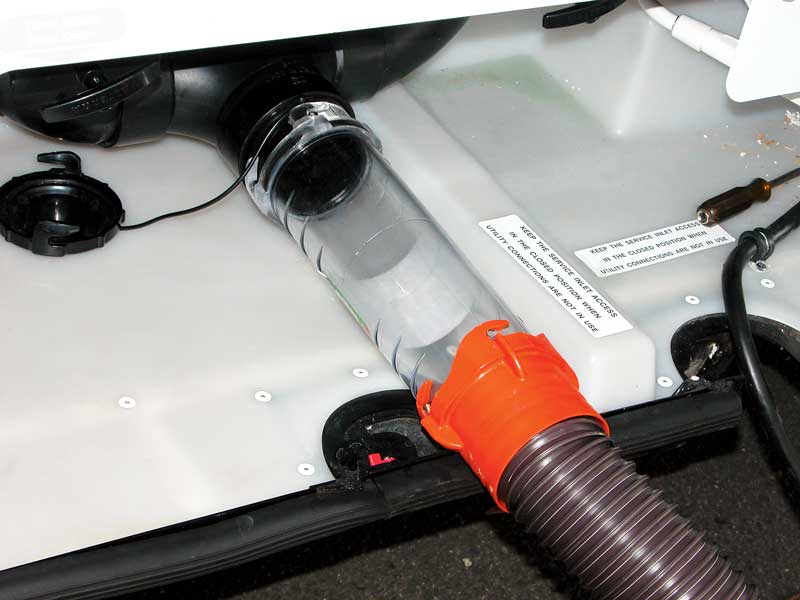
A clear-view hose adapter lets you see when the tank flow stops … clear discharge indicates a clean tank.
Use a specialized treatment product for the gray tank after each dumping because the gray tank holds solids flushed from the kitchen sink that need breakdown and deodorization. You can help to help keep your gray-water tank clean by using a fine-screened sink-drain strainer in all drains (available at houseware stores) to catch food and hair in the drains.
Dumping
Good tank maintenance can make the difference between an unpleasant chore and a routine procedure. A leak-free dump hose is essential, along with a good dumping procedure. Always use protective gloves (such as mechanics’ latex gloves) and water hoses dedicated only to flushing black-water tanks while dumping and flushing that tank; discard the gloves before touching fresh-water hoses or equipment.
If possible, when preparing to dump, position the motorhome so the tank outlets are angled downhill toward the dump valves. Be certain that all hose connections are secure.
Procedure

One way to clean out your black-water tank is to power wash with a tank wand that hooks to a hose. Don’t use your potable-water hose.
Be sure the dump hose is securely connected to its fitting and that the discharge end is securely positioned in the drain pipe. Open the black-tank valve first and allow it to drain. When it’s empty – with the dump hose still in place and the discharge valve still open – use a tank-flushing device (an in-tank spray nozzle, or a wand inserted through the toilet) to flush the tank. If possible, refill and flush. Next, close the black-tank valve and open the gray-tank valve, allowing its contents to drain. Close the gray-tank valve, disconnect the dump hose and flush it thoroughly. Don’t forget to flush the dump station catch basin.
Tip: While connected to RV park utilities, keep tank valves closed, allowing content to build to the three-quarter-full level, which supports waste breakdown and creates more flushing action during the dumping process.
Tank Problems
To remedy an odor problem, refill and flush the tank several times with a strong stream of water directed through the toilet to break up solids that may have built up directly under the toilet.
While traveling, refill to about the half-tank level and pour in a strong dose of effective deodorant. Use large amounts of water and dump again soon. If the motorhome can be parked for several days, flush well, add treatment, fill to the top and allow the vehicle to sit for several days. Drain and flush. Thereafter, use more water, flush the tanks more often, and use a very effective treatment.
In a more extreme case, it’s sometimes suggested that a couple of bags of ice cubes (not crushed ice) poured through the toilet after filling the tank to the 1â„4-tank level – followed immediately by aggressive braking and acceleration – may help break up solids. If odor continues, the tank may need to be replaced.
With good maintenance, an RV sanitary system will go for many years without a problem, making a very important difference in motorhome travel comfort and convenience.