Husky Center Line TS Hitch Review & Installation Guide
Image Caption:
Pound for pound, dollar for dollar, nothing improves the overall towability of a travel trailer more than a high-quality, properly installed and balanced hitch assembly. The most sought-after features of any hitch system are ease of use, the ability to keep the duo on a level plane and the effectiveness of sway control. Husky Towing Products recognized these requirements when crafting its Center Line TS series of weight-distribution/sway-control hitch systems.
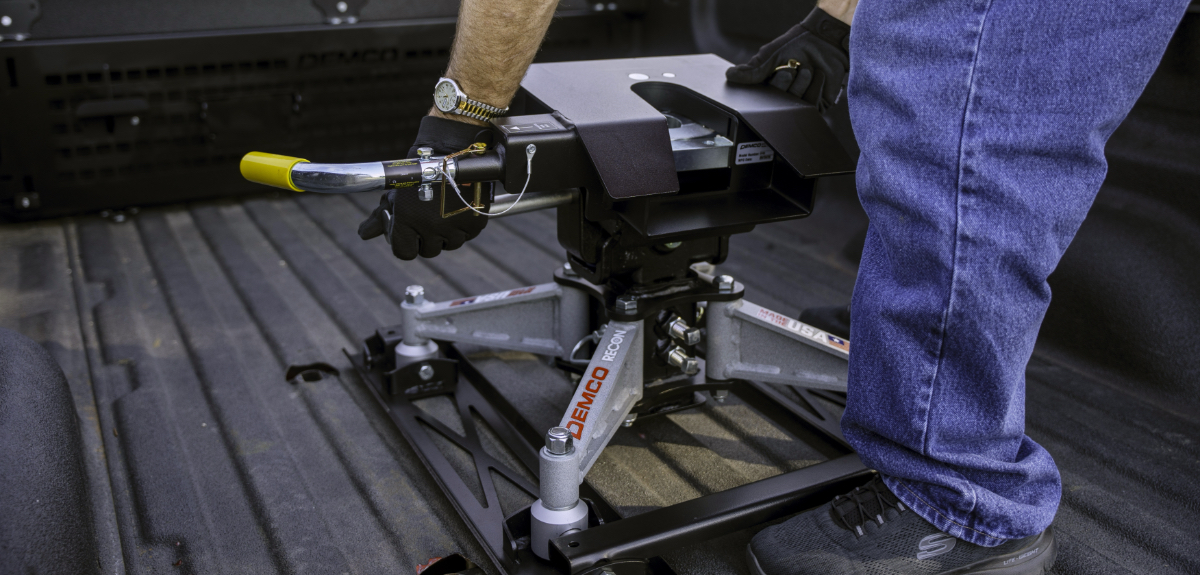
Husky’s lineup of Center Line TS hitches incorporates sway control into the system using two principles: clamping force and friction. Sway control is achieved in the ball mount and via the spring bars. Clamping force and continuous friction are created by bolting the ball-mount trunnions between the rigid top plate and semirigid bottom plate during the manufacturing process. This creates side-to-side resistance for the trunnions.
On a second front, friction created by the spring bar ends sliding in the specially designed frame brackets resists movement, thus limiting sway. It’s a one-two punch that not only distributes the weight evenly but keeps sway under control without additional hardware.
Hitches are segregated into three part numbers, offering packages to handle 400- to 600-pound, 600- to 800-pound or 800- to1,200-pound hitch weights. Tapered spring bars are matched by weight and secured to the trailer A-frame using a cleverly designed bracket system that eliminates the need for chains.
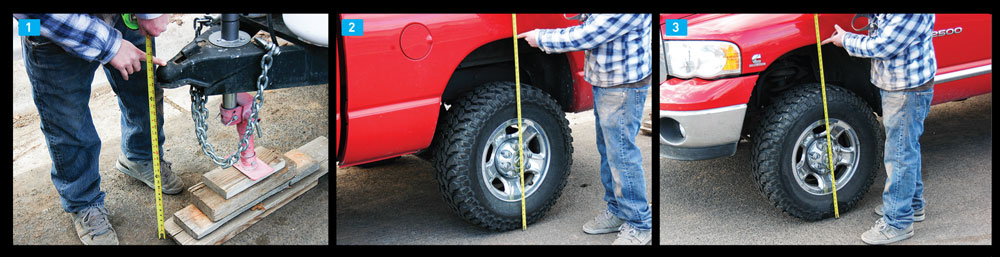
[1] Before setting up the Center Line hitch for the first time, position the trailer so it’s level and measure the distance from the top of the A-frame coupler to the ground. [2] Measure the distance from the top of the tow vehicle’s rear wheel well to the ground. [3] Do the same for the front of the truck. Record all the measurements, which will be used when adjusting ball height and spring-bar tension. When hitched up, there should be equal drop at the front and rear of the truck.
Parts
Each of the three hitch packages is nicely presented as a virtually ready-to-use structured system, which includes an all new multi-position shank and head assembly, plus matching spring bars, frame brackets, necessary hardware and even a ball. Of course, there’s still a small degree of installation required, but it’s limited to a handful of bolts and nuts, taking a few measurements and following an incredibly well-illustrated and -written step-by-step instruction manual.
Installation
Installation for the first time will require the most work. Before starting the process, the trailer and tow vehicle must be parked on level ground, leaving about 4 to 5 feet between the two, so there’s some room to assemble the components. To complete this task, the following tools will be needed:
- 15/16-inch and 11/8-inch combination wrenches
- 15/16-inch and 3/4-inch sockets (at least 1/2-inch drive)
- a tape measure
- torque wrenches capable of 260 ft-lbs
- and a big 1/2-inch drive or large breaker bar for added leverage and torque when tightening the hardware.
*This is also a good time to assemble the lift tool (which helps you position the spring bars) using two small bolts.
You’ll have to take a number of initial measurements before starting the assembly, one from the top-inside edge of the coupler to the ground and one from the top-center point of the front and rear tow vehicle fender wells to the ground. Make sure to record these reference numbers in the provided spaces in the instructions; you’ll need them later. Proceed to determine what position, either up or down, will provide the required hole location to attach the head to the shank. Husky offers a number of shanks in lengths from 10 to 14 inches with various rises and drops to accommodate just about any hitch receiver/coupler height. When using a shank with a longer drop, it’s important to make sure there’s sufficient ground clearance under the shank to allow for negotiating driveways and fuel-stop entrances. To help plan the shank positioning, subtract 8 inches from the final ball height noted in the instructions. This number should provide the bottom 3/4-inch mounting-bolt-hole-to-ground measurement.
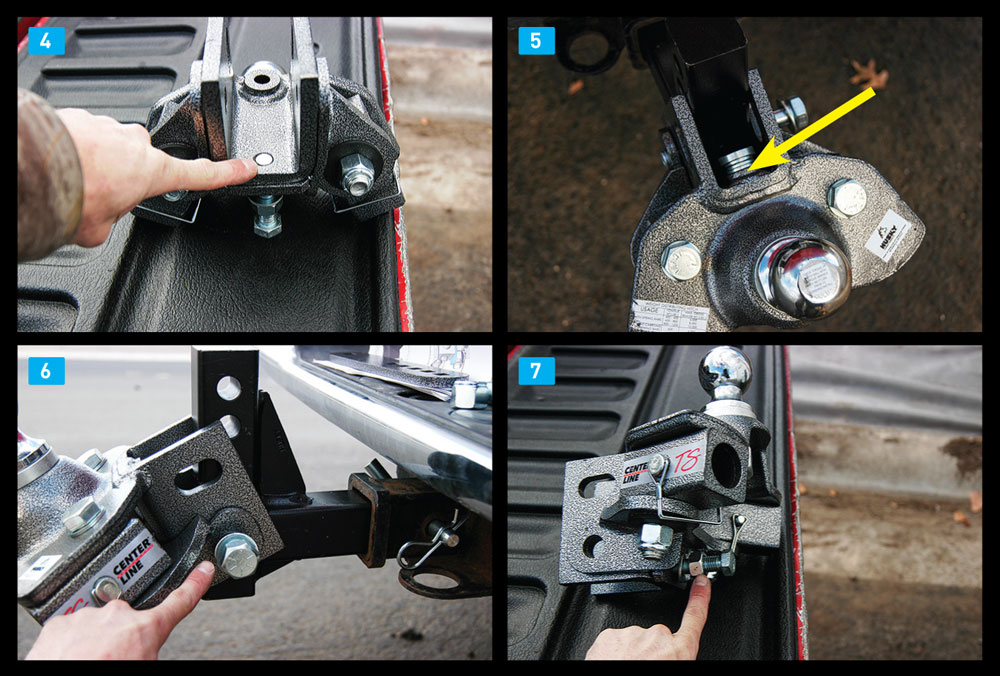
[4] Make sure the 5/8-inch bolt in the bottom of the ball mount channel is all the way out and flush with the surface. [5] Washers (arrow) are used to establish the ball angle. [6] Inserting one 3/4-inch bolt will make the job of assembly easier.[7] Once the proper ball angle is attained, the bolt can be tightened and the lock nut set.Before assembly of the head, make sure the 5/8-inch bolt in the bottom of the channel is all the way out with the threads flush to the inside of the channel. Using the 3/4-inch bolt with a washer to hold the head on the shank, you’ll need to continue with the assembly by adding three of the hardened washers marked F436 to the large head pin as a starting point to find the appropriate ball angle. The large head pin is simply placed into the allotted bushing that’s welded to the inside of the channel, located right in front of the ball. We found it easiest to just place one 3/4-inch bolt into position, after sliding one of the conical tooth washers onto the end. The two supplied conical tooth washers are intended to bite into the channel of the head assembly to establish the proper head angle and lock it in place.
At this point, any needed J-shaped shims to close the gap between the ear of the bottom plate and the U-channel can be put in place. Don’t focus on equalizing the number of shims per side versus simply filling the gap. Now the remainder of the washers and nuts can be threaded on and properly tightened, but only after using a 15/16-inch socket to adjust the lower 5/8-inch bolt against the shank until it bottoms out, followed by about a quarter- to a half-turn, and then securing the locknut.

[8] J-shaped shims are used to close the gap between the bottom plate and the ball-mount U-channel.[9] Spring bars fit into the ball-mount trunnions and are locked in place with pins. [10] Spring-bar brackets are mounted on the A-frame from 281/2 to 301/2 inches from the center of the coupler. This gives some flexibility for clearing the LP-gas cylinder plate.The hitch head bolts are torqued to 260 ft-lbs, which means having a professional-grade torque wrench or incredibly high-powered air-impact driver at your disposal.
Since these are usually expensive tools and not common for a home garage, most people just use a more typical 3-foot 1/2-inch drive breaker bar to get the nuts as tight as possible. If you’re unsure or don’t have the brute strength to tighten the nuts properly, check with a dealer who has experience assembling weight-distribution hitches. Before any final tightening, double-check the angle on the ball (after hitching up) to determine if adding or subtracting the F436 washers is mandatory. The ball is included with the package and is already installed in the hitch head and torqued to the proper value.
Once the ball mount is fully assembled, attention can be directed to the trailer A-frame brackets. A measurement is made from the center of the coupler to 28.5 to 30.5 inches back on the A-frame and marked. Hopefully, the LP-gas cylinder plate is not mounted in the location where the brackets must be located. If so, modifications will have to be made before continuing. The brackets are mounted to the frame using the 1/2-inch carriage bolts, one at the very top and the other in whichever hole best lines up with the bottom edge of the frame. From this point each spring-bar lift bracket can still be adjusted up or down as needed by quickly using the two 5/8-inch dog-point screws. Before the correct spring-bar support surface height can be attained, one more easy measurement must be taken, which is best described by the drawings in the instructions.
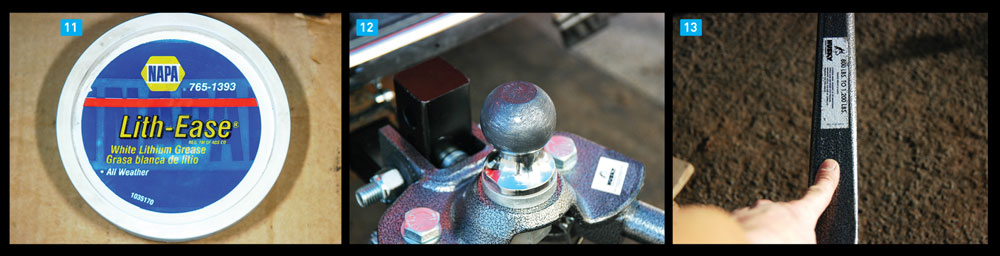
[11] White lithium grease is used to lubricate the hitch ball. [12] The hitch ball is supplied with the kit and torqued to specifications from the factory. [13] The spring bars are mounted in the trunnions with the label up. Spring bars are available to handle 400- to 600-pound, 600- to 800-pound and 800- to 1,200-pound hitch weights.
Adjusting the spring bars requires a little trial and error using the measurements taken at the beginning of the installation process. As with any other weight-distribution hitch, the trailer must be raised with the coupler locked on the ball in order to preload the spring bars to make them safe to work with. Once the spring bars are nearly level with the spring-bar support surface, the lift tool is used to guide the bar end onto the its resting position, which is then locked in place with the L-pins and clips. The trailer should sit level and measurements should be checked again to confirm that any drop in the front and rear height of the tow vehicle is equidistant from the top of the wheel wells and ground. The instructions provide superior details on how to achieve proper adjustment.
Assembling the Center Line TS was surprisingly quick and painless, with attribution to the CAD-designed components and easy-to-follow instructions. About the only suggestion we can make is to inform the user that the trailer needs to be lifted considerably to facilitate the positioning of the spring bars onto the brackets. The effort required to lift these bars seems excessive, which means a lot of cranking if the A-frame is not fitted with an electric jack. As part of the installation, we’d recommend installing an electric A-frame jack.

[14] Once the brackets are mounted, the spring bars are lifted into position using the lift tool. [15] The second part of the sway-control system is the result of friction created by the spring-bar ends sliding against the brackets.
In Use
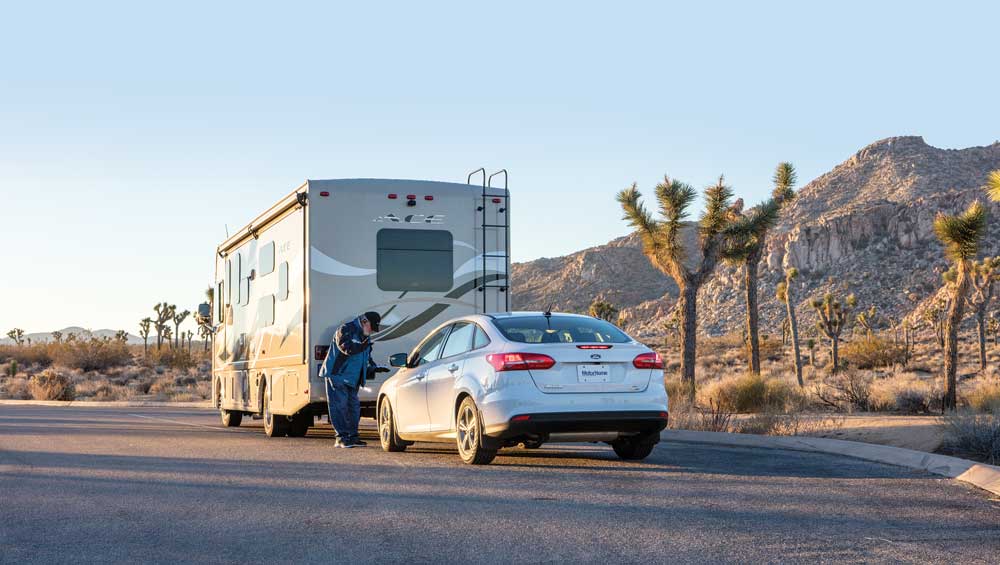
In use, the Husky Center Line TS did a nice job providing a stable, comfortable and stress-free towing experience. The technology Husky uses in manufacturing this hitch results in very quiet operation without disconcerting squeaks and groans. This technology allowed the company to come up with a solid sway-control system without the use of additional friction-type equipment, which not only looks nicer but eliminates another step, one that’s difficult to ascertain without getting on the road and finding the sweet spot when adjusting. It also means that there’s no equipment to remove when making super-tight maneuvers.
Towing a trailer can present challenges, especially for newbies. Relying on a hitch like the Husky Center Line TS can take most of the anxiety out of the process.