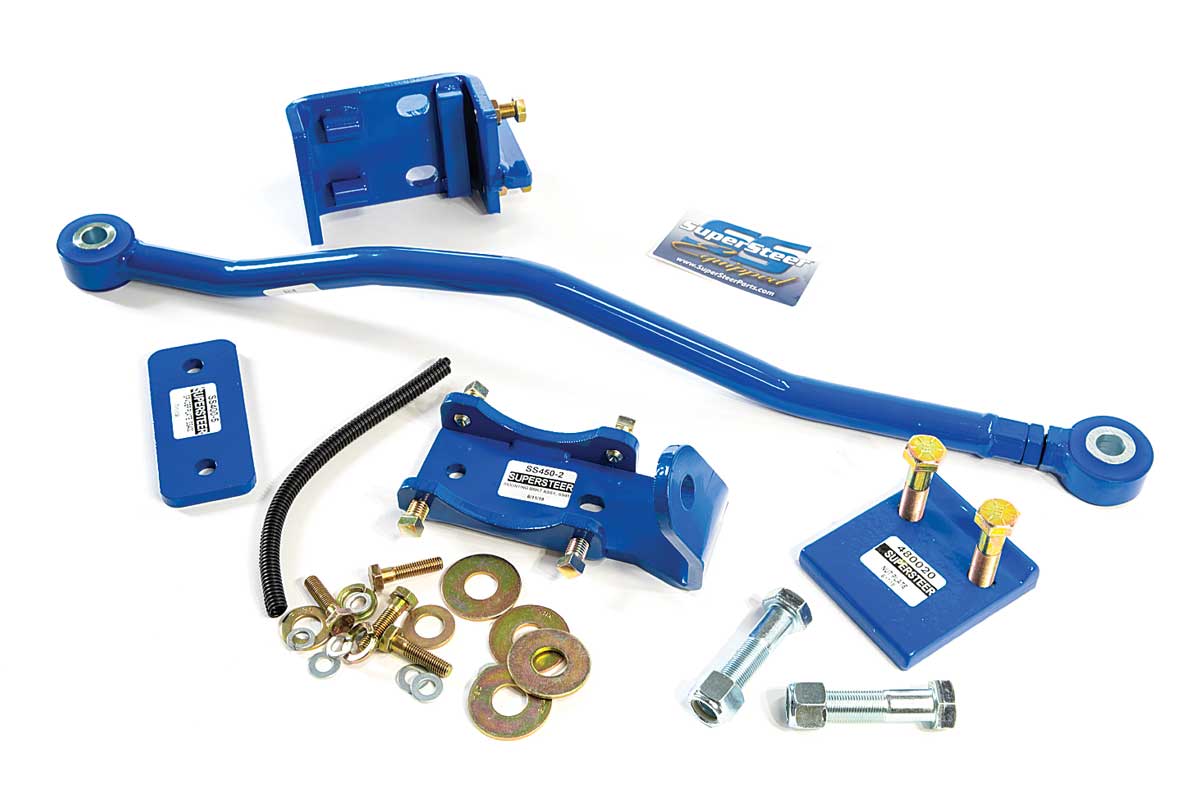
SuperSteer Trac Bar kit tightens up the handling and tail wag of Ford E-350/E-450 Class C motorhomes
Many Class C motorhome owners complain about sloppy handling, so they search for suspension-related solutions to make the Ford E-350/E-450 chassis (the most common Class C platform) more stable. We addressed one aspect of enhancing a Class C’s suspension a few months ago (“Smoother Sailing”) by upgrading to heavier-duty anti-sway bars (also known as anti-roll bars), front and rear, along with replacing the original shocks with high-performance gas shocks.
Those suspension upgrades made a significant difference in reducing body roll and the motorhome’s tendency to “porpoise” (bounce excessively in the front) as it cruises over undulations on the highway. But there’s still another movement in a Class C that contributes to the feeling of instability, especially in cornering: lateral rear axle movement.
G-Forces at Work
When a vehicle turns, g-forces immediately try to push everything to the outside of the corner. The heavier the vehicle and the higher the speed, the more these forces come into play. It’s those g-forces that can make a Class C, or any higher-profile vehicle, feel like it’s going to tip over when going through a turn, and it’s the anti-sway bars that help lessen that effect.
When cornering, those very same g-forces try to slide the chassis sideways on the rear axle as the front tires turn into the corner. The leaf springs, shackles and bushings work in unison to keep the rear-axle housing centered under the chassis — but in motorhome reality, there’s always some movement. This is because the rubber bushings in the spring shackles are compressed by the tremendous forces generated by the weight of the motorhome, combined with g-forces trying to push everything laterally.
A little movement, say, fractions of an inch, doesn’t create any noticeable ill-handling effects. But as the bushings age with miles and time, that movement increases to the point where it feels like the rear of the motorhome has a case of “tail-wag.” Side-to-side movement in the rear axle assembly also causes oversteer, “push” from passing semis, and even delayed steering response. It can also cause the rear of the RV to oscillate back and forth before straightening out, adding to the handling drama. To make matters worse, towing with a Class C motorhome exaggerates those ill-handling traits because of the additional leverage applied by the vehicle/trailer.
SuperSteer Trac Bar
The massive leaf-spring packs on the Ford E-350/E-450, like those found under the 26-foot 2007 Lazy Daze we have been upgrading, do an excellent job keeping the axle assembly centered under the chassis. But as suspension components wear, excessive movement still creeps into the picture. In “Smoother Sailing,” we mentioned the benefits of a track bar (panhard rod) such as the SuperSteer Trac Bar. These kits are available as retrofits and can also be found on brand-new motorhomes. The popular SuperSteer Trac Bar attaches to the axle housing and the frame rail. That way, it mechanically prevents the rear axle assembly from shifting side-to-side, while allowing it to move vertically.

SuperSteer Trac Bar kits are model specific and are designed to fit both older and new Class C’s built on the Ford E-350/E-450 chassis. The product prevents lateral movement of the rear axle assembly, which causes handling maladies such as oversteer, push/pull when big rigs pass and the “tail-wagging-the-dog” syndrome.
Easy Installation
John Henderson, who has more than 35 years’ experience in the RV industry, took all that into consideration in designing the SuperSteer Trac Bar kit. Each kit is specifically engineered for the application, the parts powder-coated, and the instructions clear, so a do-it-yourselfer could do the install, if so inclined.
“Developing the Class C Ford E-350/E-450 kit was a challenge because of the limited amount of space in the way Ford designed the rear suspension,” said Henderson. “We did a lot of prototype development and testing before we figured out the best solution for the mounts to clear the huge spring packs and get the Trac Bar in the proper position to the rear differential housing while clearing the anti-sway bar.
“We attach the SuperSteer Trac Bar to the frame and the axle with solid, bolt-on, vehicle-specific mounts,” Henderson explained. “The Trac Bar is then adjusted to the proper length at normal vehicle ride-height and attached between the two mounting points with ¾-inch bolts and firm urethane bushings with steel inner sleeves. This stops the [axle assembly] side movement, but freely allows up and down movement so the Trac Bar doesn’t harshen the ride.”
SuperSteer’s instructions for the SS450 kit (for use on E-350/E-450 with rear sway bar) says to allow 90 minutes for DIY installation. The test kit was installed at Muffler Works, an automotive/RV service center in Florence, Oregon, which had the motorhome off the rack in a little more than an hour.
Such an investment in the suspension upgrades we made may not be for all Class C owners. But for those who put on a lot of road miles over twisting coastal and mountain roads, the addition of the SuperSteer Trac Bar, Roadmaster anti-sway bars, and Bilstein shocks is a tremendous improvement. The changes made the ’07 Lazy Daze handle and ride like an entirely different motorhome, which makes frequent long-distance journeys a pleasure instead of an endeavor.

The mounting brackets that secure the anti-sway bar to the E-450’s rear axle housing are removed in preparation for the new SuperSteer brackets.

Prior to installing any parts, one of the two supplied ¾-inch bolts is installed through the bracket that mounts on the driver’s side of the frame, forward of the axle housing. If the bracket is installed first, the bolt can’t be put in because there’s not enough room between the bracket and axle tube. (The same applies to the passenger-side bracket.)

We started on the driver’s side and positioned the SuperSteer frame bracket and nut plate so the two pieces go over the bottom and side of the driver’s-side frame rail, forward of the axle housing and against the rear crossmember, as shown.
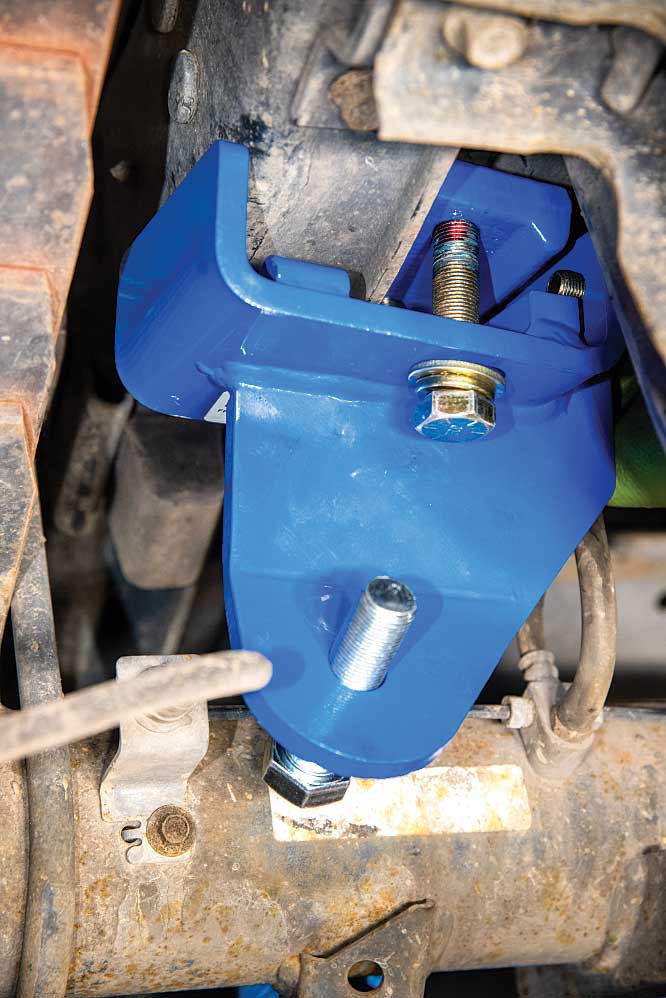
The frame rail is placed between the threaded top nut plate and main bracket, and the nut plate lip (bulge) faces down. Loctite thread locker is used on the mounting bolt and side jam nuts. The bracket is held in place by the bolt that threads into the nut plate, and by four square-head set-screws on the sides. The mounting hardware is hand-tightened at this point.

On the passenger’s side, insert the ¾-inch bolt through the bracket so the bolt head would be next to the differential when installed. Put a drop of Loctite on each of the four square-head side set-screws. Slide the mounting bracket between the axle tube and sway bar bracket as shown. Reinstall the original anti-sway bar mounting bolts to hold the anti-sway bar and bracket in position. Tighten securely.
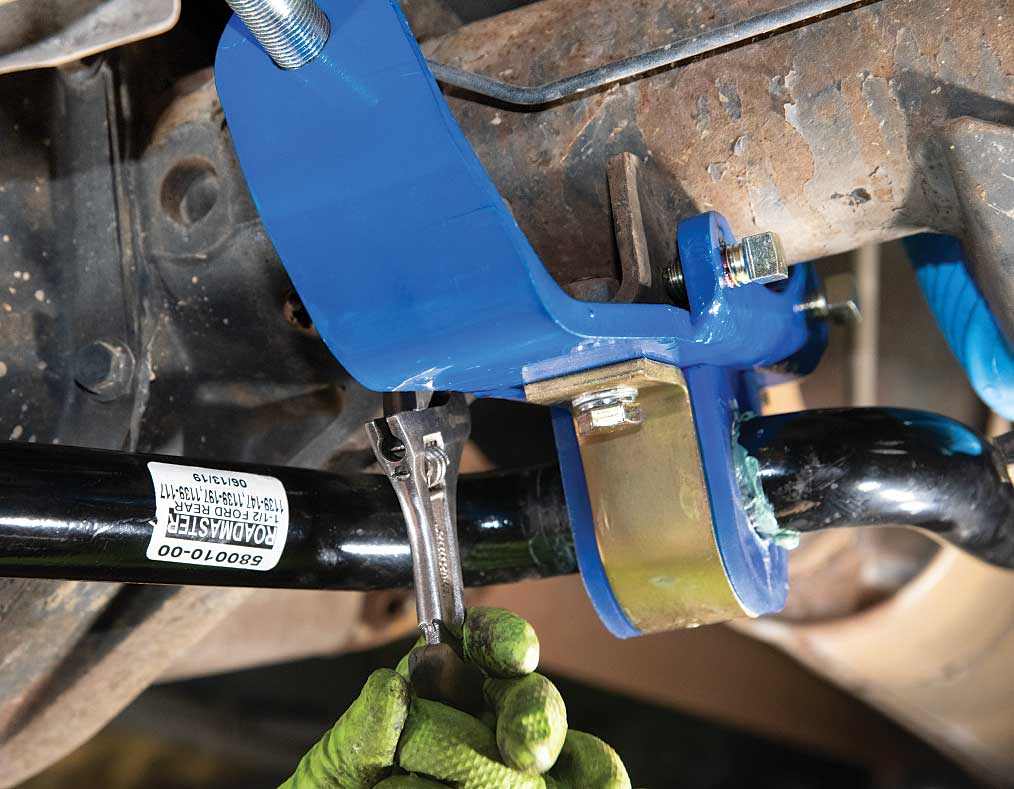
Now tighten the four side set-screws on the passenger’s-side bracket. The set-screws stop the lateral movement of the bracket. The test Class C recently had Roadmaster anti-sway bars installed, so brackets and bushings were still new.

On the driver’s side, install the SuperSteer spacer plate so it’s sandwiched between the axle tube and anti-sway bar bracket. These spacers provide clearance between the anti-sway bar and the Trac Bar as it cycles up/down. Reuse original bolts and tighten.
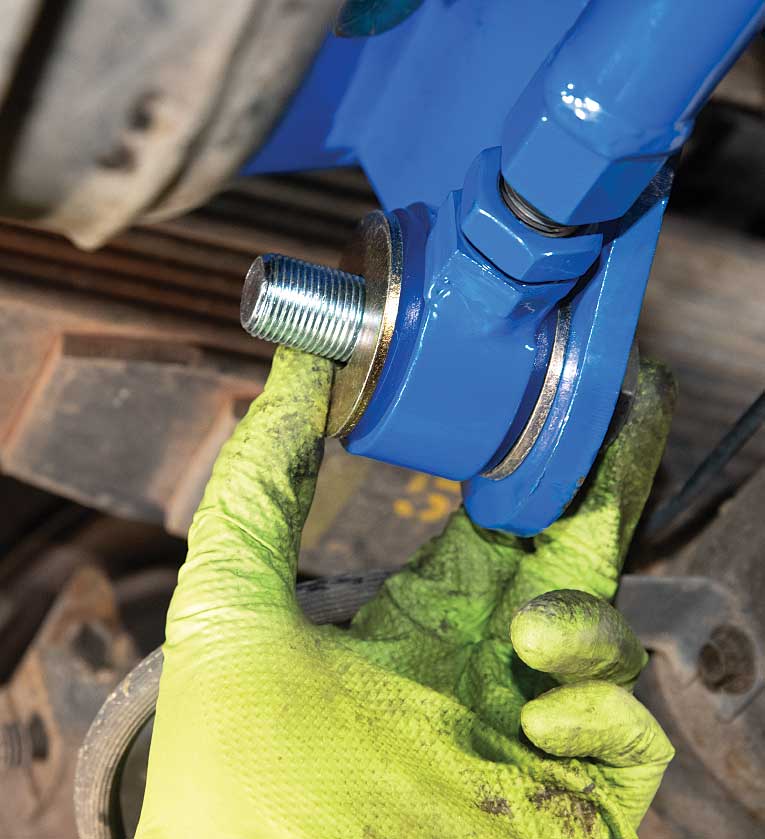
The kit comes with four big anodized washers, which go on each side of the Trac Bar bushings — one washer on the bracket side and the other on the nut side. These allow the Trac Bar to rotate as the rear suspension moves up and down.

Note: The driver’s-side Trac Bar bar joint is adjusted with the motorhome sitting with its full weight on the ground at normal ride height.

The last step is to tighten all the mounting bolts and set screws. The ¾-inch rod end bolts are torqued to 130–160 ft-lb, while the jam nut on the Trac Bar rod should be set at 100–150 ft-lb. The fasteners and Trac Bar rod should be checked again after 250 miles or six months to ensure all is tight and adjusted properly.
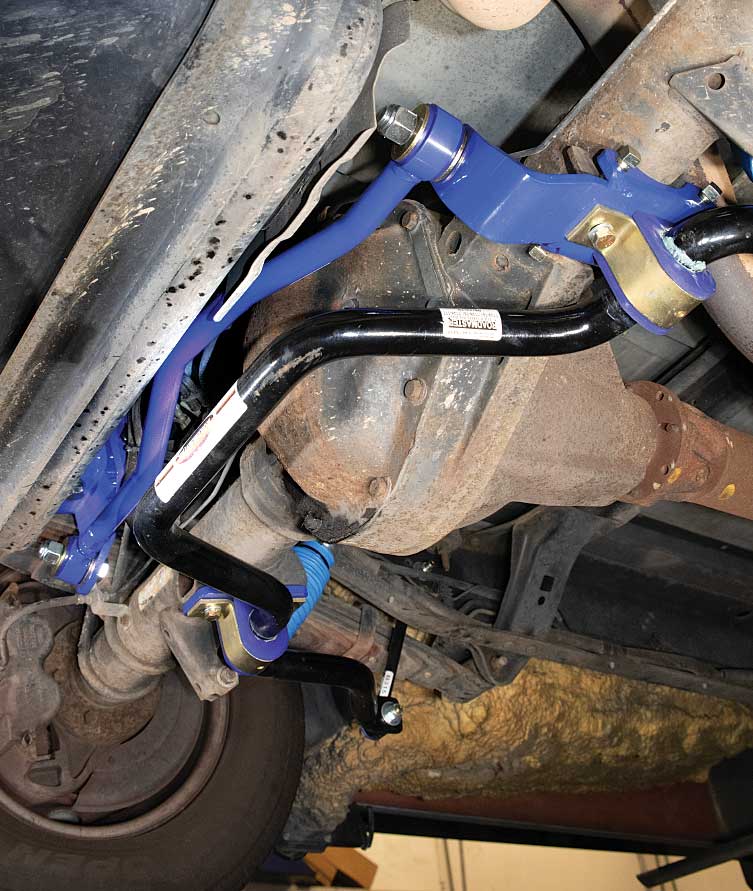
The SuperSteer Trac Bar fits perfectly and looks like it was a factory-installed part. The aftermarket anti-sway bar and Trac Bar really help improve the handling dynamics of Class C’s built on a Ford E-350/E-450 chassis.
Estimated Cost
Labor $135 (1.5 hours @ $90/hr)
Parts SuperSteer Trac Bar kit: $583.47
Total $718.47
Muffler Works | 541-997-4400
SuperSteer Parts | 888-898-3281, www.supersteerparts.com

