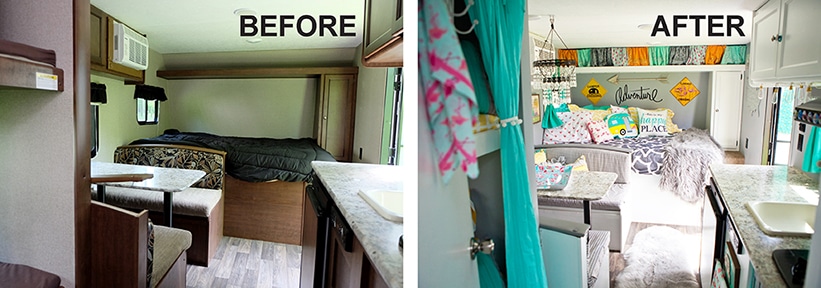
Contemporary decor, vintage flair and personal touches add charm to a thoroughly reimagined 2017 bunkhouse travel trailer named Lola
For two years I searched high and low for a 1950s Shasta camper. My heart was set on finding a vintage gem to remodel. There’s something about the decor and styling in the 1950s that I’ve always been drawn to. I’m pretty sure I was born in the wrong decade. But everything I discovered was either too heavy to tow with my vehicle, had water damage or was on the other side of the country.
See Related Stories: RV Makeover
One day while we were at an RV show, our kids ran inside a travel trailer that was on display and immediately jumped in the bunk beds, exclaiming it was perfect. Hmmmm, maybe they were onto something. What if we purchased a brand-new camper? No water damage to worry about, light enough to tow with our Toyota Highlander and within our budget — and I could make it my own and add the vintage accents I wanted.
The thought of purchasing a fresh, clean camper that was ready to hit the road sure was exciting. I wouldn’t have to worry about lingering smells in the bathroom or the thought of strangers who once slept in the bed. The money we’d save on renovations with an older camper could go toward the custom paint job and interior decor I desired.
 Once I decided on the make and model — 2017 Keystone Hideout 175LHS Bunkhouse — then came the price hunt to find the best deal. I have a black belt in bargain shopping and was diligent in my search to make sure I found the best price. John’s RV in Lexington, South Carolina, had a unit for $2,200 less than the local RV dealers where I live. We had the hitch installed on the Highlander, then I packed up the kids and headed seven hours south to pick up our new addition.
My husband was traveling that weekend for work, but I was bound and determined not to miss out on this great deal. I had never towed anything before in my life, but I got a quick crash course, as I drove the camper home on I-95. Thoughts of Rosie the Riveter saying “We can do it!” echoed in my mind as I navigated my way through my first gas station fill-up.
Exterior Transformation

Daniels took the nearly blank slate of the trailer’s original exterior and made it her own.
The Hideout was purchased the first weekend of April, and our maiden voyage was scheduled for the middle of May, which gave me about six weeks to get her ready to hit the road. There was nothing special about the trailer’s original cream paint job and tan and brown swirls. Over the years, I had collected an assortment of inspiration photos for the exterior paint scheme. So, I took my stack of photos with me and visited about half a dozen local custom auto detailers. Most of them either laughed at my idea and said they wouldn’t do it or gave me a price quote that was nearly what I paid for the camper. But I’m a girl on a mission and wasn’t going to give up on my vision.
Then I ran across Dent’s Custom Body and Refinishing in Fredericksburg, Virginia. Yes, they chuckled at my idea but were willing to take on the job and gave me a fair quote that was within my budget. Two weeks later, I picked her up, and Lola had come to life! The brown decals were in the garbage, and she has been coated in a lovely Tiffany Blue paint with silver stripes. The paint was custom-blended to match the robin’s egg blue shade in the swatch I submitted. Be still my heart!

A chrome flower box with silk marigolds comes off for storage during travel.
We ordered retro-look Shasta chrome wings from eBay, and my handyman hubby installed them to the rear of each side. Just a touch of whimsical flair to give the trailer that kiss of vintage charm. Along the main window on the driver’s side, I added a long chrome flower box that we display once set up at camp. The marigold silk flowers add a fun pop of color, because life is too short to be basic and sometimes you need to be just a tad extra. Once the original tires are worn, I’ll purchase a set of whitewalls to add another small element of 1950s’ styling.
Interior Paint Job

The kitchen counter and dinette tabletop were among the few original surviving decor elements.
Now that the exterior was complete, I could start the fun job of tackling the interior and let my creativity run wild. My oh my, where to begin! It was a blank canvas, and I was ready to get going on this long-awaited project. I now had just four weeks left till our first family camping trip, and I was laser-focused on giving Lola the ultimate glamping makeover.
I’m a crafty gal, but I stink at painting. Actually, truth be told, I just really, really dislike it. So, I hired my friend, who is a phenomenal painter. It took him three solid days to paint the interior walls and all of the cabinets and doors. The walls were an odd-textured material, beige in hue, that were painted a soft gray. It took one coat of primer and just one coat of paint, as the walls absorbed the paint easily and had a nice velvety coverage.

Pink flamingos are just one of Lola’s many whimsical interior features.
The brown wood doors, trim and cabinets were a bit of a beast to cover. My friend had to remove them all from the hinges, use crud cutter, a primer, then two coats of white cabinet paint. It was definitely a tedious task, but nonetheless, it looked fantastic once it was complete. The biggest challenge was trying to squeeze into the tight spaces and corners. I couldn’t believe the difference it made from just a couple of cans of Benjamin Moore paint.
Even though it was a new camper, the original brown and dark colors made it feel dated and dreary. But now she looked fresh, bright and inviting — so inviting that I would go inside the trailer just to eat lunch at the table. It had that new camper smell, which I think is even lovelier than a new car smell. I stared at the blank canvas in awe and was eager to get my decor on.
Esprit Decor

Burlap paintings of Lola by the Daniels’ two children hang next to the bunk nook where they sleep.
When it comes to interior decor, it’s been said that you need just one simple piece for inspiration. It can be anything that makes your heart smile and that you feel a personal connection with. Right after we purchased the trailer, I gave the kids each a small burlap canvas to paint their own version of Lola. With a turquoise, pink, gray and golden yellow color palette, they began crafting their tiny masterpieces. Those were the first elements hung inside, using Command Velcro strips.
Spending hours searching the aisles at T.J. Maxx, Target, HomeGoods, IKEA, World Market, Ross and Hobby Lobby, I quickly collected all the decor and bedding for Lola. What I couldn’t find in stores, I ordered from Amazon, Mercari and Etsy. Some of my favorite finds included flamingo-printed sheets on sale for $10 at Walmart, a $15 crystal-drop chandelier from Ross to hang over the dining table, a gray faux-fur runner rug for $16 and mini wall succulent planters for $8 from Michaels. Most of the bedding came from Pottery Barn Outlet in the teen section because the colors matched perfectly.

Colorful bandanas brighten the interior and hide storage clutter above the main bed.
There is a nice storage area over the main bed, but it was unsightly to view that sea of clutter. I found an assortment of bandanas at Michaels and Hobby Lobby for $1 each. One pattern was even aqua with pink flamingos, so it fit the motif perfectly. My dad helped me install a line of picture wire from one side of the camper to the other, then added clear small Command strips along the ceiling line to hook the wire through and keep it from sagging. We draped the bandanas over the wire side by side to look like a curtain, but each one can be pulled to the side to access the storage space. My crafty mum used the extra bandanas to help me make a row of banners to hang outside on the awning with our exterior light strands.
Seat Cushions

Vinyl-coated gingham covers the dinette cushions like gift wrap.
Next on the agenda was to tackle the seat cushions at the dinette. You guessed it — they were also dark brown. IKEA had an adorable white-and-light-gray gingham indoor-outdoor fabric for $4 a yard. The sealed vinyl coating on the fabric was perfect for messy kids around the table. If anyone spills, a paper towel does the trick, and no stains are left behind.
I stared at that fabric and the cushions for a good two days because I had never recovered upholstery and had no clue where to begin. Scratching my head, I thought, let’s just wrap them like you would a Christmas present. So that’s what I did. Using double-sided duct tape, I just wrapped each cushion and folded the corners like you would a gift box. The curved edges were a tad tricky, but overall, it was easier than I had anticipated. I’m sure there are a gazillion ways to do this, but I took the quick and easy route, and it worked out well.

Hung over the dinette, an inexpensive crystal chandelier transforms the camper into a “glamper.“
Around the air-conditioning unit, above the kitchen window and around the door were some pieces of wood that were covered in brown pleather. I plucked those off the walls, covered them in gray pleather from Jo-Ann fabric and craft stores, and secured them on the back side with a staple gun. Instead of covering each button, I painted them with gray acrylic paint that matched the fabric. Now, finally, everything brown was a distant memory. The only two original elements that I kept were the kitchen and dinette countertops and the flooring. The ivory and gray worked well and didn’t need to be changed.
Window Treatments

Leftover pom-pom accent trim makes playful pullbacks for the curtains.
I don’t know about you, but I cannot sleep unless it’s totally dark. Even our kids can’t fall sleep with a nightlight on. We are like bats in a cave; the darker the better. But during the day I want it as bright and airy as possible. Maybe it’s the photographer in me, but I am obsessed with lighting. During the day in our house, I draw open every window curtain and turn on all of the lights, and my husband quietly follows behind me, turning them off one by one. It’s my thing; the light affects my mood. So I knew it was important that I get the curtains just right in Lola.
At the Pottery Barn Outlet, I found some nice blackout drapes in white and turquoise. I quickly discarded the plastic horizontal blinds that came from the factory and cut the curtain panels to fit each window. At night they give us full coverage and privacy, but during the day I can open them and let in that glorious light. I hot-glued some cut pom-pom accent trim under the window box and used the leftover cording to make the pullbacks for each curtain.
The large window on the door proved to be a tricky little rascal. Because of the second screen door, there wasn’t enough space to add a curtain rod. Taping foil over the window like I did in my college dorm room wasn’t an option. So I found some pineapple-printed puckered cotton at the fabric store, sewed an extra piece of the blackout fabric behind it, then applied a strip of Velcro across the top. The coordinated strip of sticky Velcro was placed on the door just over the window. Since the door is also white, you don’t even notice the Velcro piece during the day. And at night I just slap the curtain over the window. Voila!
Bunk Bedding

Flamingo-printed duvet covers protect the bunk-bed mattresses.
Because the bunk nook is pretty tight, trying to make up those two beds is a beast. I found a couple of duvet covers on sale and used them to cover each twin mattress. Since the mattresses are narrower than a standard twin size, I took elastic sheet clips to tighten the extra fabric on the underside. When the kids sleep on the bunks, we just pull their sleeping bags out from the storage area for them. That way, I don’t have to unmake, wash and remake the bedding on the bunks after each camping trip.
To add a little bit of color, softness and privacy to the bunk nooks, a lightweight curtain rod was installed at the top of the bunks, and a thin sheer aqua drape from Pottery Barn was added.
Photos and Mementos

Stickers commemorate the Daniels’ travels on a piece of plexiglass on the fridge door.
Each place we visit, we try to find a patch, a magnet and a sticker. My kids absolutely love collecting these, and it’s a fun hunt to see who can find the best ones. I’m a sucker for all things nostalgic that will help us keep each trip locked in our memory banks. The magnets are hung on our oven hood or the metal board next to the kitchen. Each sticker is placed on a piece of clear picture plexiglass, then hung with Command stickers on the front of the fridge door. That way, if we ever decide to get a different camper or fill it up completely and need to start a new one, the plexiglass can be easily removed and hung within a frame inside our home. And the patches, which aren’t as commonly available, are sewn onto decorative throw pillows.
On the wall when you enter the camper, we hung a small sticker map, purchased on Amazon. Every state we visit, the kids take turns placing a new state sticker on the map. Not only is it a fun hands-on way to learn about geography, but it’s also a cool way to track all the places we’ve been.

Magnet clips hold Polaroid memories on a metal map.
We have a metal map hung on a different wall. Our family takes at least one Polaroid picture at each new campground we visit. We attach our favorite image onto a magnet clip (sold at the Dollar Store), which sticks onto the coordinating state on the map.
We have a wooden-frame letter board below the flat-screen TV. We change out the message to welcome friends, celebrate birthdays, inspire us with a favorite quote or list the places we’ll be visiting on each trip.
Although I’m a professional photographer, I rarely pack my large camera when traveling, but I always have our small Fujifilm Instax Mini Polaroid in tow. They sell small albums for these, where you can easily sort and store your images and flip through them like a scrapbook. We also have hung some of our photos on a string of photo-clip lights above the bunks. There is space under each photo where the kids write the date and location and choose their favorites to display.
Rules of the Roost

A No Pooping emoji sticker serves as a friendly reminder.
I have only two rules in Lola. The first is, no shoes inside. Pretty self-explanatory. It helps keep the sweeping and mopping to a minimum. Anyone with little ones knows that they are total dirt magnets.
The second rule is, no pooping in the potty. To help reiterate this steadfast Lola law, I stumbled across a No Pooping emoji sticker on Amazon and stuck it to the inside of the toilet lid as a friendly reminder. My husband travels a lot with work, so many of our camping adventures are just me and the kids. The no pooping rule makes life easier when I’m the one dealing with the glamorous task of connecting and dumping the tanks. Plus, our bathroom smells as fresh as it did the day we bought the trailer, and there are no lingering unpleasant odors.
Traveling Mascots

Cheerful Troll doll “planters” hold plastic succulents.
I’ve been asked quite a bit about the Bigfoot sign, the flamingos and the Troll dolls. Our son, Dane, absolutely loves all things Bigfoot. Our daughter, Chapel, has a thing for pink flamingos, and I (a child of the ’80s and ’90s) adore Troll dolls.
I wanted to create a cute little traveling mascot for Lola. After digging through a box of some of my old childhood toys, I found a couple of long-forgotten Trolls. Since their hair had seen better days, I decided I would give them a little chop and turn them into mini succulent planters. Their hollow bodies were stuffed with a small block of floral foam, and I inserted a few miniature plastic succulent plants, purchased at Hobby Lobby. Tiny Command strips were added to their itty-bitty feet, and they now sit in Lola’s kitchen windowsill.
Welcome to the Glamper Gang

”The camper should be our escape, our sanctuary, our happy place,” writes Daniels.
After seeing how much joy Lola has brought our family, two of my close girlfriends and my parents have also purchased their own travel trailers. As a welcome-to-the-Glamper-Gang gift, I made each of them their own Troll planter to display in their new campers. It’s a small token to tie all of our travels together. The kids in each family have taken photos with their Troll, much like a Flat Stanley traveling adventure.
Friends who have purchased their own traveling playhouses have asked me for decorating advice. I tell them to start by selecting a color scheme or theme that you love. Find one decor element that speaks to you and use that as your inspiration piece. Using Command strips to hang art takes away the “What if I change my mind or find something I like better?” worry. You can change out your art as much as you like, and there’s no damage done to the walls. Add a whimsical element for each of your family members so that they feel they have their own little place inside the camper. There are no rules, so mix and match patterns, add in a bold color and try something unexpected — you might just love it!
And less is more. I tend to over-clutter things and am a bit of a hoarder. Just ask my husband to describe what my closet overflow looks like at home. But, since the space inside most campers is so small, using too many elements can make the area feel crowded.
Once you feel finished with your masterpiece, take photos of each area. Sometimes our eyes can be deceiving, but when looking at a photograph, we might view things more objectively from a different perspective. Once Lola was complete, I realized I had a little too much flair going on with my throw-pillow collection on the bed, and it needed to be edited down. After all, where would all those pillows go when we actually needed to sleep on the bed?
Be sure there is space to live, breathe and relax. The camper should be our escape, our sanctuary, our happy place. It’s where we don’t have to worry about unloading the dishwasher, throwing a load of clothes in the washer or returning umpteen emails. It’s the keeper of priceless memories with our family. It’s a place where laughter is welcome and stress is uninvited. It’s the vessel that brings us on adventures and awakens our soul. Make sure that you love every square inch of it, because the more you love being in it, the more you’ll use it.
2017 Keystone Hideout 175LHS: $10,990
Custom Exterior and Interior Paint: $3,450
Decor, Bedding, Curtains and Art: $1,200
Total Cost Investment: $15,640
Total Time Investment: 6 weeks
 Brooke Daniels is a nationally published portrait photographer who resides in northern Virginia with her husband and their two children. She’s in the process of starting a new family travel blog, Wanderlust Lola, with camper-renovation tips, campground reviews, recipes, photography tutorials and advice for glamping with just Mamma Bear and the little ones. Her work can be found on Instagram and Facebook @brookedanielsphotography, and on www.brookedanielsphotography.com.
Have you modified your RV or remodeled it completely?
Tell us about it in 500 words or less, including the total cost and time spent, and email your description to [email protected]. Include an ample selection of photos illustrating the project, along with your full name and mailing address. We’ll pay $50 for every RV Makeover we publish in the magazine.