Carefree’s easy-to-install fabric Awning Extend’r can nearly double canopy coverage
In one way or another, RVers seem to be in a constant battle against the elements. One element on every RVer’s radar, regardless of location, time of year or climate, is the sun. That’s why most RVs are factory-equipped with a patio awning, and for the most part, they work pretty well. But there are times when there’s just not enough dimensional coverage to keep the sun’s relentless rays from penetrating the patio area. In many cases, finding more shade can be futile.
Carefree of Colorado has introduced a relatively easy-to-install, inexpensive and clever way to extend the coverage of a typical awning without using unsightly makeshift materials like towels and generic sunshade cloth. The company’s Awning Extend’r adds 8 feet to the width of any patio awning, and in most cases the extension just about doubles the coverage area. The material is lightweight and comes in 12- to 20-foot lengths, in 2-foot increments, to match that of the existing awning, electric or manual.
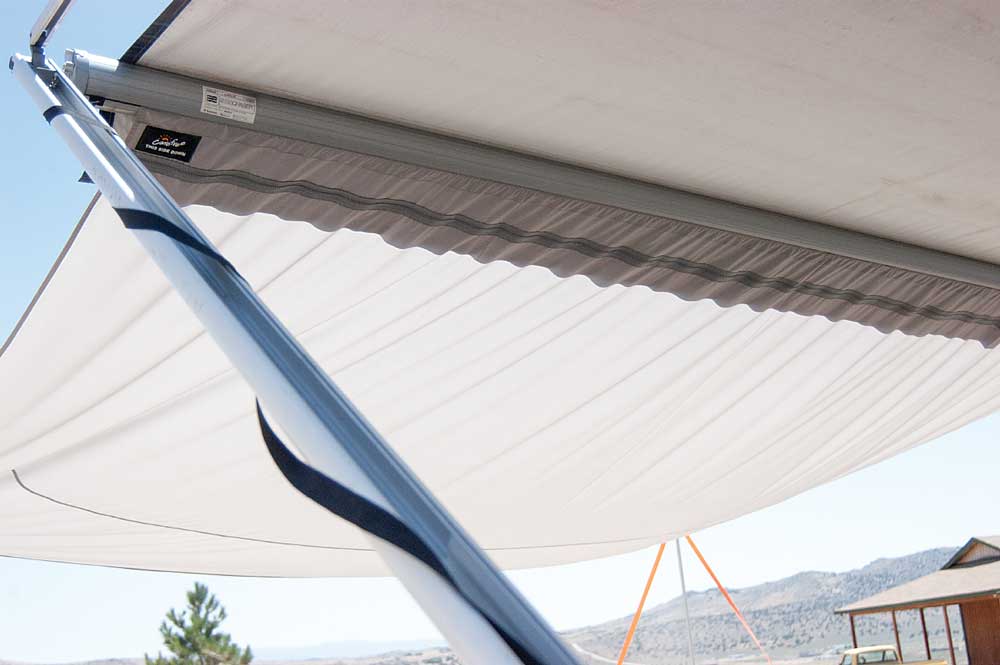
The Awning Extend’r adds 8 feet width to the awning coverage, which in most cases provides about twice the shade.
It utilizes the slot in the roller tube for installing a zipper insert, which is a section of fabric that attaches to the extension canopy. The zipper insert rolls up with the awning, which encourages easy setup. Also included in each Awning Extend’r kit is a pair of adjustable-height support poles, complete with heavy-duty steel stakes, adjustable nylon straps to secure the material and a carry bag.

To begin the installation process, the awning is extended so the slot in the roller tube is exposed.
To assemble the extension fabric, you’ll need only a couple things: a good hammer for pounding in the stakes, and a helper, which is imperative, even for this seemingly rudimentary operation. In fact, having help is such a key element to success with the Awning Extend’r that if you attempt it solo you’ll feel like you’re on a sailboat; any wind will prevent the material from staying put in the roller-tube slot during the setup. I chased it three times before getting help.
We also had some difficulty dealing with posts atop the support poles that were a little too short. Again, you’ll need help, and the instructions don’t shy away from that recommendation.

The zipper insert fits nicely in the roller-tube slot and is rolled up when the awning
is retracted. It’s designed to work without creating bulges in the awning fabric, and it makes the installation of the extension canopy a simple task.
The process begins by placing the awning in its fully opened position and lining up the slot in the roller tube, per instructions, depending on the awning style. The polyrod from the zipper insert portion of the canopy is then slid into the roller-tube slot until centered, making sure to orient the seams toward the trailer. Once the canopy is zipped to the insert, have your trusted helper hold the centered placement and pull out the slack in one corner in preparation for installing the first vertical support pole.
After finding the ideal pitch by adjusting the support pole for length (46 to 90 inches), the canopy’s corner metal grommet is put on the end of the pole, and the D-rings from two tension straps are placed on the protruding end through the canopy. The straps are then positioned at 90 degrees from the pole and extended straight out from the awning’s edge, stopping at about 5½ feet, measured on the ground. The straps are staked to the ground, and tension is adjusted.

Once the support pole is adjusted for desired pitch, the grommet in the fabric is placed over the post before placing the D-rings for the straps in position. The straps should be 90 degrees from the poles and staked down about 5½ feet from them.
The process is repeated for the other end of the canopy. While the instructions go into a lot of detail, which may cause some consternation at first read, the setup is rather simple and reminiscent of erecting a freestanding canopy. But again, there’s no way to pull this off without the aid of a helper, since you need to keep tension while simultaneously measuring, hammering and adjusting.
The Awning Extend’r definitely improved the amount of shade in the patio area, and the gray polyester fabric seemed strong enough to withstand a moderate amount of wind. When it comes time to detach the extension canopy, the straps and poles are removed, and the fabric is unzipped from the insert, folded and placed in the carry bag for storage.
For $199 to $239 (depending on size) the Awning Extend’r is a good accessory for those who spend time on the patio, especially when you consider how little storage space it consumes. Most importantly, don’t forget to offer your helper a nice refreshment to enjoy under almost twice the shade.
Carefree of Colorado | 303-469-3324 | www.carefreeofcolorado.com