Some expert tips to keep a fully painted motorhome looking great
If you are an owner who insists on keeping the full-body paint job on your motorhome looking like new, you have only two options: Spend a lot of money with a professional detailer; or learn all the proper techniques, buy the tools and products and do the work yourself. For many reasons I prefer the do-it-yourself method, and with years of detailing experience in the automotive world, I can tell you it’s just one big step up to detail a fully painted, full-size motorhome. It may not be as easy as with a car, but if you have the time, patience and interest you can deliver the results of a professional detailer without the expense.
Detailing a fully painted motorhome must be done one step at a time, otherwise the job seems overwhelming. Unless you have a crew of two or three helpers, it’s impossible to do all this work in a single day. Plan on spreading things out over a few days. If you want professional results you should follow all the steps we cover. If, however, you are happy with “average Joe” results, you can skip a few of them. The major steps involved in a full exterior detail are roof cleaning, bug removal, overall washing (including awnings), tire cleaning/protecting, clay-bar paint decontamination (pro step), polishing/swirl removal if needed, paint sealing (pro step), wheel cleaning/polishing, glass cleaning and adding a water repellent to the front glass (pro step). If that list sounds like a lot of work, it is, but nobody cares more about your motorhome than you, so you will often produce the best results.
Commercial detailers are a great resource, but choose them wisely. They often skip many of the professional steps, and they may simply wash and wax the motorhome with a one-step product, which is not always enough to produce professional-looking results. Of course, the main reason detailers are forced to skip steps is that most motorhome owners are not willing to pay the cost of a true professional job. Many times at rallies or on internet forums you may hear owners bragging about getting their coach detailed for $150-$250. If you have ever done a true pro-level job, you already know that it is impossible for a professional detailer to properly complete all these steps at that price.
Not everyone wants or needs a true professional multistage paint prep and decontamination, so feel free to skip those steps if that describes you. If you have ever touched the surface of a true show car, the paint is very slick and smooth, and it has tremendous gloss and reflectivity. This high-quality paint surface is no accident. One of the steps that produces these results is a paint decontamination that uses a detailing clay bar to remove tiny specs of contamination that will stick in or on the surface of the paint.
Fortunately, there is a simple way to test your fully painted motorhome’s paint to see if it needs a clay-bar decontamination. Place a small plastic sandwich bag over your hand, and with your fingertips rub the bag over the surface of the paint. The grit you may feel is comprised of surface contaminants that need to be removed with a clay bar.
Another stage of detailing that is part of the pro package is paint polishing or swirl removal. Since a motorhome is large and difficult to wash, it’s easy to resort to more aggressive methods to clean the sides of the coach, such as heavy-duty brushes like those used at truck-wash stations. These methods of washing (or improper drying practices) can leave swirls in the paint’s clear coat, and from certain angles you will see a series of circular scratches that show up (particularly in darker colors). If you truly want a blemish-free surface, those swirls must be removed. That usually means a random orbital buffer must be used, and it also adds a complete step, or two in some cases, of polishing the entire motorhome to remove those swirls.
The last step in the paint aspect of detailing is the application of a true long-lasting automotive polymer sealant. Polymer paint sealants have become very popular in the automotive detailing world for several reasons: 1) They last longer than traditional carnauba wax products; 2) They are easier to apply and remove from the paint; and 3) They make cleaning the vehicle easier. These polymer sealants usually have no paint cleaners or polishes, and they tend to be a bit more expensive compared to an old-fashioned carnauba wax, but they are well worth the small added expense.
 Don’t assume the products you find on the shelf at the local parts store or discount store are the best products. There are some acceptable over-the-counter products on the market, but the best ones are usually found only at detailing specialty stores or online. As we walk you through the process we can’t cover every possible aspect of detailing, such as exactly how to properly polish every type of paint or how to safely climb onto your roof, so always be careful. That means you need to exercise caution when you polish the paint with a buffer or use any other tool/product not recommended by the motorhome manufacturer. Always check with the owner’s manual or the factory for specific instructions before proceeding with paint detailing. And, of course, exercise caution while climbing a ladder or walking on the roof of your motorhome, especially when the surface is wet.
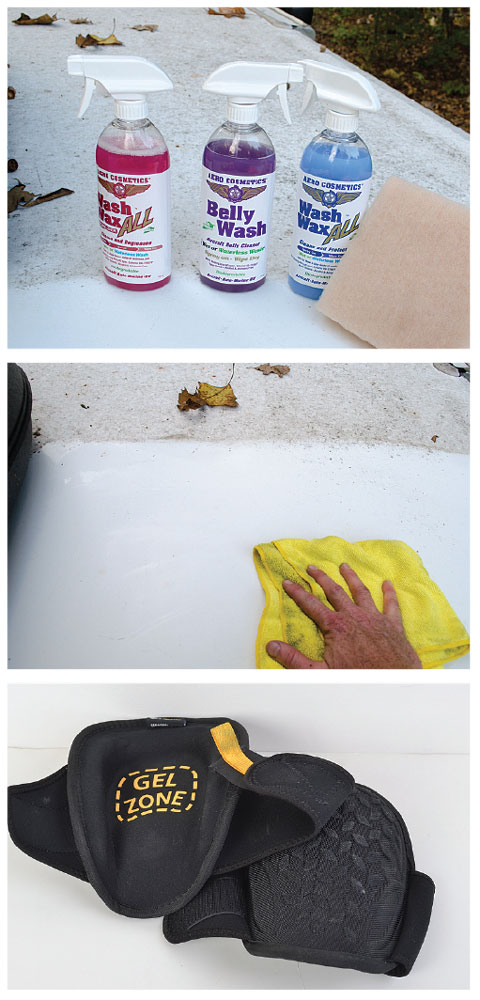
Roof Cleaning
Detailing always starts at the top, so the first step is to clean the motorhome’s roof. The steps shown here apply only to fiberglass roofs. Do not use this method to clean a membrane-style roof or else damage will occur. I have two techniques that I use with two different products, but I prefer the waterless method because it doesn’t allow the dirt from the roof to run down the side of the motorhome.
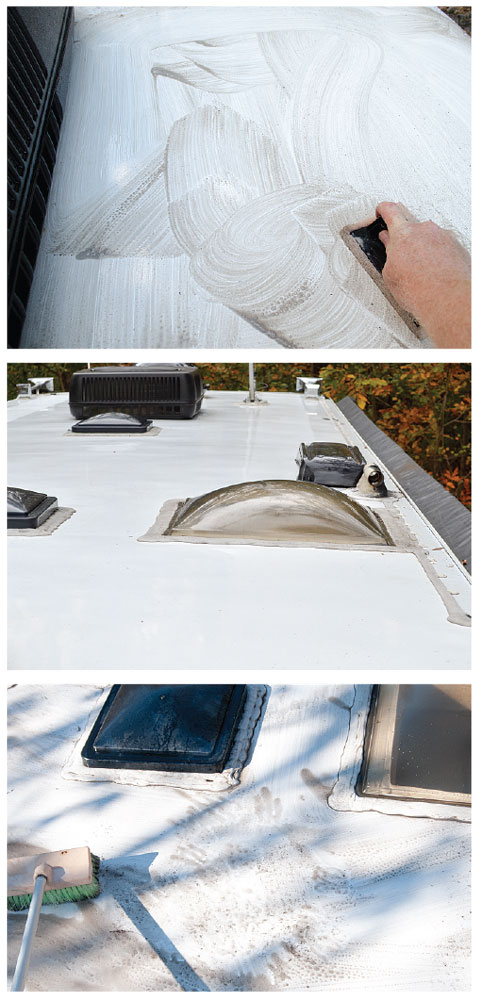 Using Aero Cosmetics Belly Wash and its Aero scrubber tool, spray the cleaner onto a small 2- to 3-square-foot area. Next, use the scrubber tool to remove the dirt, then wipe dry with a clean towel. According to Brian Phillips, owner of Aero Products, the Belly Wash “is completely safe for use on fiberglass roofs and all sealants used on them when used as directed.” In fact, Phillips has no concerns for using it on any solid roof surface. The scrubber actually comes from the cosmetics industry, Phillips says, and is the exact texture used to scrub faces. “It is safe for all painted and nonpainted surfaces and is safe for all the film coatings applied to many motorhome fronts to prevent rock chipping,” he says. If one application doesn’t work, step up to the heavy-duty Belly Wash cleaner and scrub it again. After each scrubbing, wipe the area dry with a clean towel. Repeat this process until the entire roof is clean. A good set of kneepads is also a big help for when you plan on crawling around on the roof for this project. If you encounter areas that refuse to clean up, try a Mr. Clean Magic Eraser pad.
If you choose the wet method, first wet down the entire motorhome, including the top and sides, to help dilute the cleaner and dirt that will get rinsed off the roof. Then spray a cleaner, such as Simple Green or Thetford Black Streak and Bug Remover, liberally on a small section of the roof. Scrub one section at a time with a medium poly-bristle cleaning brush mounted on an extension pole. Rinse each section completely, then repeat until the entire roof is clean. Since the roof is typically made from smooth fiberglass, be very careful while walking around because a wet, soapy roof can be very slippery.

Motorhome Washing
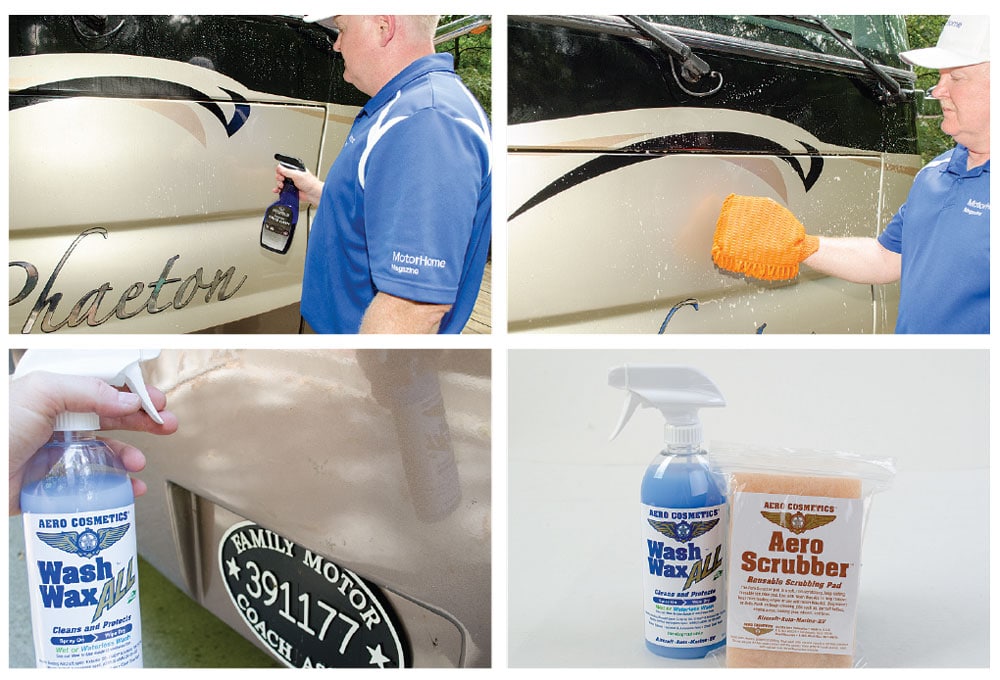
Washing a motorhome is not a difficult task, but it does take some time, and the correct products. There are several ways to wash a motorhome, including a waterless method, but for a thorough cleaning of a really dirty coach you need to get it wet. First, spray the coach completely with water. It’s best to wash the motorhome in the shade if possible, so plan for an early morning or later in the evening to prevent spotting. After wetting the surfaces, we use a hose-mounted foam gun that generates a lot of suds when used with a high-quality soap such as Optimum Car Wash. This high level of suds is critical to lubricate the surface and float the dirt off the paint while cleaning. Next, use a pole-mounted microfiber mitt or a very soft brush such as a Montana boar’s-bristle model. Carefully brush or swab a small area at a time, starting at the top and working your way down. Then rinse completely with water before moving to the next section. Since a motorhome is not flat it takes some work to clean obstructions such as awnings, slideout-awning covers and windows, so make sure you swab around all those areas to get them cleaned. In order to prevent water spots, use a product like the microfiber mop system from Aero Cosmetics to dry off the flat surfaces after the final rinse.
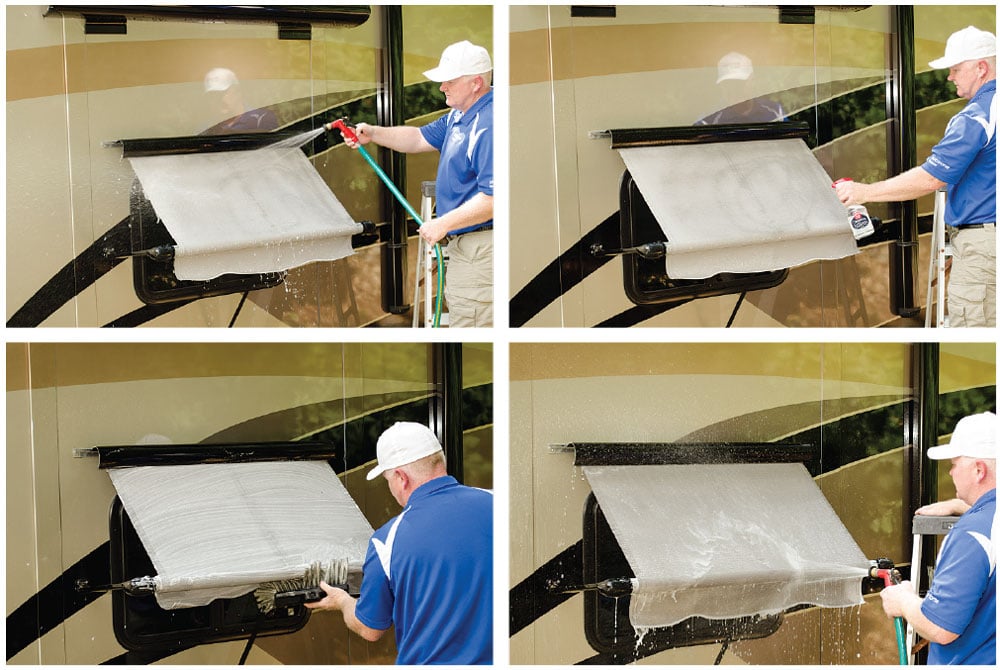
Awnings and Slideout Covers
Awnings and slideout covers get dirty, too, so they must be cleaned as part of the detailing process. For the fabric awnings I use Griot’s Garage Convertible Top Cleaner. It is specifically made for automotive tops and works great on acrylic/Sunbrella awnings while remaining gentle on the paint. Awnings positioned closer to the ground can be done on a ladder, while others may need to be done from the roof. First, wet the awning, then spray on the cleaner. Next use a soft-bristle brush or foam sponge to completely clean the awning or slide-topper, then rinse completely. Repeat this same process on all awnings and slideout toppers. If the fabric is heavily stained, follow the instructions on Sunbrella’s website or your owner’s manual for specific removal instructions.
Bug Removal
Bug removal on the front of the motorhome is another process that must be done regularly. One of my favorite products is Optimum’s Power Clean. To use this product for bug removal, dilute it 3:1 with water and then spray it on a cool surface in the shade. Allow it to soak in a bit and then scrub with a bug-cleaning pad like this one from Griot’s Garage, then completely rinse with water.
If you prefer a waterless method of bug removal, use Aero Cosmetics Wash Wax All and spray directly on the surface. Then scrub the surface with the Aero Cosmetics scrubber pad and wipe dry with a clean microfiber towel. This method is great when you are on the road or if you don’t have access to rinse water.
Professional Step: Paint Decontamination
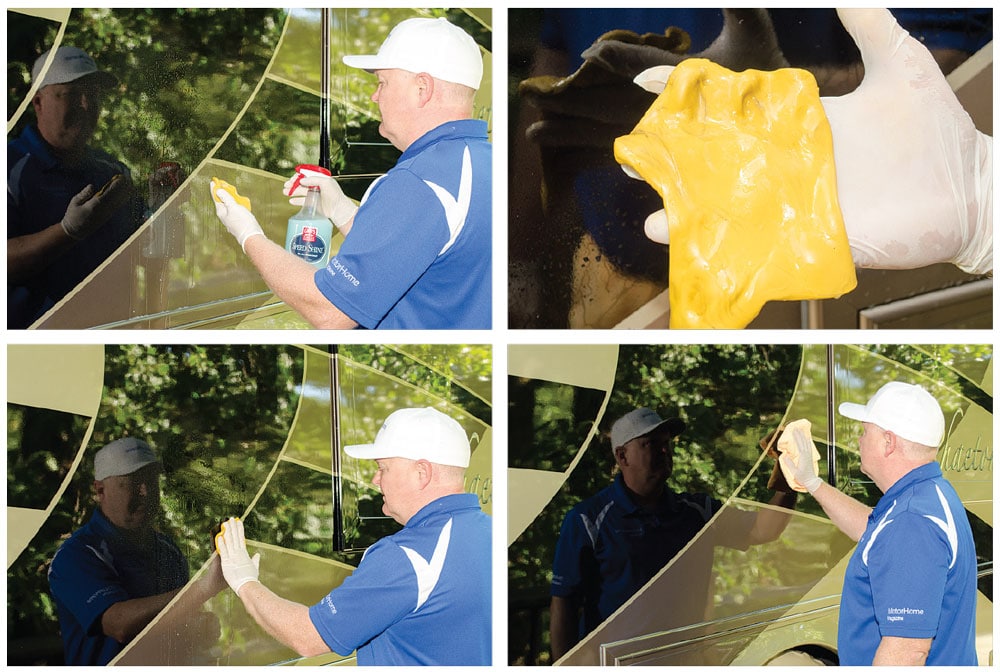
After the fully painted motorhome is washed and dried, it’s time to turn your attention to paint preparation before polishing and sealing. This is one of the professional steps that is called clay-bar paint decontamination. Clay bar is a dense clay material that is slid across the paint using a barrier spray lubricant to protect the paint. The clay removes tiny particles of road tar, grit, acid-rain deposits, etc., that are stuck to the paint and not removed by normal washing. The result is a super smooth paint surface that feels as if it just rolled off the production line. It’s best to wear thin protective gloves to keep the clay from sticking to your hands.
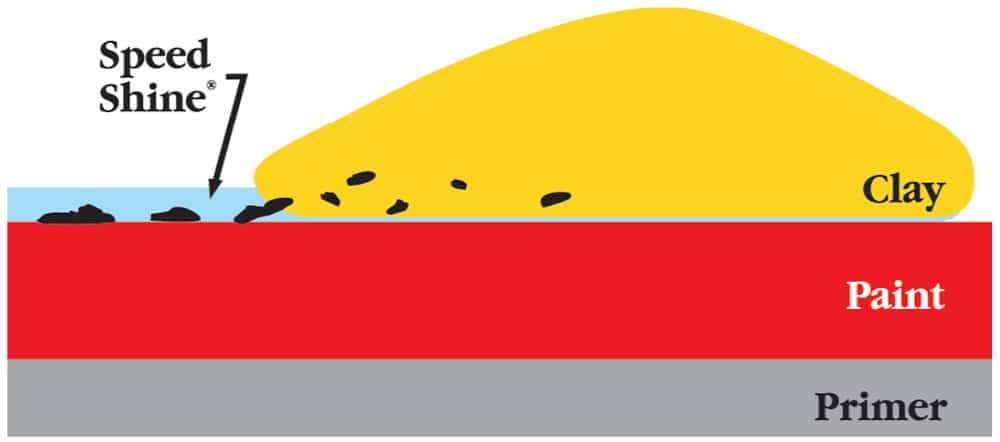
Clay bar is used by the pros to remove surface-paint contaminants.
First, spray the clay and the paint surface in small sections (2- to 3-foot squares) with a surface lubricant such as Griot’s Speed Shine. This lubricates the paint and allows the clay to glide freely. Then flatten the clay (it works best if you keep it warm in a plastic tub of hot water when not being used) to a 2- to 3-inch-diameter piece that looks like a small pancake and work it lightly across the wet section of paint several times. If you feel the clay grabbing on the paint, you need more lubricant. After you have completed one section, dry it with a microfiber towel. Before moving to the next section, fold the clay several times and create a new pancake to ensure you keep a fresh section of clay against the paint. Take care to never drop the clay on the ground and if it gets too dirty you may need more than one piece to complete an entire motorhome, especially if this is your first time doing this step. Complete the clay-bar paint decontamination of the entire motorhome before proceeding to the next step.
Professional Step: Polishing and Swirl Removal
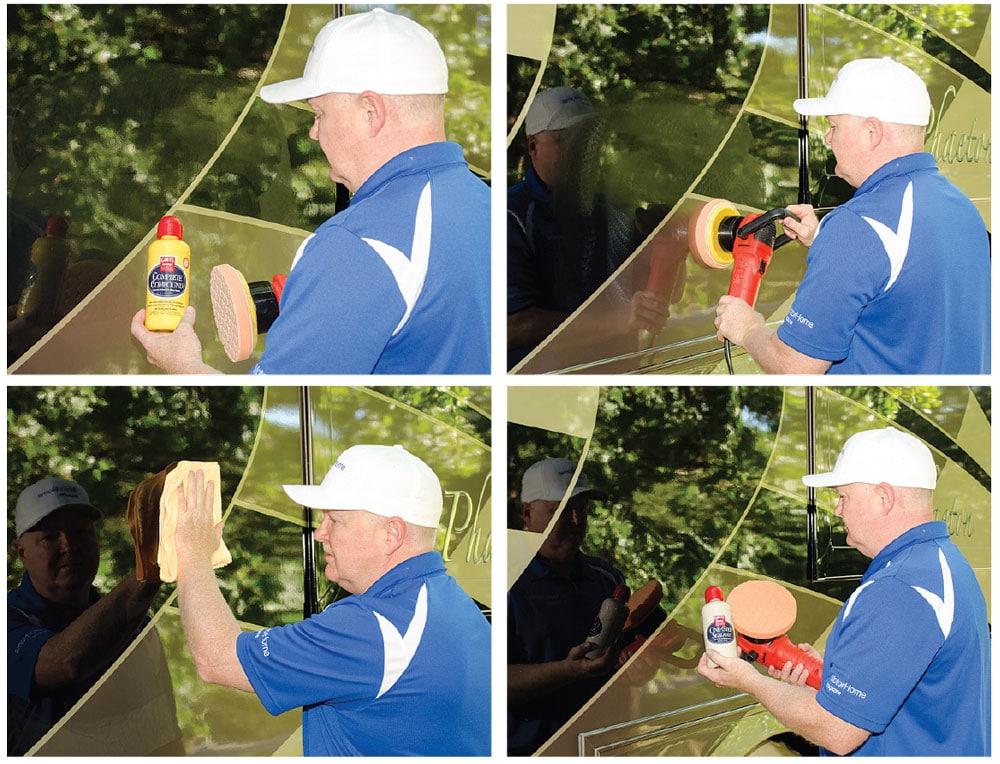
Paint-defect and swirl removal is one of those steps that really separates the pros. No, it is not easy, and yes, it takes a lot of time, but if you want the shine and swirl-free finish of a show car it’s a necessary step. For swirl removal and polishing out paint defects there are two options. One is to use an all-in-one product. This means the product has polishing abrasives and a wax or polymer sealant built into one, such as Griot’s One-Step Sealant. These all-in-one products offer good polishing and good paint protection, but to achieve true professional results the polishing needs to be separated from the sealing, and performed as individual operations.
I use an electric buffer from Griot’s and a white (polishing) foam pad (use an orange light cutting pad if you have more severe defects), along with Griot’s Complete Compound (use Griot’s Complete Polish if you only have mild defects) to remove all swirls and to polish the paint to perfection. There are different polishes with different levels of “cut,” and the density of the foam buffer pad is also important, so make sure to match the polish and buffing pad to the severity of the paint defects or else you can create more scratches than you remove. If you are not familiar with the buffing process, speak to a professional or view some of the many tutorials online.
After buffing each section of the paint, remove the residue with a high-quality microfiber towel. Repeat this process until the entire motorhome is buffed and free of defects. This could take between four and eight hours, depending on the condition of the exterior. Make sure to buy microfiber towels made specifically for automotive detailing. For wax or polish removal, I prefer a soft, medium to medium-plush pile, lint-free towel; 360-500 grams per square meter (gsm); with a 75/25 or 70/30 blend. Most detail supply stores carry these, but one of my favorite suppliers is www.chemicalguys.com due to its great selection.
Professional Step: Paint Sealing
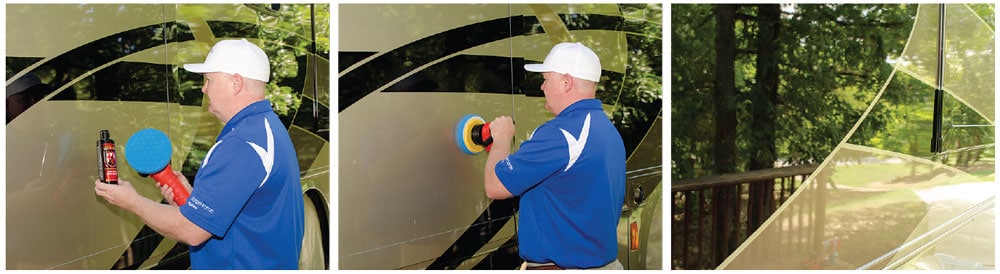
After the paint is clayed and polished, it needs to be sealed to protect it from the elements. As with the other steps above, there are many options and products to seal the paint. The traditional method is to hand- or machine-apply a synthetic sealant to the paint and remove it by hand with a quality microfiber towel. For many people this is the only step used. For longer-lasting results I recommend using a synthetic polymer sealant. Some of my favorite and easiest to use polymer paint sealants (with no polishing abrasives) are Rejex Paint Sealant and Wolfgang Deep Gloss Paint Sealant. If you skipped the separate polishing and defect-removal step and want to use a traditional paint sealant, you will need to use one that also contains paint-cleaning abilities such as Duragloss Total Performance Polish #105 or Griot’s One-Step Sealant. Most of these products will provide good coverage for four to eight months, depending on the environment.
The easiest way to apply a paint sealant to a large vehicle such as a motorhome is by using a power buffer and a blue or red foam pad made specifically for applying sealants. Place a small amount of the sealant on the pad and spread it out over each area, then let the polish completely cure before removing it. This sealant is so 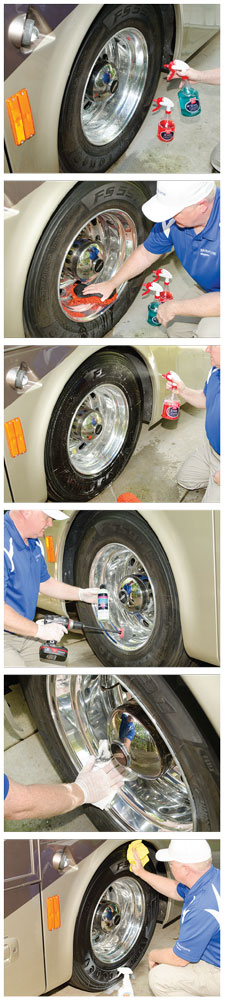 forgiving you can apply it to the whole side of the motorhome (in the shade) before removing it with a new, high-quality microfiber towel. In this step you are not polishing the paint, so do not apply pressure; simply allow the buffer to evenly spread the product to a thin, almost invisible layer on the paint. After curing, the sealant wipes off very easily and leaves a great, long-lasting shine. Each product may have different application and removal directions, so read the label of the polish and wax you plan on using and follow those directions.
Tires and Wheels
Now that the paint is cleaned and sealed, the next step is detailing the tires and wheels. The tires will need to be cleaned with a product made just for tires and then protected with a UV-rated protectant spray. Some tire companies recommend that tires are cleaned with only soap and water, so check with the manufacturer before proceeding. The wheels also need to be cleaned and polished. Since motorhome tires usually age out before they wear out due to tread wear, it is very important to use products made just for tires. I use Griot’s Rubber Cleaner and a brush or stiff sponge to wash away road grime and dirt. For the wheels, I use Griot’s Wheel Cleaner and a foam or microfiber sponge. After the wheels are clean, they need to be polished to a high gloss (assuming they are uncoated aluminum wheels). Make sure the wheels are not coated aluminum before completing this step, or else you can damage the surface coating applied to some types of aluminum wheels. My favorite wheel polish is Zephyr Pro 40. When combined with the Mothers PowerBall foam polisher attached to a cordless drill and a roll or two of paper towels, you can easily produce a great-looking shine in about 20-30 minutes per wheel. All paper towels are not the same, so use Viva brand for best results.
After the wheels are cleaned and polished, it’s time to apply a rubber dressing on the tires to protect them from UV rays. A longtime favorite of RV owners is 303 Aerospace Protectant. Since its ingredients don’t include anything harmful to rubber, it won’t accelerate tire wear or degradation like some tire dressings that contain petroleum distillates and/or silicone can do.
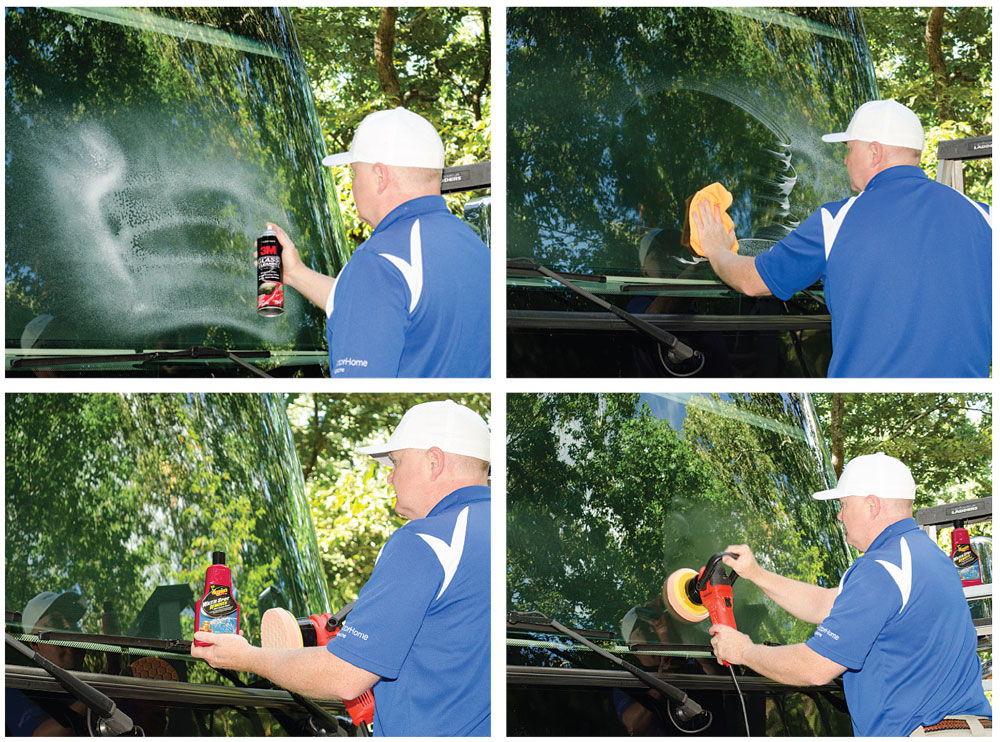
Professional Step: Glass Cleaner and Sealing
If your motorhome’s windshield glass is not clean, it makes driving harder and more annoying as you try to peer through smudges, streaks and bug splatter. For these reasons, detailing glass properly is just as important as detailing the rest of the motorhome. There are many good glass cleaners on the market, but two of my favorites are Stoner Invisible Glass (aerosol version) and 3M Glass Cleaner. First, clean the glass completely inside and out using Viva paper towels, old newspaper pages or a new microfiber towel. If there are hard-water deposits or etching on the glass, you may have to attack it with a buffer or by hand polishing with a product like Meguiar’s Water Spot Remover.
After the glass is squeaky clean you should then use a water-repellent spray to make driving in rain a lot easier. The application of a water-repellent spray will make the water bead up and roll off the windshield, greatly increasing visibility. Rain-X has been a favorite of mine for many years but it can be tricky to apply and remove without streaking. If you struggle with streaks, I have found that using Optimum’s Opti-Seal sealant is not only easier, but it lasts longer as well. Simply spray it on a foam pad sparingly, wipe it on the surface evenly then buff any residue off with a microfiber towel. This product flashes off the surface almost instantly so there is very little residue to wipe off if applied properly. It also really helps to use it on the driver’s side window and the rearview mirrors.
Once you’ve completed all the steps, take some time to appreciate how great your motorhome looks. Not only does detailing help retain that showroom shine, but keeping the motorhome clean can help increase the longevity of many of the components, and will only add value should you decide to trade in for a newer model.
Sources
303 Aerospace (a Gold Eagle product) | 800-367-3245 | www.goldeagle.com
3M Auto Care | 877-666-2277 | www.3mauto.com
Aero Cosmetics | | 800-927-4929 | www.washwax.com
Duragloss | 336-229-6480 | www.duragloss.com
Griot’s Garage | 800-345-5789 | www.griotsgarage.com
Meguiar’s | 800-347-5700 | www.meguiars.com
Optimum Car Care | 901-363-4955 | www.optimumcarcare.com
Rain-X | 855-888-1990 | www.rainx.com
RejeX | 877-577-5803 | www.rejex.com
Stoner | 800-227-5538 | www.stonercarcare.com
Thetford | 800-543-1219 | www.thetford.com
Wolfgang Car Care | 800-547-8109 | www.wolfgangcarcare.com