Eliminate the 3,000-mile service interval and keep brakes efficient, even as they wear
What is more important than getting your RV to a destination for the weekend? Being able to stop it, of course. The electric brakes on travel trailers and fifth-wheels are necessary to safely stop the combo, but they need regular maintenance and adjustments to continue operating properly. In fact, electric brakes need to be adjusted every 3,000 miles or annually, whichever comes first. During that mileage period, there can be some, although minimal, reduction in brake efficiency as the pads wear. So, snowbirds, for example, would likely exceed that interval during a winter trip south and back.
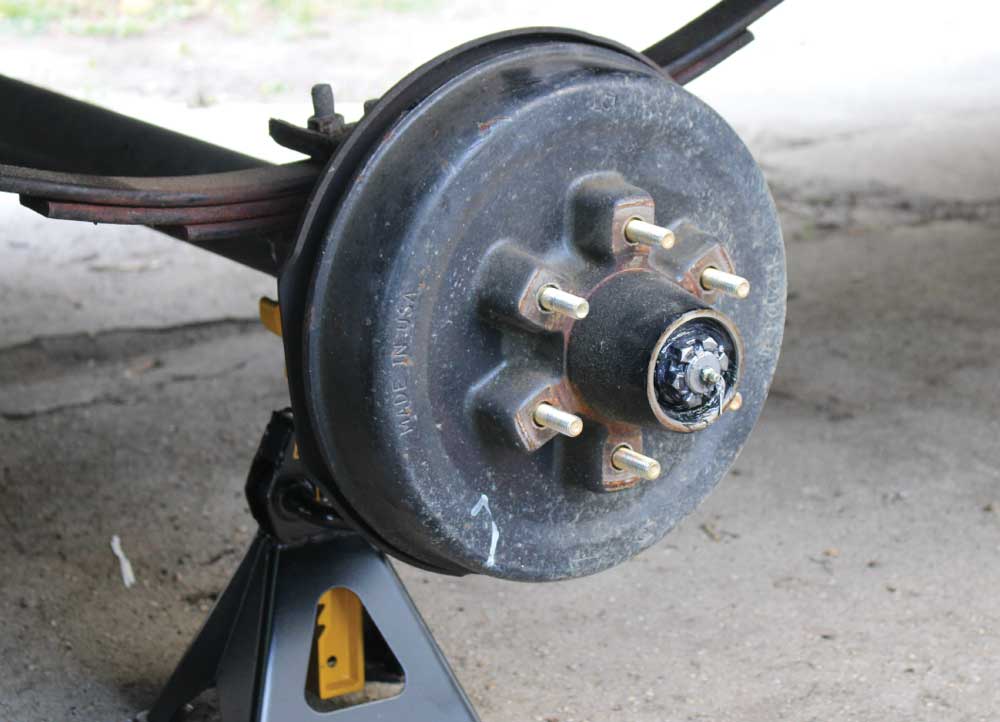
The dust cover is removed, exposing the cotter pin and castle nut. The
test trailer was equipped with LCI’s Super-Lube axle spindles.
Forward Self-Adjusting Brakes from Lippert Components (LCI) eliminate the need for periodic adjustments that are required to maintain the integrity of standard electric drum brakes, which can be a great service convenience while on the road.
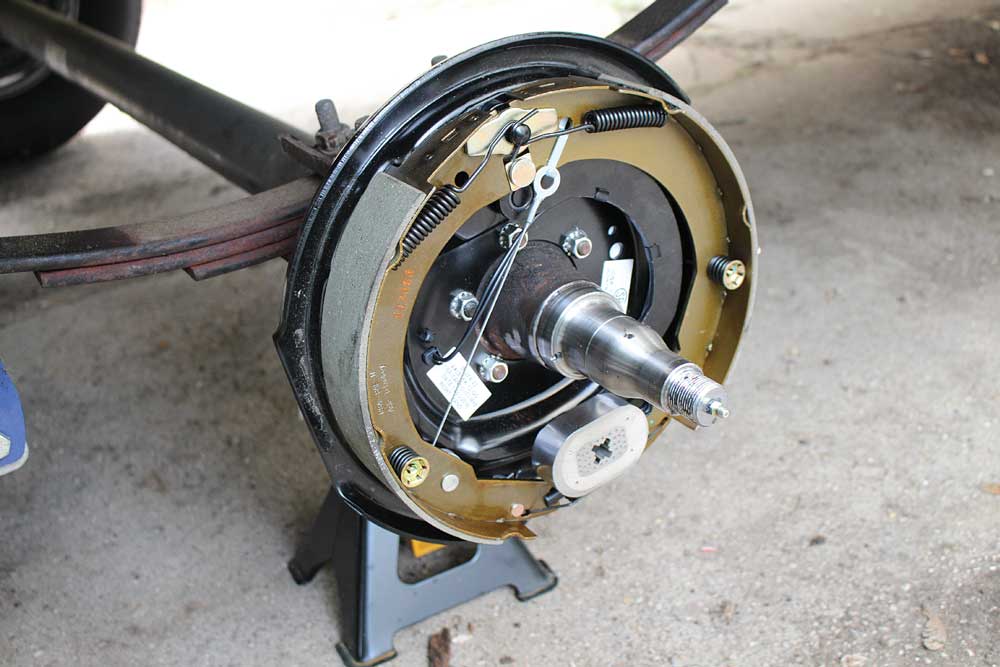
Electric drum brakes have long been the dominant braking system used on travel trailers and fifth-wheels due to their reliability and low cost. They operate using two brake shoes with attached friction material commonly referred to as the brake lining. At the bottom, an adjuster joins the two shoes together. An electromagnet, connected to an actuating arm, is energized by electric current from the brake controller in the cab of the tow vehicle. When energized, the magnet is attracted to the rotating surface of the drum, causing the actuating arm to move and press the brake shoes against the drum. Friction between the brake linings and the drum slows the wheels.
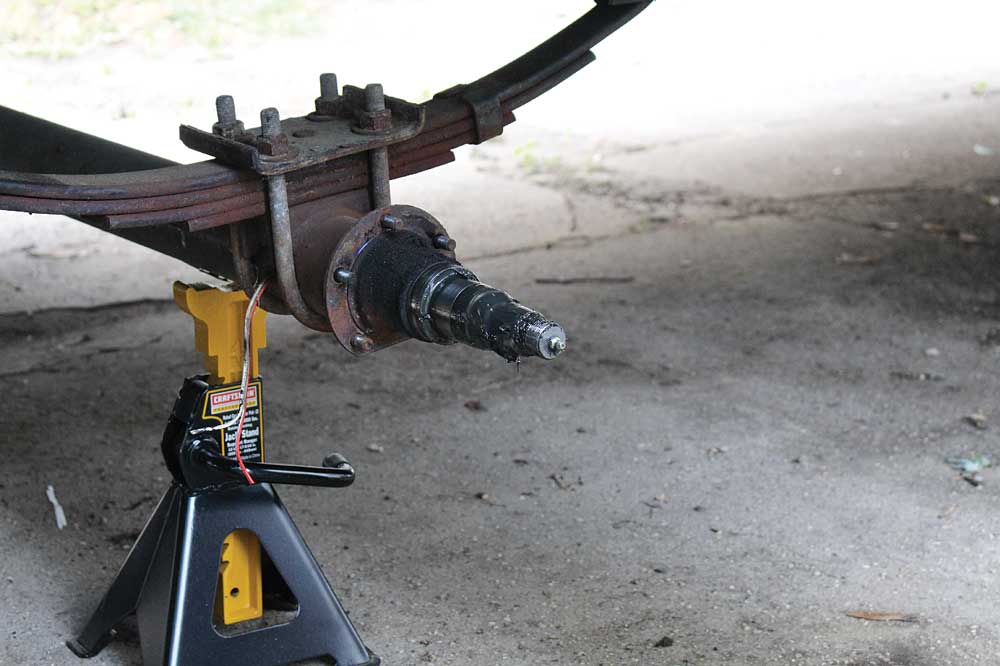
The brake wires on the right side of the trailer are routed through
the axle tubes.
Unfortunately, every time the brakes are activated, the friction needed for slowing the trailer causes the brake linings and the drums to wear, forming a gap between them, subsequently decreasing the performance of the brakes. On standard electric brakes, the gap can be mitigated by manually adjusting the brakes after the first 200 miles and then every 3,000 miles. Although the brake adjustment isn’t difficult, the procedure requires raising the vehicle, safely supporting the frame, crawling underneath for access behind the wheels and performing the adjustment with a special brake tool. Having the adjustment done by a professional adds to the trailer’s maintenance cost, but it’s well worth it if you aren’t comfortable performing this procedure.
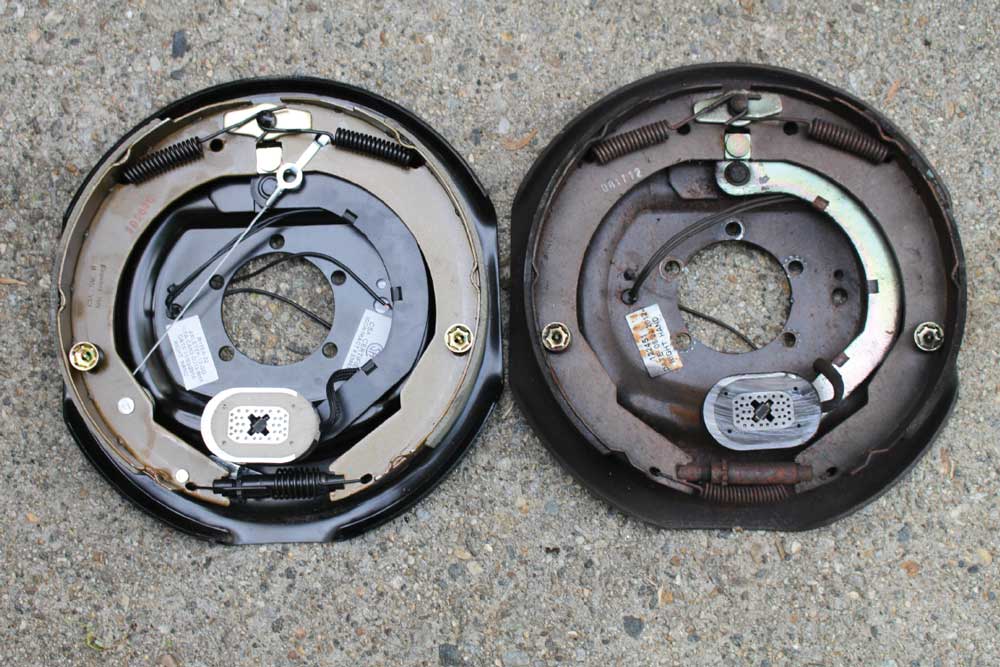
LCI’s Forward Self-Adjusting Brake is shown on the left, and the trailer’s
original standard electric brake is shown on the right.
Often, even seasoned RVers will overlook brake adjustments. Instead, brake wear is compensated for by increasing the gain on the brake controller, sending more voltage to the magnets. Increasing the gain is an imperfect solution that still results in reduced brake performance and causes increased wear of the magnet and drum surface.
Forward Self-Adjusting Brakes have a mechanism that automatically adjusts the brake shoes during every forward stop. A cable attached to the front brake shoe wraps around a pulley on the rear brake shoe. The cable is connected to a lever that rotates the adjuster when the brakes are applied, keeping the required aforementioned gap in spec. This type of self-adjusting drum brake was used for many years on motor vehicles with drum brakes, so it is not a new technology; it’s a proven, reliable system used in a new application.
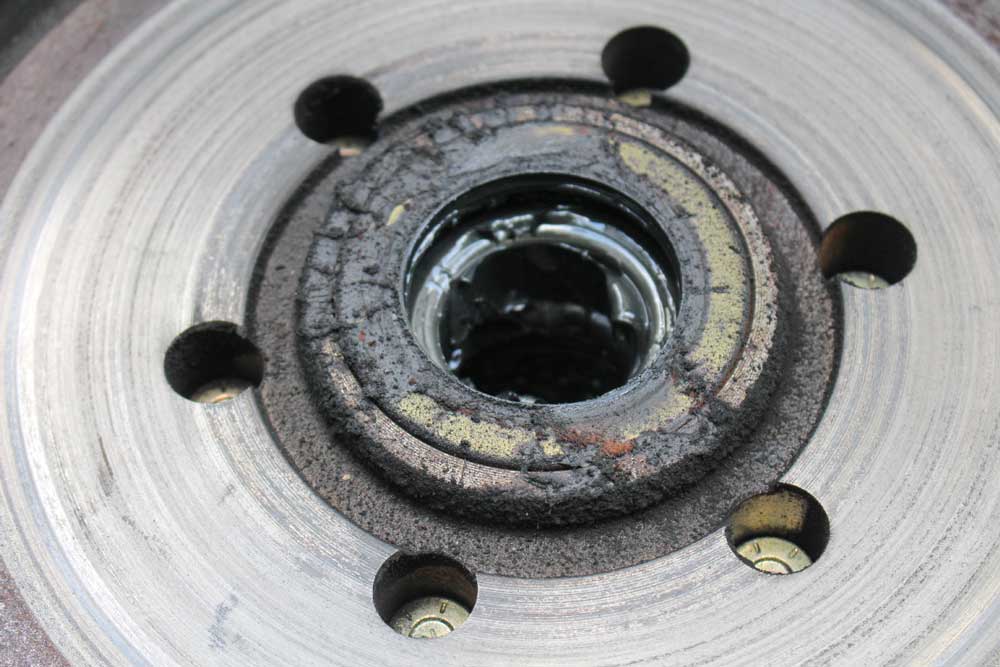
This inner seal showed indications of wear and was allowing grease to
enter the drum.
To test the effectiveness of these self-adjusting brakes, the components were installed on a 33-foot travel trailer. The installation took about an hour per wheel, including greasing the bearings, and the process should be within the capability of trailer owners who are familiar with brake maintenance. Although the brakes did not come with installation instructions (the company is in the process of developing an installation manual), the necessary information can be found in the Electric Brakes Owner’s and Service Manual on www.lci1.com.
Two brake assembly sizes are available: 12-by-2-inch for trailer axles rated between 4,000 and 7,000 pounds, and 10-by-2.25-inch for 3,500-pound-rated axles. The test trailer was equipped with LCI axles, rated at 5,200 pounds, and fitted with 12-by-2-inch electric drum brakes. To get the first number in the brake size, measure the inside diameter of the brake drum or the diameter of the installed brake shoes. The second number is the width of the brake shoe. We used LCI part number 296651 for the left side and 296652 for the right, which include the brake assembly, washers, nuts and sealed wire connectors. New drums are not included with the brake assemblies.
Five backing-plate nuts and washers attach the brake assembly to the
axle housing.
There is a difference between the left and right brake assemblies, and they must be installed in the correct position. LCI provides a label on the new assemblies that indicates the intended sides. A quick visual inspection will reveal that drum brakes have a forward-facing primary shoe and a rear-facing secondary shoe. The primary shoe has an easily identifiable shorter brake lining than the secondary shoe and should always be installed with its brake lining facing toward the front of the trailer.
Installation began with jacking up the trailer. A trailer must never be lifted by the suspension or axle. An appropriately sized jack should be placed under the trailer’s frame, being careful not to push against propane pipes or electrical wires. A block of wood between the jack and trailer frame can help prevent damage to the frame. The front and rear of the wheels on the opposite side of the trailer were chocked, and jack stands were placed under the frame and axle. For safety, never raise or support a trailer with its leveling or stabilizing jacks.
Once off the ground, the lug nuts and wheels were removed. Working on one drum at a time, the dust cap was removed. This can be done using slip-lock pliers, a dust-cap removal tool or a flat-tip screwdriver. The cotter pin was then removed, followed by the castle nut, flat washer, outer bearing and drum. Some axles may use a retainer instead of a cotter pin, which can be pried off easily with a screwdriver. The two brake wires were cut near the crimped-on connectors. It was not necessary to tape the wires since no electrical current was present. The final step was to remove the backer-plate nuts and the brake assembly.
The new brake assembly, which comes completely assembled and ready to bolt on and wire up, was held in place with the new nuts and washer, and tightened to 35 to 55 lb-ft. Connecting the wires was made easy with the included sealed terminals, which didn’t require stripping the insulation. One wire from the brake assembly was inserted into one of the three holes in the connector, and one of the trailer wires into another hole. Electrical polarity isn’t a concern with an electromagnet. These weather-resistant connectors, which are included, are filled with dielectric grease to provide moisture resistance.
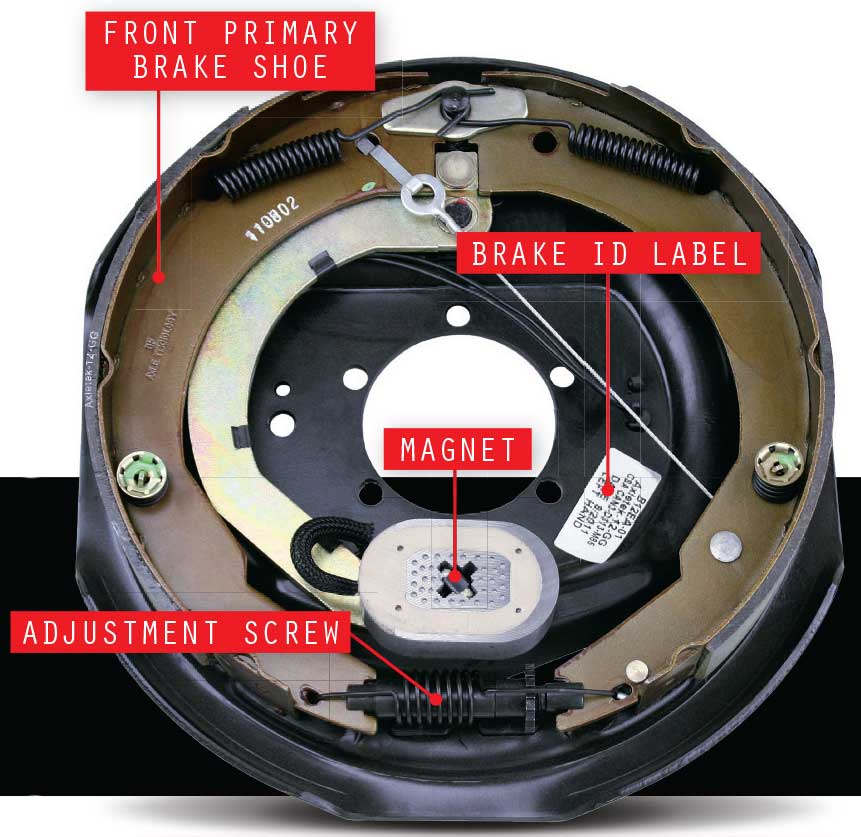
KNOW RIGHT FROM LEFT?
When replacing the brakes, be sure to order two left and two right
brakes. Double-check when installing them. The primary brake shoe
faces the front of the trailer, and the brake ID label indicates left or right.
The connector was crimped with pliers, making sure the cap was fully seated but being careful not to apply too much force. Slip-joint pliers should not be used due to the action of their jaws, which can cause the cap to become cocked with only one side fully engaged. Be sure to check the connection carefully to verify that the connector grabbed correctly. Purchasing additional connectors before starting the job is a good idea in case one fails,
as they are not reusable. LCI sells its Sealed Wire Connectors on its website (store.lci1.com/sealed-wire-connector),or you can purchase 3M Scotchlok 314 connectors, which are available from Amazon, Waytek Wire and some local auto-parts stores.
The test trailer bearings were due for service, so this was an opportune time for repacking and replacing the inner seal. Bearings should be repacked once a year or every 12,000 miles — if possible, with a bearing packer (available at tool and auto-parts stores). If repacking isn’t necessary, the inner axle seal should be inspected for nicks, tears, cracks and axle grease that has passed through the seal. If there is any reason to suspect that the seal has failed, it should be replaced by prying it out with a seal removal tool or a screwdriver. Never strike or press on the inner bearing to force out the seal, which could damage the bearing. Install the new seal with a seal driver or by placing a block of wood over the seal and driving it evenly with a hammer until flush with the edge of the drum.
Next, the drums were inspected for excessive or uneven wear, scoring and damage on both the braking surface and the surface that contacts the magnet. Precise tolerances, provided by the axle manufacturer, can be checked by a qualified technician. It may be possible to resurface the drums to correct uneven wear or scoring; however, it may be necessary to replace them. The test trailer’s drums showed only minor wear and were reused.
After the drum was slid in place, the outer bearing, flat washer and castle nut were installed on the spindle. The castle nut was tightened to 50 lb-ft while slowly rotating the drum. The castle nut was then loosened and finger-tightened until snug. A new cotter pin was inserted into the hole in the spindle. If the tabs on the castle nut do not line up with the hole in the spindle, slightly loosen the castle nut until the cotter pin can be inserted. With the cotter pin installed, the castle nut should be free to move slightly. The wheels were then reinstalled, and the lug nuts tightened to the torque specification and sequence in the trailer owner’s manual. The lug nuts’ torque was rechecked after the first 50 miles and rechecked after the next 50 miles.
Like all new drum brakes, LCI’s Forward Self-Adjusting Brakes should be properly broken in (burnished). LCI recommends a break-in period requiring 20 to 50 brake applications. To burnish the brakes, set the brake controller’s gain to approximately midway or slightly higher (see the brake controller’s owner’s manual for directions). Tow the trailer at about 40 mph, then activate the manual button or lever on the brake controller until the combo slows to 20 or 25 mph. Using only the manual control forces the trailer’s brakes to slow down both the tow vehicle and trailer, which helps burnish the brakes quicker. Braking applications should be conducted at no less than 1-mile intervals to prevent the brake linings from overheating.
Burnishing the pads smooths out any high spots in the brake linings, magnets and drum surfaces. LCI states there should be close to 100 percent contact between the brake lining and drum surface after 50 brake applications, and the driver should notice an increase in brake performance in as little as 10 applications. The brakes on the test trailer became noticeably more effective after the break-in. The trailer has been towed more than 2,000 miles since the installation, and the brakes have functioned evenly and strong with
no noise or excess heat.
LCI’s Forward Self-Adjusting Brakes can pay for themselves through reduced maintenance costs. The 12-by-2-inch brakes sell for $96.03 each, and the 10-by-2.25-inch assemblies are $83.72 each. The relatively low cost of the braking assembly makes it practical to replace the entire unit rather than just the pads on the old brakes, given the time and effort involved, and the peace of mind knowing the brakes will always be adjusted properly.
Lippert Components, Inc. | 574-537-8900 | www.lci1.com/self-adjusting-brakes