Replacing worn and broken trailer fender skirts is an easy DIY project, thanks to Icon Technologies
Our 2013 Dutchmen Coleman travel trailer’s sun-faded, scratched and cracked fender skirts had become an eyesore. A blown tire had left the right-side fender skirt badly scratched, while several cracks had formed on both skirts, originating from the mounting screws. A set of replacement fender skirts was overdue.

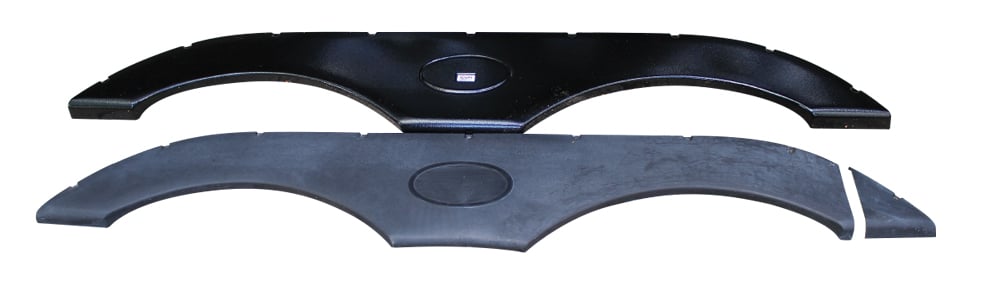
The new Icon fender skirts are nearly a perfect match for the originals, thanks to the website’s three-step process for finding the right replacements.
Our search began on Icon Technologies’ website, a company that specializes in plastic products used in the RV industry including freshwater tanks, skylights, bathtubs and fender skirts. The website greatly simplifies the process of finding the correct replacement fender skirts. We started by printing Icon’s Easy As 1-2-3 Fender Measurement Guide, which contains a diagram identifying the six measurements Icon uses and the corresponding letter identifier. We used a tape measure to take the necessary measurements and recorded them.

Start by removing the mounting screws in the original fender skirts and keeping them handy. The Icon replacements do not come with screws. Our screws were in good condition, so they were reused.
Returning to Icon’s website, we clicked on a link to the company’s online fender-skirt app, www.lookup-our-skirts.com. The app uses a simple three-step process. Step one requires choosing between single-, tandem- and triple-axle fender skirts. In step two, we identified the trailer’s manufacturer. Coleman wasn’t listed in the drop-down menu, so we selected Coleman’s parent company, Dutchmen. The third step provided a list of fender skirts that might fit the trailer, along with measurement diagrams. By comparing the recorded measurements of our trailer’s fender skirts with the diagrams, we found a nearly perfect match, which was available in six color choices.

Depending on the design, a support might be used behind the lower center of the original fender skirt. A screw attaches the fender skirt to the support, either through the front or under the lower edge of the fender skirt, and needs to be removed.
Icon fender skirts can be ordered from any Icon distributor or reseller, or at www.icondirect.com. The fender skirts for our trailer sold for $159 each, plus shipping, with a 10 percent discount for ordering two. Prices vary depending on length, model and color.
Installation starts with detaching the old fender skirt by removing the mounting screws. Screws are often added under the bottom edge of the skirt and can be difficult to see. The top edge may have been sealed with silicone that will need to be carefully cut with a utility knife. Any sealer remaining on the trailer’s siding can be removed with a plastic scraper and mild solvent.

The new fender skirts are predrilled with a 1/8-inch drill bit to prevent possible cracking caused by the mounting screws. Icon recommends predrilling, even if self-drilling screws
are used.
Our replacement fender skirts had indentations where the mounting screws go through the skirt. The fender skirts should be predrilled before installing the screws to prevent cracking. We installed the center screw first in the existing hole in the siding. The remaining screw locations were slightly different from those on the original fender, requiring new holes to be made in the siding. This worked in our favor because some of the original screw holes had been stripped. If you use new screw locations, fill the old screws with sealant to avoid water intrusion via those holes.

The fender skirt is mounted in place, and the cut line between the slideout and the body of the trailer is marked with a strip of painter’s tape. A screw is removed, and a spacer is placed between the fender skirt and the side wall to prevent damage while cutting.
The next step was to align the curved ends of the fender skirt with the radius of the trailer’s bottom skirting (J-wrap). The curves on the bottom edge of the new fender skirts were slightly different from the originals, causing a small gap between the J-wrap and each fender skirt. We took a few minutes with a sanding block to slightly alter the curves in the fender skirts, resulting in a tight fit with the J-wrap.
On both sides of the Coleman trailer, the fender skirts mounted on slideouts, except for a small section that was cut off and mounted on the trailer body. We used an oscillating tool with a saw blade to make the cut and a sanding block to remove burrs and sharp edges.
The final step was to carefully tighten all the screws until they were snug, without overtightening. Overtightening can cause cracking when the fender skirts expand and contract due to changes in temperature.
Installation was an easy one-hour job for both Icon fender skirts, and they give the trailer a more polished look.

Showing their age, the original fender skirts had scratches, cracks and fading after years of exposure to the sun and weather.

The Icon replacements give the trailer a fresh, clean look.
Icon Technologies Limited | 888-362-4266 | www.icondirect.com