Adding inexpensive, temporary plastic film helps maintain comfort in cold weather by restricting heat loss and condensation
No matter how much we all love our time RVing, let’s face it, for many it’s still a seasonal thing. Typically, RVing is most desirable during the fall, spring and summer months when it’s warm and friendly outside and we don’t have to struggle to keep the interior — and systems — warm. Many RVs are not designed for cold-weather travel, and getting them to that level requires some modifications. When considering a cold-weather adventure, preparation must include improving the insulation, especially at the windows where heat loss can be huge.

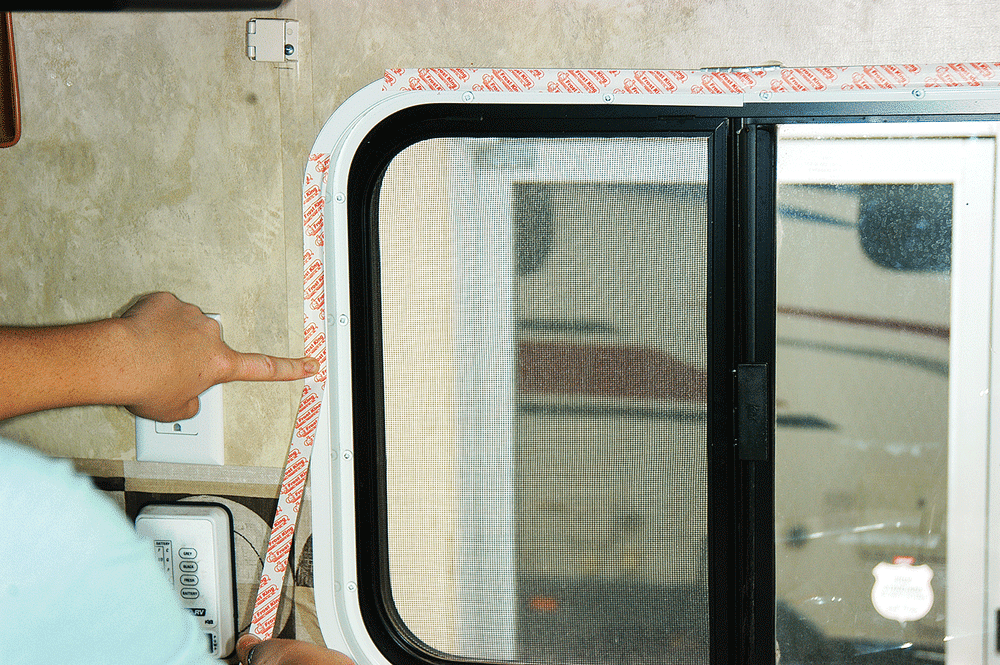
(1) Double-sided tape is applied to the window frame after cleaning. The tape has a strong
adhesion but will need to set for 15 minutes before applying the window film.
Most RV windows are not dual-pane and therefore don’t offer the insulation needed to reduce heat loss or gain. Additionally, condensation can build up easily on the inside due to the extra cold coming in through noninsulated windows and moisture that’s created by using the shower and stove, and from occupants breathing. Adding a second pane, commonly referred to as a storm window, helps immensely, as does buying the dual-pane window option when you order a new RV. Storm windows are impractical, heavy and must be stored in the winter months, but the space between the two panes provides excellent insulation.
There is an easy way to add this vapor barrier. Frost King, a company that specializes in home weather stripping and insulation, offers an affordable, effective and temporary alternative to dual-pane or storm windows, and can be installed by just about any do-it-yourselfer. The kit is basically a length of plastic sheeting (shrink film) that is “stuck” to the window frame, creating space between the window and film. The Window Insulation Kit we used for the installation was the company’s heavy-duty version, which uses a more rugged double-strength shrink film that is 1.5 millimeters thick. Just like in the standard kit, the heavy-duty kit includes three 42- x 62-inch clear sheets and a roll of extra heavy-duty double-sided tape to attach it.

(2) When cutting the film, leave a 1-inch overlap so that the material can be stretched over the window.
To install the Window Insulation Kit, you have to start with a clean window-frame surface. Using a 50/50 mixture of acetone and water to prep the area will remove all the dirt and grease. From here, the double-sided tape is applied using firm pressure to the cleaned surface and is allowed to sit for 15 minutes for proper adhesion. While waiting for the tape to finish bonding, the film can be unfolded and stretched out to help simplify the installation. Since RV windows are usually smaller than standard house windows, it may be easiest to trim the film closer to the size of the window getting the treatment. Make sure to leave at least 1 inch more film than the dimensions of the frame so there’s something to hold on to.

(3) A hair dryer is used to shrink the film so it forms a tight fit.
The plastic is then attached to the double-sided tape starting at both upper corners and continuing around the edges, while trying to pull all the wrinkles out simultaneously. Pressing firmly on the tape assures good adhesion. The next step involves the use of a hair dryer and moving warm air across the film until the remaining wrinkles have literally disappeared before your eyes. To make a tight fit, the film is actually shrinking. The film is then trimmed carefully with a razor blade, and the job is done.
Frost King advertises an increased R-value of a single-pane window by a

(4) Once the film provides a tight surface over the window, the edges are trimmed with a razor blade or knife.
whopping 90 percent with properly installed heavy-duty film. At first we were skeptical, until the installation was finished. No, it wasn’t crystal clear, but the difference in temperature at the test window versus the others was obvious. Bottom line is this stuff works, you can see through it and considering the less-than-$10 investment from Home Depot or a similar store, it’s well worth the gain in heat retention. It can be easily removed when the weather gets warmer (although the double-sided tape residue will likely give you a bit of a struggle) and there’s nothing to store.
Frost King | 800-299-5700 | www.frostking.com