When was the last time you noticed that funny smell and realized there was steam coming from under the engine’s hood? You may not have noticed that the little needle on the instrument cluster was pegged on “HOT.” Most owners check fluid levels and tires regularly, and we fill the fuel tank, but what about the cooling system? If it stops working, you’ll notice it right away, and if you’re not parked in front of a parts house or a dealer, chances are that molded hose is not going to be hanging on the wall of the local service station like it was 50 years ago.
Diesel or gas, modern engines run significantly hotter today in their efforts to gain better fuel mileage while reducing exhaust emissions. At the same time, plastic parts have become nearly standard wherever they can replace metal. Plastic is great, but it has a lifespan affected by the conditions inside an engine compartment.
In preparation for a lengthy trip we were planning from Lisbon, Portugal to Beijing, China (yeah, driving), we decided it would be prudent to take a careful look at the cooling system in our 1999 Ford F-550. What we discovered might apply to every vehicle on the road that’s more than 5 years old.
The water pump is at the heart of the cooling system, literally. Careful inspection with a flashlight showed clear signs that the seal was leaking and failure was in the wings. That was just the beginning of a full cooling system overhaul. While much of the work could be done by a good do-it-yourselfer, we took our truck to the expert hands at Ken Imler Diesel Performance. Watching the process, we did pick up some tips that may apply to many other makes and engines.

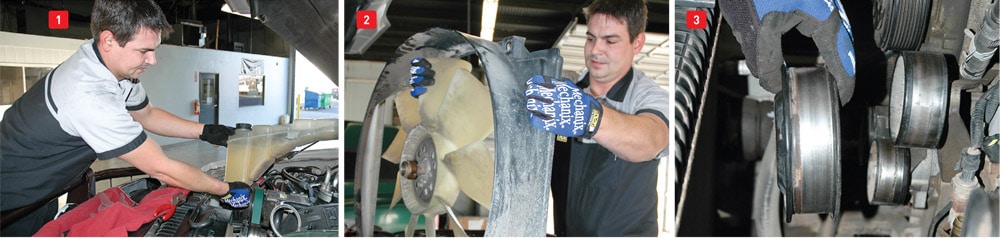
(1) Removing the coolant jug or reservoir opens up working space. (2) The fan blade and shroud are best removed together. (3) Removing the main drive pulley gives access to the pump bolts.
With the coolant drained, Logan Andersen began the operation like a heart surgeon doing his 100th transplant; systematically, but with a trained eye for common problems. With the top hose out of the way and the coolant tank removed, the fan clutch hub was loosened, allowing the belts still under tension to hold it in place. Next, the fan shroud was unbolted and the fan was removed with the shroud. We noted that on this vehicle the fan is a right-hand thread. It was easiest to remove the shroud and the fan together. Caution must be exercised here to avoid poking a hole in the radiator. With the belt still holding everything in place, bolts on the water pump were loosened before finally removing the serpentine belt.
Plugs for the cam sensor, crank position sensor, and coolant temperature sensor were unplugged and moved out of the way and the pulley was taken off. On the 7.3-liter diesel one of the idler pulleys was removed to get to the 10mm bolt on the pump. The water pump, thermostat and housing, and the down-tube all slipped out complete in one piece.
With the water pump on the bench various heater hose fittings and sensor plugs could be moved over to the new Gates water pump.
Gates Water Pumps are recognized in the industry for their durability and superior quality. Every Gates Water Pump is constructed with premium alloy materials and a 100 percent functional test of seals and bearings along with a 100 percent leakage test — for both the casting and assembled water pump — is a big part of the manufacturing process. The quality controlled factory calibration of the Gates Heavy-Duty Thermostat assures accurate heat control under extreme variations in temperature, load and engine vibration.
For the install, a light lubricant is applied to all the O-rings and Teflon tape is used on all of the threads. The Gates pump came with all the necessary gaskets and hardware, including new bolts for the thermostat housing. Installing the spaghetti-like gasket into the groove on the base of the water pump was a little tricky. In this case a small screwdriver was used to push the little nubs in to hold the gasket in place. A bit of lubricant (you can even use liquid dish soap), helps the gasket slide into its slot and keeps it there until the pump is installed. The gasket will leak if it’s twisted.

(4) A hook tool facilitates removing stuck hoses. (5) The water pump, thermostat and housing, and the down-tube all slipped out complete in one piece. (6) The backside of the old water pump was deceivingly clean.
The surface of the block was cleaned using a mild 3M scrub pad and a razor blade. Using an abrasive product could compromise the sealing surface. The new pump was installed and bolts tightened in a cross-pattern to keep the pressure even. They were torqued to 15-18 ft-lb. According to the people at Imler’s, one of the biggest mistakes people make is overtightening the bolts on the water pump. This can crack the front plate, allowing coolant to get in the oil, resulting in a very expensive repair.
With the new pump and drive pulley in place, new Gates idler pulleys and belt tensioner were installed and torqued to 35-40 ft-lb. The belt tensioner is a spring-loaded device that exerts a constant pressure on the engine’s serpentine belt. Gates tensioners ensure proper performance on serpentine belt drives and reduce noise and vibration levels helping to prolong life of other accessory drive components. Gates’ asymmetrically dampening tensioners provide more energy absorption versus conventional symmetric damped tensioners. The pulleys and tensioners rely on sealed greased bearings. They have a lifespan, and like tires on a jet aircraft, it’s prudent to replace them before you have to.

(7) The factory thermostat was easy to remove. (8) The Heavy-Duty Gates thermostat (right) will ensure accurate heat control under extreme variations in temperature, load and engine vibration. (9) The Gates thermostat came with a round gasket. It’s preferable to use the larger flat design that is interchangeable. (10) A small screwdriver is used to push the little nubs in to hold the gasket in place. (11) The new pump was ready for hoses, sensors and the drive belt. (12) Gates tensioners (left) ensure proper performance on serpentine belt drives and reduce noise and vibration.
What makes it all go around and around is the serpentine belt. We slipped on a new Gates Heavy-Duty FleetRunner Belt. Gates claims that it provides twice the service life compared to other heavy-duty serpentine belts. The company designed and produced the industry’s first V-belt and today is the world’s largest manufacturer of V-belts, timing belts and serpentine belts.
Installing a new serpentine belt can be intimidating for the novice. There is usually a diagram on the radiator frame showing the pattern the belt must follow. A long-handled breaker bar works well to release the pressure on the main tensioner and it’s always easier to slide the last section of belt over the smooth idler pulley, not the ridged ones.
As a general precaution, we replaced all hoses with new Gates rubber and in the process, switched from the factory hose clamps that require a special tool to remove for a more common screw-type adjustable hose clamp. Sharp edges of the clamps were protected with Clamp-Aid end guards.

(13) The coolant jug was deteriorating and the plastic brackets were cracking. (14) The fan blade had a bad chip and was clearly showing the brittleness of time. (15) Gates Heavy-Duty FleetRunner Belts are designed to provide twice the service life compared to other heavy-duty serpentine belts. (16) The DieselSite Coolant Filter kit for the 7.3-liter Power Stroke ($129) comes with well-designed brackets and instructions.
In the process of this cooling system overhaul, we took care of a couple of other problems. Plastic is convenient for lightweight manufacturing, but it doesn’t last forever. The coolant reservoir was deteriorating and the plastic brackets were cracking. The fan blade had a bad chip and was clearly showing the brittleness of time. Even the small drain plug on the lower radiator tank was cracked and needed replacing. With 180,000 miles on the engine, many of them on rough backroads, any critical component made of plastic presented a possible liability.
As an extra precaution, we added a simple coolant filter by DieselSite. When you think about it, we filter the oil, the air and the fuel, so why wouldn’t we filter the coolant? The DieselSite Coolant Filter kit for the 7.3-liter Power Stroke ($129) comes with well-designed brackets and instructions. Any contaminants that may be in the system from the original block casting or random corrosion is trapped in the spin-off filter that can be periodically replaced. Surely this will extend the life of the water pump.
Finally with all the hard parts renewed we turned our attention to the coolant itself. Coolant is critical to the proper function of any engine, but especially diesels. After draining all the coolant, we refilled with Fleetguard ES Compleat Lifetime Heavy Duty Fully Formulated Antifreeze/Coolant. We like the fact that it uses the environmentally friendly propylene glycol, and the term “Lifetime Heavy Duty” had a nice ring to it.

(17) A diesel engine’s coolant should be checked at regular intervals with a test kit such as the Fleetguard CC2607 Quik-Chek. You can also have the coolant analyzed by a professional lab. (18) A refractometer can be used to determine the freeze point protection. (19) There is usually a diagram on the radiator frame showing the pattern the belt must follow.
Improper mixtures of antifreeze can cause corrosion, rust, overheating, and even cylinder wall cavitation that can turn into little pinholes, and that’s an engine’s death sentence. To prevent cavitation, a diesel engine’s coolant should be checked at regular intervals with a test kit such as the Fleetguard CC2607 Quik-Chek or the POLARIS four-part test strips to verify the concentration of molybdate and nitrite, which in turn will determine the number of Supplemental Coolant Additive units (SCA) needed per gallon in the system. Fleetguard’s DCA4 additive is designed to protect against corrosion, scale formation, foam, liner pitting and solder bloom.
A refractometer can be used to determine the freeze point protection. A third method of testing, and perhaps the best, is to have the coolant analyzed by a professional lab. We sent a sample to POLARIS Laboratories. We have been “trending” the coolant’s condition for several years. The results showed no major problems in the system.
As we prepare our truck for shipping from Baltimore to Europe, I guess we can discard that canvas water bag hanging on the grille.
Sources:
Clamp-Aid | www.Clamp-Aid.com
Cummins Filtration Fleetguard | www.cumminsfiltration.com
DieselSite | www.dieselsite.com
Gates Rubber | Companywww.gates.com
Ken Imler Diesel Performance | www.imlerdiesel.com
Polaris Labs | www.polarislabs.com