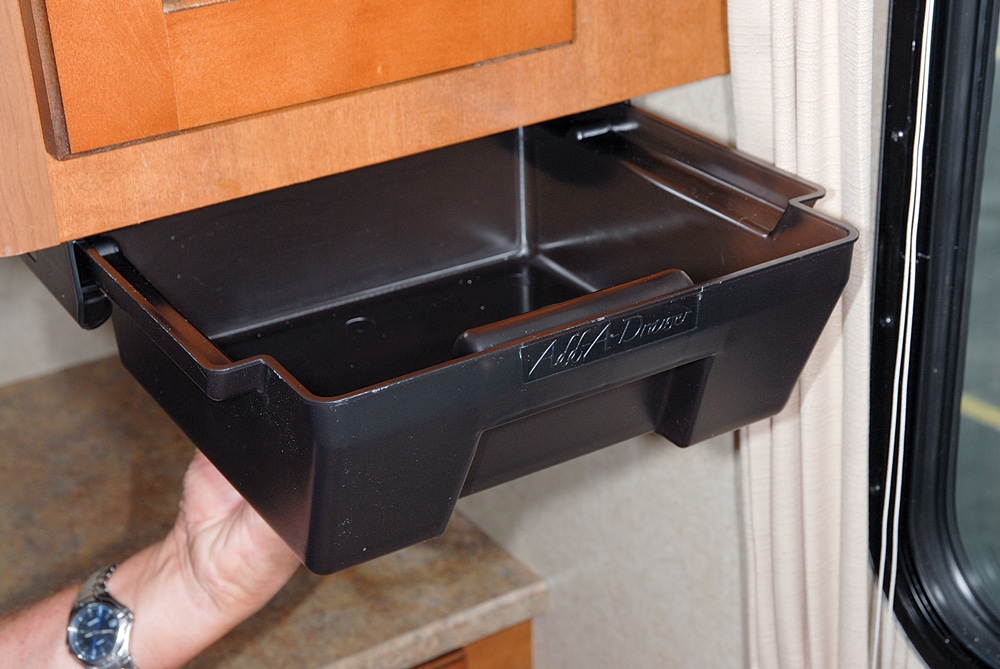
Add-A-Drawer allows RVers to utilize otherwise wasted space to stash items that usually end up as clutter
Storage, storage, storage! It seems like RVers universally never have enough places to store stuff in their rigs, regardless of size. The dilemma is finding more storage space without making major modifications, since most owners prefer not to tear into existing cabinetry. While there are countless ideas from owners on how to add storage — and a number of products on the market to help — many times the solution is not easy or cost effective.
Smart Solutions has taken a different approach with its Add-A-Drawer. The Add-A-Drawer offers a quick way to add storage that is very simple and efficient. As the name implies, it adds a drawer to the underside of any cabinet structure and, if you’re creative, you can even find locations inside storage areas where wasted space can be utilized. You can also add one or two drawers under a table. Add-A-Drawer is comprised of nothing more than a strong, high-quality molded plastic enclosure coupled to plastic guide rails for mounting, a small pile of Phillips wood screws, a rubber band and drill template/install instructions, depending on the drawer model.

Deep Profile drawer was mounted easily below the cabinet structure above a nightstand in the bedroom for convenient easy-to-reach storage.
The “handyman” skill level required to install an Add-A-Drawer is very low. However, logical location determination is necessary in order to ensure that the correct Add-A-Drawer version is selected. One thing to consider when finding a spot is the thickness of the material the Add-A-Drawer is being affixed to. This will judge how much weight the drawer will truly be able to handle, regardless of the capacity rating.
When scouting for a location, you’ll need to determine the strength of the structure. Start by tapping under the cabinet or table where you plan to install the Add-A-Drawer. If you hear a thin, hollow sound, most likely that’s exactly what’s there — thin and hollow material — usually just a 1/8-inch-thick finish panel. If there’s a thick, dense sound, you probably will find a solid-wood cabinet or framing. Either place will work for installing the drawer, but only the thicker of the two will be practical if heavy items are stored in the drawer.
Once the new drawer location has been selected, the installation can begin. For this project a measuring tape, a drill with a 1/16-inch drill bit and a Phillips screwdriver are the only necessary tools. First, secure the guide rails to the drawer with the supplied rubber band and place in the desired mounting location. Next, grab a pencil, outline the outer edges of the rails and remove the rubber band. At this point, if a paper drill template was included, tape it within the outline that was just made. If there is no template put each rail in the outline separately and mark the center of the slots. Now the pre-drilling can be done, but before starting,
keep in mind whether your chosen location to mount the Add-A-Drawer is in a place where there is no framing backup. If so — and again, this is not the preferred way to mount the drawer — take a small piece of masking tape and wrap it around the 1/16-inch drill bit only leaving the amount to be drilled exposed to act as a visual stop; in this case it was 1/8 inch. This is a simple step to prevent damaging the inside shelf.
The screws can now be started followed by the temporary mounting of the guide rails and the drawer to adjust for the best fit. If everything is lined up properly and the drawer is functioning smoothly,
tighten the screws and it’s done. Although it isn’t mentioned in the installation instructions, I found it best to slightly space the guide rails with a couple of washers per screw to achieve a custom fit and unrestricted operation of the drawer. Yes, I could’ve just used the lower portion of the rails to clear the small lip, but I wanted the drawer to have more sliding drag on it to keep it snugly in place during travel.
It takes only about 30 minutes for a totally custom installation, and the design is so simple, it almost can’t fail. I don’t know of any RVer who couldn’t benefit from a practical product that puts wasted space to good use. I found the longer and narrower Add-A-Drawer to be especially useful in my long, narrow and low-on-space food pantry, where the
drawer just happened to fit perfectly under the framing. I was also pleasantly surprised to discover that some of the drawers are interchangeable without changing the guide rails.
The Add-A-Drawer is available in three sizes. The Deep Profile version is 4 x 117/8 x 1015/16 inches and sells for $24.99. The Low Profile size is 2 x 117/8 x 10 inches and is $23.99. Models for mounting under a table are 8 x 17 x 2 inches and sell for $19.99 each (not packaged in sets of two as illustrated by some marketing images). Add-A-Drawer is sold by Camping World and other RV parts stores.


