Compact Camping Concepts’ Dinoot M416 kit and a Yakima SkyRise Poler rooftop tent enhances and extends adventures.
I’ve been towing a trailer off-pavement since 1975 when we explored deep into Baja California’s Sierra de Juárez, which is Baja’s major mountain range. From the Southern California border into Baja California Sur (south), this mountain range extends throughout the state of Baja California Norte (north). We strapped our three kids into our 1974 Jeep CJ-5’s backseat, tossed our mutt in with them, packed all our gear and supplies into a 4-by-6-foot cargo trailer that began life as a mid-’50s Chevy Stepside, and headed south. But that trip is a whole new adventure unto itself.
A few years later, in 1978, we repainted the yellow trailer to match the maroon 1978 press-fleet CJ-7 with which we’d be towing to the annual Mile-Hi Jeep Club All-4-Fun week in Fairplay, Colorado. Once again, we tossed our kids and dog in the Jeep’s backseat and headed out from our Southern California headquarters. (I was working for the major off-road magazine at the time.)
I mention these ancient adventures to illustrate how a trailer can enhance, expand and extend your adventures. We couldn’t even add an ice chest to the CJ-5 or a CJ-7 with it already stuffed with two adults, three kids and a dog. But with a trailer, we can bring all our clothes, camping gear and supplies. Plus, for this reincarnated mule skinner, it’s a lot of fun towing a loaded trailer over off-pavement trails.
Over the past several decades, I’ve towed everything from a boat trailer (on my 16th birthday I towed a 22-foot ski boat to the Colorado River from Long Beach, California) to a 40-foot fifth-wheel trailer, including all the test units I towed as Trailer Life’s managing editor for nearly 10 years. I also built a pair of camping trailers within the past three years, including the trailer that followed me on the Continental Divide Expedition in 2018 (published in Trailer Life’s August 2019 issue). All this experience educated me and greatly assisted me while I was planning the Dinoot M416 build.
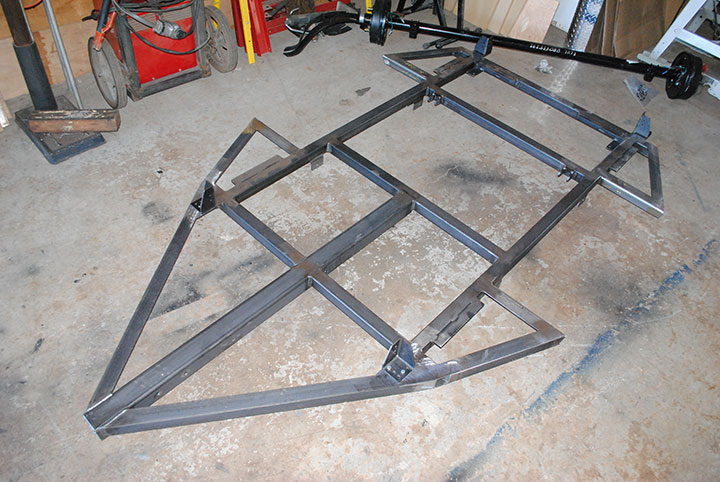
The Dinoot factory-welded frame is much heavier-duty than the optional Harbor Freight frame. It is more costly but is demonstrably stronger, and you can see the triangular fender supports. If you plan on exploring more radical trails, go with the Dinoot frame.
My first task in the Dinoot project was to call Scott Chaney (owner and chief designer of Compact Camping Concepts to discuss all the various options available with the M416 kit (one of the several trailer-kit designs from CCC). The builder can use a Compact Camping Concepts’ frame or a Harbor Freight frame; I chose the heavier-duty CCC frame for more rigidity.
The trailer’s tongue length, which depends on your tow vehicle’s tailgate design (tailgate, lift gate, swing gate, etc.), also needs to be determined. For the tongue length, you’ll want to measure what clearance you’ll need for your tailgate (depending on its design) and swing-away tire carrier (if equipped), plus whatever you plan on mounting on the tongue (spare tire, toolbox, fridge or cargo tray). In my case, over the course of several phone conversations, Scott and I worked all that out, plus all the other options we decided upon. Scott patiently works with customers on options as well.
Assembling the Trailer
Compact Camping Concepts’ Dinoot trailer assembly instructions are excellent, so I won’t be taking up space going over that. I do, however, have some ideas we had that differ slightly with the factory instructions. The major difference, though, between the Dinoot instructions and this trailer was its frame. The instructions use a Harbor Freight lightweight frame and suspension, so if you order the factory-welded frame and soft ride suspension, you’ll need the supplement instructions.
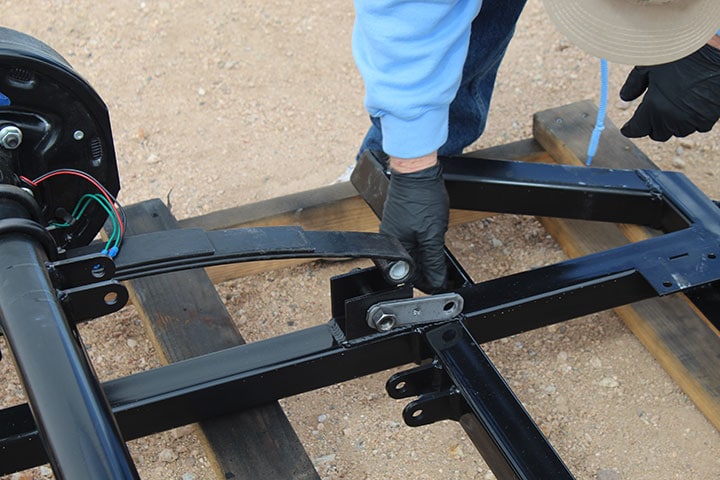
The electric brakes, drums, springs and axle are assembled at the factory and arrive on the pallet ready to be bolted to the frame. Attach the springs with the shackles at the rear frame mount. After mounting the wheels and shock absorbers, torque all the suspension bolts to the specs provided by Dinoot.
Among the options list for the M416 is the tailgate selection: no tailgate (solid end panel), Dinoot tailgate or Jeep CJ tailgate. I chose the CJ tailgate because I’d be towing the trailer with a 2005 Jeep Wrangler Rubicon Unlimited, and I wanted to tie the look of the trailer to the Jeep. Here are some of the options available on an M416: tailgate, tongue length, factory-welded frame, rooftop tent (RTT) mounts, electric trailer brakes, lug bolt pattern (able to match the tow vehicle’s lug pattern), and fender design (rounded, squared or step sides that integrate with the fenders).
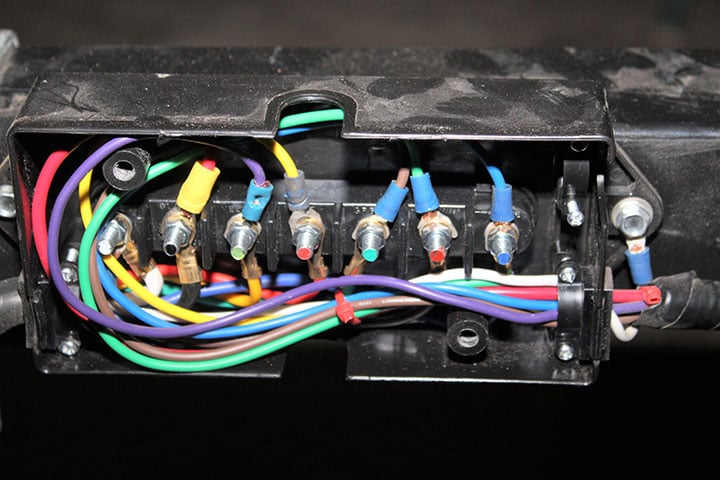
From Amazon, I ordered the BougeRV weatherproof junction box with a sealed seven-pin connector and 8-foot cord. As you can see, the box’s pins are color coded. I also ordered spools of wire from Amazon in the colors needed to match a trailer’s wiring. In this box, the wire colors do not match the pin colors because this box is for a heavy-duty trailer, and tow vehicles’ connectors and trailer wiring are for light-duty trailers. I’ve been wiring trailers and trailer connectors for more than 50 years and this is the first time I’ve ever seen a different color code.
For consistency, some folks prefer having the same wheels and tires on the trailer as on their tow vehicle. Others don’t think it matters; while a third group prefers wheels that match the tow vehicle’s lug-bolt pattern but do not agree on matching tires. There’s a lot to be said for matching both wheels and tires, but I’ve seen what happens when the trailer’s tires are heavy lug off-pavement tires. When in gumbo mud, the aggressive treads collect mud quickly and will rapidly turn the tires into huge sloppy donuts, which can even lock up against the fenders (snow can collect on the tires and cause the same problems).
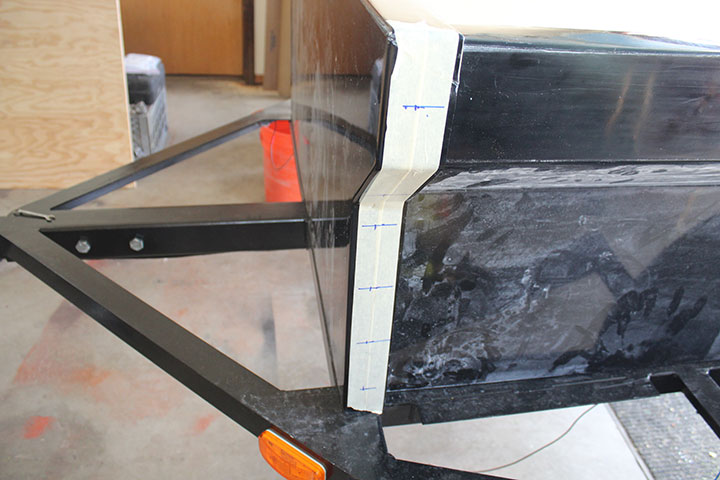
Masking tape is used for two functions. It’s much easier to see the bolt hole locations and it keeps the fiberglass from cracking and fracturing while being drilled.
I prefer matching the lug-bolt pattern—so in a pinch the other vehicle’s spare can be used—with a reasonably sized tire. In my case, I’m using Yokohama Geolandar A/T 17×265 tires with a highway tread pattern. They’re tough as heck — including the sidewalls — and will roll over almost any obstacle, can slide off large rocks instead of grabbing them (possibly tipping the trailer up on its side), and the tread doesn’t collect snow or mud. For wheels I chose Cragar rims from Summit Racing that closely matched my Jeep’s Raceline wheels in looks (although I did not opt for the heavier beadlocks that I have on the Jeep).
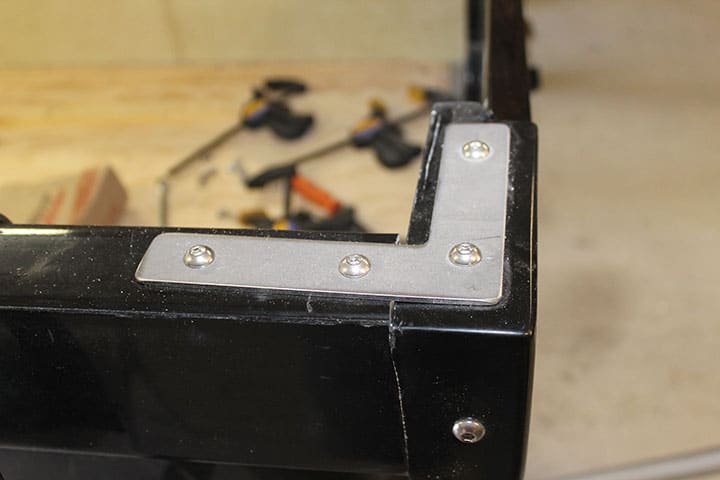
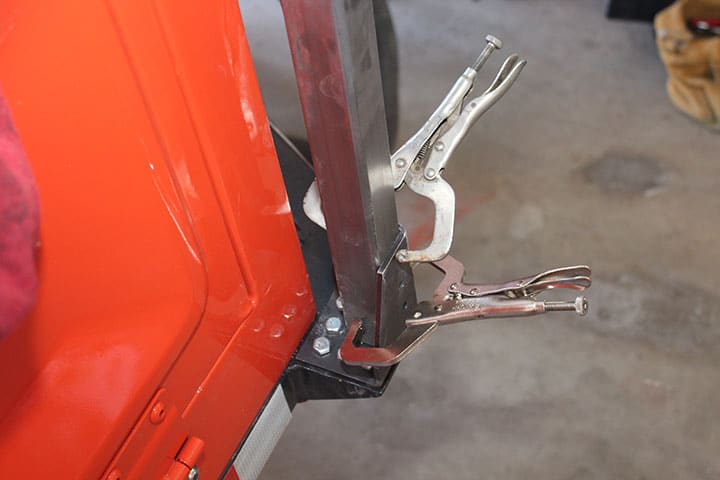
Dinoot provides four L-brackets for the tub corners and suggests that they be mounted beneath the corners with the bolts counter-sunk. Because we wanted additional strength, we used a second set of brackets and sandwiched the fiberglass corners between the steel L-brackets.
Just inboard of the wheels are the trailer brakes. Even though brakes are not required on a trailer as light as the M416 (500 pounds without the RTT), you’re much safer when towing it with a relatively small vehicle like a Jeep. You can adjust the brake controller to brake as hard as the tow vehicle. Plus, there may be times when using the trailer brakes alone will avoid a condition of upset; such as descending a steep muddy hill. As you drive down the hill, you’re using the Jeep’s brakes to maintain a safe speed, which could cause the trailer to begin to overtake the Jeep. To avoid this, you simply lock down the trailer brakes and pull it downhill with the Jeep. This assures you that the trailer won’t pass the Jeep.
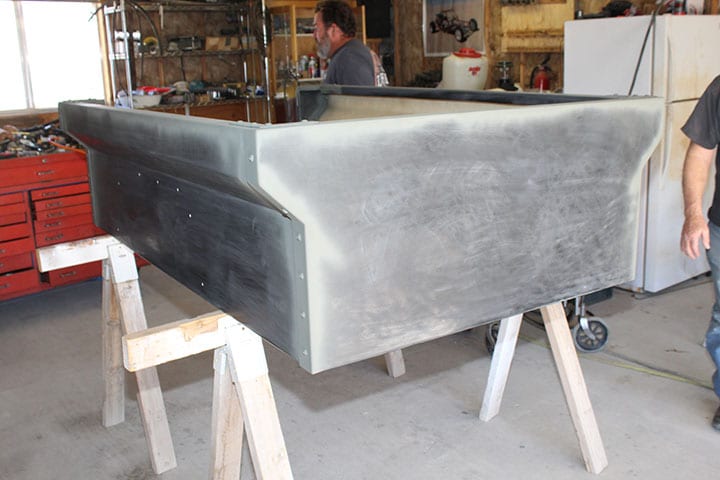
With tub assembly completed, remove it from the frame, and sand its entire surface to prep it for painting.
To me the fender design was a no-brainer; I wanted them to match the Jeep’s squared-off fenders. Although the rounded fender design looks more like the original World War II 1/4-ton trailer, nothing can be carried on them. With the squared fenders, and the triangle-shaped frame supports, each fender is rated to carry up to 50 pounds (which covers the weight of a 5-gallon jerrycan of fuel or water). With the proper restraints — bungee cords and ratchet straps — firewood, sleeping bags, toolboxes or whatever can be stored on the fenders while traveling off-pavement.
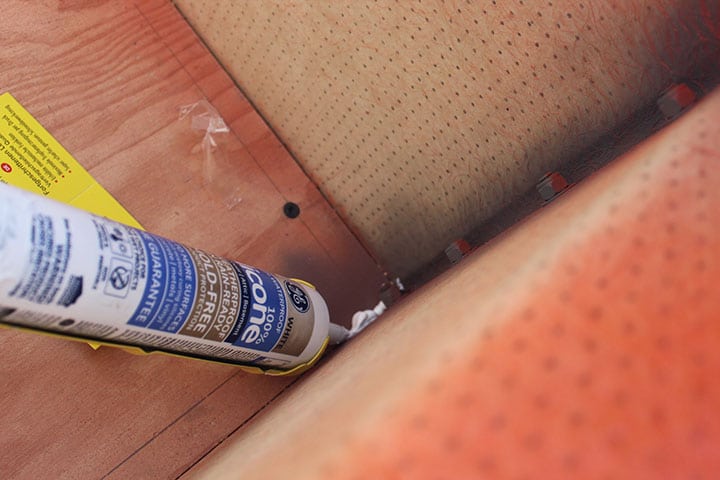
Seal the floor by caulking along all four edges. Be liberal with the caulking because it’ll be covered later with the bed liner.
By mounting the taillights on the fenders as I did, rather than on some type of mount, I’ve protected them from being ripped off by stray boulders and protruding tree branches. Also, they can’t be broken by backing up into a rock or tree while setting up camp. The LED taillights were part of the kit from Camping Concepts. With some judicious thought, you can also use the triangle-shaped frame supports to carry gear; i.e., water containers, gas cans and battery. Trailer-kit assembly time is estimated at eight to 16 hours, depending upon your ability.
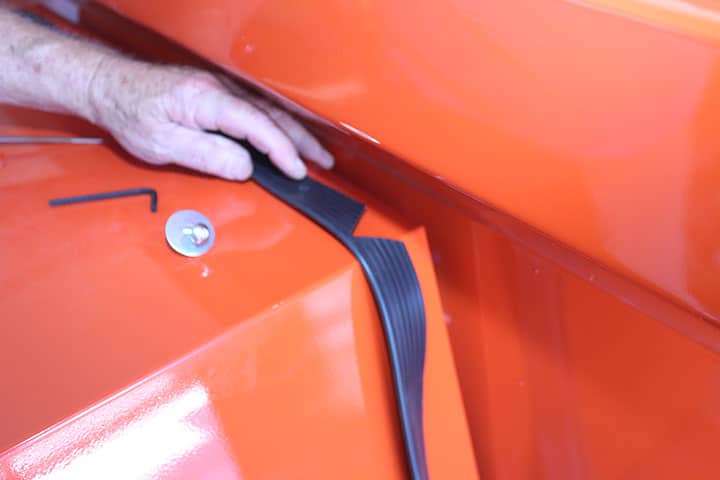
I ordered the fender beading from Amazon to provide a cushion between the fenders and the tub. Notch the beading to match the bolt holes and the change in direction.
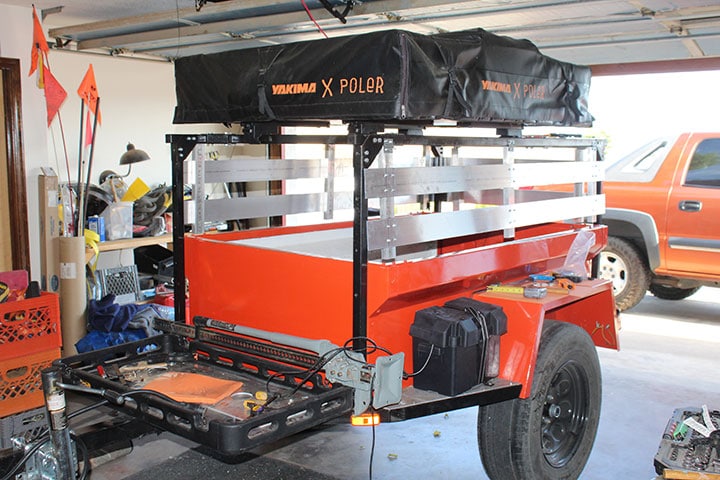
Dinoot offers two types of no-weld racks. I chose the stronger of the two because my plans for the use of the trailer include some very rough trails, such as the Dusy-Ershim and Rubicon in California, and a long life of use. Although I’ll be using my rack to carry the Yakima SkyRise Poler Medium rooftop tent (RTT), the rack can be adapted to carry canoes, kayaks, inflatable boats, wind sailing boards and surfboards.
The lighter-weight no-weld rack bolts to the bed’s fiberglass sides while the heavier-duty rack mounts directly to the trailer frame on four optional frame tabs. By bolting this RTT 1.5-inch steel square tube rack to the frame, it is my belief that it adds to the trailer’s overall strength. The four frame tabs, the eight junction brackets, and the nuts-and-bolts hardware were included in my Dinoot kit — the steel tubing was locally sourced (meaning I picked it up at a local supply shop and decided the height of the rack — length must match the bed’s length) or you can order the steel along with the kit. I made the determination that 16 inches above the tub sides would give us plenty of room for packing without constantly hitting our heads or arms on the rack.
The Dinoot instructions give you the drill bit size for the hardware, and I’ll give you a hint: buy eight or 10 carbide-tipped drill bits in that size before you begin the assembly because you’ll go through them. I also suggest that you have a shop vacuum standing by to clean up all the debris from drilling all those holes! Assembling the rack and attaching the RTT took me about eight hours.
After a couple of trips with the trailer, we determined that additional security was needed if we were to continue traveling and parking on public highways and streets. Picturing a flatbed truck’s stake-bed sides, I designed the aluminum stake sides that are now on the trailer. Using 1/8-inch by 4-inch aluminum straps and 1×2-inch aluminum square tubes, I assembled the stake sides. Hinged on top to the RTT rail, we swing them up and out of the way when packing the trailer. The stake sides also give us approximately 25 cubic feet of additional storage. During travel, they are secured by latches and BOLT cables, which are unlocked by the Jeep’s ignition key.
Another advantage to ordering the factory frame is that it can be equipped with the four frame tabs needed to mount the rack. At each corner, mount the support brackets, making sure they are completely aligned with each other. The brackets are predrilled, but the frame is not, so you’ll have to drill the five holes at each corner. All rack hardware comes with the optional rack kit.
I secured an aluminum sheet to the front of the trailer on the RTT rack’s vertical supports to protect the tub’s contents from rain and mud and gravel thrown up by the Jeep’s Yokohama aggressive off-road tires (it’s also a great place to affix all your travel and product decals). I also added an aluminum sheet to the top of the RTT rails behind the tent, which provides security, weather protection and a platform on which I can carry a pair of 7-gallon plastic water containers for longer expeditions.
Yakima SkyRise Poler Medium Rooftop Tent
I could really wax poetic about the SkyRise Poler, but I won’t. It’s my fourth RTT and by far the best of the bunch. Rated as a medium, in my opinion, it is a true three-person tent, with enough room for our L.L.Bean sleeping bags, plus our Bluetick and Catahoula dogs on the 2.5-inch wall-to-wall foam mattress. Constructed of lightweight yet durable 210D nylon, the tent features a weatherproof rainfly and mesh panels (for stargazing on warm, clear nights).
Once the stake sides were finished, I removed them and painted them black. I also painted an aluminum sheet black and bolted it to the front vertical bars. You’ll notice the battery box mounted on the fender support. The battery, which will also be connected to a 50-watt solar panel, will operate the Engle fridge/freezer that’ll be carried in the cargo rack on the tongue.
As with other rooftop tents, its retractable aluminum ladder supports the foldout half of the tent and makes getting up and down easy. The SkyRise Poler weighs just 115 pounds and tools aren’t required for mounting. Its rail clamps actually lock to the mounting bars so it can’t be stolen.
Also, with the tent, we ordered what Yakima calls the annex, but we call a skirt. It attaches to the base of the tent around three sides of the foldout portion of the tent. This skirt gives you a small room under half the tent, in which you can place a Porta Potti, change clothes or store gear out of the weather while in camp. Other accessories include a shoe bag, which attaches to the tent’s base and gives you a secure storage for your boots or shoes, keeping mud and sand out of your sleeping bags.
I have several people to thank for all their assistance, knowledge and expertise in helping me with this fun project: Mike Barnes, Kevin Lake, Paul Schupp and Jack Turton. Remember, much like a Jeep, a camping trailer is never finished! Some things are added, other things are taken off and some are moved. This trailer will be constantly changing and evolving.
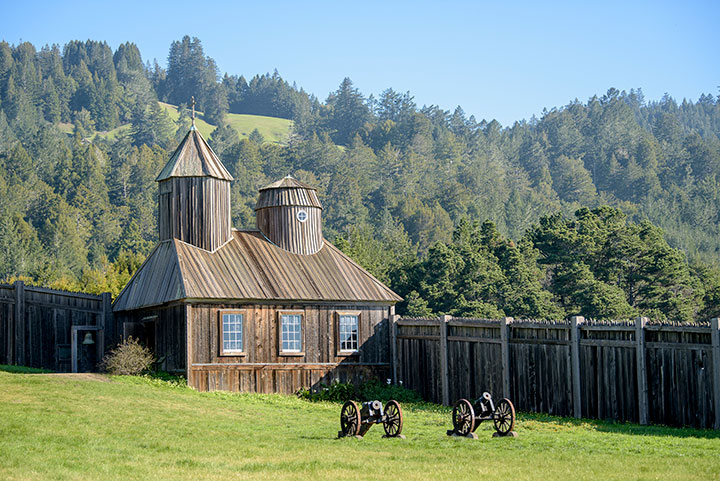
We tested the Dinoot on California’s iconic Highway 1, and one of the many, many attractions along Highway 1 is the historic Fort Ross. The Russian fort supplied the trappers collecting otter skins along the Northern California coast.
BOLT Programmable Locks, www.boltlock.com
Compact Camping Concepts, www.compactcampingconcepts.com
Summit Racing Equipment, www.summitracing.com
Yakima Products, www.yakima.com